Boxes of Love

IMG_4658

My inspiration this week was an advertisement I received from Michael’s Craft Store.  I thought these boxes were very cute and the project looked very easy to recreate.  I was right!  Once I got the boxes them selves done though, I decided to head in a different direction with the inside of the boxes. Lets get it to it!

Supplies

DSC_0608DSC_0575


To make this project, I used 4 of the Dollar Tree shadow boxes.  I also used Waverly White Chalk Paint and Red Chalkboard Paint.  You will need a few paint brushes, some E6000 or another type of strong glue, and a hot glue gun.  When I decided to go a different direction, Dollar Tree come though again with some very cute Valentine’s stickers.

Time to Get Started

I started by popping off the circles that were in the middle of each one of the boxes.  Then I used the Waverly White chalk paint to prime the boxes on the inside and out, but I did not do the backs.  I also painted the circles, that I had removed from the boxes, white.  They needed 3 coats to get the look I wanted.  I applied the white paint on the circles very thick because I wanted deep brush strokes on the circles to add some texture to the project.

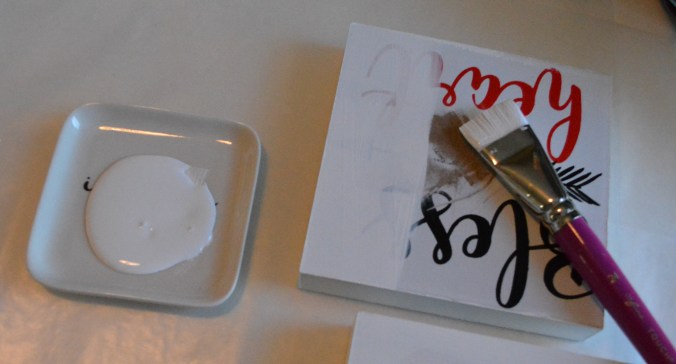
My next step started with painting the outside rims of the boxes red, leaving the middle of them white.  Then I remembered that the circles were white and that they would not stand out once I put them back in the boxes so I decided to paint the inside of the boxes red too.  I only put one coat of red paint on them.  I did not want the red to be completely opaque to add some more visual interest to the final project.

DSC_0136

  I am hoping that you can see the way the paint looks in this picture.

So once I had the boxes and circles painted, I started looking at different ways I could write the word “LOVE”  out in them like the inspiration project.  Sitting on my desk were these Dollar Tree Valentine’s stickers.  The top ones in the picture are metallic stickers and the ones on the bottom are wooden hearts.  I decided to combine the two types of stickers and places them in the center of the hearts.  I used hot glue to attach the wooden hearts onto the white circles.

Now it is time to attach all the boxes together.  This is a piece of decor I want to have for a while so it must hold up when I store it each year.  It is because of this, that I used a combination of hot glue and E6000 when I attached the boxes together.  The reason for both types of glue is because the E6000 is a very strong glue and will hold the boxes together for the long term, but it takes a good 24 hours to dry.  As for the hot glue, that gives an immediate bond to give the E6000 time to dry.

Since I used a mixture of stickers, I laid out the boxes to decide how I wanted them to look once they were all attached together.  This is where I get a bit picky.  I did not want two wooden pink hearts in the same row or two of the same kind of hear stickers in the same line.  So that is why I wanted to plan it out a head of time.  Just so you know, I am not a perfect crafter.  I took the heart stickers off the wooden stickers a few times to make sure I had it the way I wanted it.  I even had to pull two of the boxes apart at one point.  When I craft, I mess up and change my mind all the time.

I added both types of glue to one side of a box and added the next box to it.  Then I repeated that step with the other two boxes. I attached the two bottom boxes together and the two top ones, making sure they were as even as possible so that they would attach to each other nicely.  From there I glued the top two boxes to the bottom two boxes with the same two types of glue method.  If any of the glue seeps out to the front of the boxes, just used a bit of red chalk paint to cover up the glue.  And your done!

DSC_0153

I love these boxes.  This is not what I had planned to do but I am glad I switched things up a bit because I like this so much better.  You can add anything you want to the center of these boxes.  You do not have to put the circles back in them but if you do not, make sure you sand down the rough spots before you paint them.  You can use stencils or stickers to spell out different four-letter words in the boxes.  Just use your imagination and you can have a one of a kind piece of decor to brighten up your home.

Thank you so much for coming back to my blog and I will see you all again soon!

Melissa McGuire

Supply List

Waverly White Chalk Paint- Walmart

Red Chalkboard Paint- You can use Waverly Red Chalk Paint.  I believe my chalk paint came from Tuesday Morning.

Paint Brushes- Hobby Lobby

Trinket Dish for Paint- Dollar Tree

4 Shadow Style Boxes- Dollar Tree

Wooden Heart Stickers- Dollar Tree

Metallic Stickers- Dollar Tree

Surebonder Hot Glue Gun- Hobby Lobby

Surebonder Glue Sticks- Hobby Lobby

E6000 Glue- Hobby Lobby


Beads can be a Great Accent

Valentine’s Day is right round the corner.  While I do not decorate big for Valentine’s Day, I do like having some Valentine’s Day decor up in our home.  Once the Christmas decor is put away, the house looks so empty.  Winter decor can be pretty bland depending on what colors you decorate with.  So Valentines decor goes up soon after New Year in our house to add some color to the blah winter.  This year though I needed some new decor and inspiration.  Facebook and its crazy amount of adds came to the rescue!

DSC_0610

I found a piece on Facebook and thought it would go great with the faux galvanized plaques I did a few days ago.  It was a wooden plaque with beads strung across the inside of it.  I was very excited to make this project and a bonus project with beads.  I had never used wooden beads before.  It was fun.  Lets get started.

Supplies

Some of the things you will need are twine, skewers, and a paint brush.  You will also need beads and a drill.  There are a few options for beads.  You can get plain wooden beads or get beads that are already colored.  If you get wooden beads you might need paint if you want to paint them like I did.  I purchased 2 sizes of beads for some variety.

Lets Get Started

The first thing I did was string the wooden beads onto the skewers.  This makes them much easier to paint and they do not roll all over your work surface.  I also found a way to prop the skewers up so that the beads were hanging in the air and not touching my work surface.  From there I started with the red chalk paint and painted 8 of the small beads.

I did not have any pink chalk paint.  So I mixed the red chalk paint that I had left in my dish with some white chalk paint to create the pink shade I wanted.  I also got out some Popsicle sticks to help roll and stabilize the beads as I painted them because I found it was messy to use my fingers to do this.  After I painted my 8 small beads pink, I painted 8 of the larger beads white.  Then I let them all dry completely.

DSC_0600

While my beads were drying, I drilled a small hole in the side of my plaque.  The top of my plaque already had a hole in it but if yours does not, you will need to drill one in the top of the plaque too.  This is to put the twine though so we can drape it across the plaque.  Make sure to use light pressure and go slow with the drill because the material of the plaque is very delicate.

DSC_0602

Once the beads were dry I took 5 of the smaller ones and strung them on the twine.  You can use which ever beads you want, in any color you chose.  I filled my twine with the beads but you could leave some of the twine showing.  If your twine starts to fray as you are pushing it though the beads, use a small piece of tape to wrap around the end of the twine to give it more stability.

DSC_0603

After you get your beads strung on the twine, thread the twine though the holes of the plaque.  You can tie knots or bows with the twine to hold it onto the plaque.

DSC_0610

This is my finished project.  It is so cute and just what I was looking for!


Bonus Project

DSC_0607

I had several beads left over and thought it was the perfect time to make a Valentine’s bead garland.  Bead garlands have been very popular lately but they are very expensive.  I was able to make one for almost a fourth of the cost.

DSC_0602

Making the garland was a piece of cake.  I started off by stringing the rest of my beads on the twine.  I did not cut the twine off the roll yet because I was not sure how much twine I would need.  I used all the beads I painted except for one white one and I also added in some plain wooden beans that were all natural.

DSC_0604

I had a heart left over that I scraped off one of the plaques I galvanized.  I got my drill back out and drilled a small hole in the top of the heart.  This would finish off  one end of my bead garland.  I painted the heart with white chalk paint and the pink paint I had left over from painting the beads.  Then I sanded the edges of the heart to make it a bit more rustic.   I tied it on to my strand of beads.

DSC_0605

On the other end of the twine I cut about 5 inches past the beads.  I then took another piece of twine and wrapped it around my hands several times.  This will serve at the tassel for the garland.  Once I had wrapped the twine around my had about 15 times, I slide it off my hand and started wrapping the bunch of twine with another piece of twine to hold it together like a tassel.  Leave a big loop at the bottom of the bunch and a small loop on the top.  You will use the small loop to tie the tassel to the other end of the bead garland.  The bottom, bigger loop of twine, you will cut the loop apart and then shape up the bottle of the tassel.  Tie the tassel onto the string of beads and you have your garland.

DSC_0609

This garland can add a pop of color to any 3-tiered tray or even a letter board.  The other great thing is that you can make this as long or as short as you want.  It is one of those crafts that is completely customizable with the colors, length, bead size and what you put on the ends.  You can have a one of a kind garland that is perfect for your home any time of the year.

Thank you for joining me today!

Enjoy your week!


Supplies

Waverly White Chalk Paint- Walmart

Chalkboard Paint- Tuesday Morning

Skewers- Dollar Tree

Paint Brush- Hobby Lobby

Twine- Hobby Lobby or Dollar Tree

Square Plaque- Dollar Tree

Wooden Beads- Hobby Lobby


Faux Galvanized Plaque Tutorial

https://wordpress.com/read/feeds/72502766/posts/2553143677

It is easy to Galvanize!

DSC_0592

One of my favorite things to do is to make anything look galvanized.  I have a lot of farm house decor in my house and anything galvanized fits right in with that.  Galvanized decor is expensive and I wanted to be able to make something on my own that did not cost a fortune.  Now I will tell you, I have tried using spray paint to do this but spray paint and I do not get along.  It runs or will not cover my object.  So I have been trying different ways to get that galvanized look without costing me a fortune.  I wanted to be able to do this method with anything and while it is not a fast method, it does work really well and I have great results every time I do it.

With this being the start of a new year and my 40th birthday being in January, the first thing I wanted to make this year was some inspirational plaques to keep me motivated thought the winter.  I wanted these plaque to fit in small places like on 3-tiered trays or as filler decor.  I think these plaques do just that.

DSC_0548

You will need Dollar Tree square plaques.  These are in the stores almost all year long.  They come in several different holiday prints or just as regular everyday decor.

DSC_0549

Also on the supply list is some sand paper, a scraper or spatula, and some kind of sponge.  All of these can be found at the craft store or Dollar Tree.  These tools are in my craft room at all times and I use them often.

DSC_0547

Finally, you will need paint.  I use the Waverly Chalk paint as my primer and to set a solid base at the start.  Then I start the faux galvanizing process with the metallic paints.  These are all from FolkArt and I get them at Walmart along with the Waverly Chalk paint.  The metallic paints that are shown here are Brushed Silver, Sterling Silver, Gunmetal Gray, and Sequin Black.  Please use what ever silver or gray toned metallic paints you have on hand.  Walmart does sell them though for pretty cheap.  Major craft stores will carry versions of these paints too. Now onto our project!

DSC_0558

I started by scrapping off the key and heart from the plaques.  Sometimes these come off really easy and other times you have to really work at it.  The heart came off easy and I set that aside for another project.  The key came off in pieces.  They each left a small spot that needed to be sanded before I could paint them.  The surface does not have to be completely smooth but I wanted it to be some what even.

DSC_0559

Once the surface of the plaques were sanded, I used a baby wipe to wipe them down.  I then took a Dollar Tree trinket tray and put some of the Waverly White Chalk Paint in it.  The brush I am using is one with short bristles from Hobby Lobby.  You can get them on sale all the time.  I feel the short bristles help to apply the paint better and gives a thicker coat.  I applied one coat of paint just to prime the plaque so the next layer of paint had a great base to stick to.  Do not worry if you can still see the words through the paint because after the next step it will be gone.  Let the white chalk paint dry completely before moving on to the next step.


Now it is time to get a bit messy.  In a Dollar Tree trinket tray, put some Waverly White chalk paint, 2 to 3 shades of silver paint and the black sequin paint in it.  To get the galvanized look, you want some of that paint to mix when you load up your sponge.  So having it in a tray like like this will help.


Place your sponge in the paint and use a bouncing motion twisting the sponge as you go to get the different paints on the sponge.  Do not bounce the sponge a lot because if you do, you can mix the colors to much and things will become muddy.

After your sponge is loaded with paint, start to bounce it on the plaque.  Twist the sponge as you go so some of the the paint will mix and blend.  I normally start of the sides of the plaque first and them move to the top.  Do one full coat of paint on the plaque and let it dry.

This is after the first coat of paint was dry.  You can still see some of the white chalk paint but you can also see the patterns and texture in the paint.

DSC_0578

And this is what it looks like after 2 full coats.  From here I will go over any spots I do not like and add to it with the paints.  I really like a big contrast between the white chalk paint and the black sequin paint.  The shine and the matte finishes are what make it look galvanized.

Now it is time for the words and phrases.  I have 4 plaques that I painted but I will only be using 3 of them today.  I knew I wanted to use something from Rachel Hollis because, for me, she screams motivation.   From there I got onto Etsy just to see what I could find.  I found one quote that was about crafting that I loved and another one that was just inspirational.

I am doing this step with a Cricut for a few reasons.  I am not a great painter so I did not want to try and free hand this.  I also did not have any stencils.  If you can free hand this please do it.  I think that would add a lot of charm to these plaques.  If not and you do not own any kind of cutting machine then you can use stencils or print out an image and color on the back of the image with pencil or chalk.  Then place the image word side up on the plaque and trace it on to the plaque.  After that use a paint pen or paint and a brush to fill it in.

I used Oracal 651 vinyl and cut out all my phrases in white.  I also cut a few detail pieces out in red holographic vinyl to make some things pop on one of the plaques.

DSC_0579

I applied the vinyl and these are the finished products.  I love them and have them sitting in different places in my home.  It is just the inspiration I was looking for to motive me in this new year and something that can say up no matter what season it is.  They look galvanized and match my farmhouse style decor that is all through my home.  I will, for sure, be making more of these to transition into different holidays.

Thank you for joining me in this tutorial.  Please look for Yellow Butterfly Craft Designs on Facebook and Instagram.  Join me on Friday for a Valentine’s Day tutorial that will tie in with this tutorial.

Have a great day!

Melissa McGuire


List of Supplies

Scraper-Dollar Tree

Sand paper-Dollar Tree or hardware store

Brush sponges-Dollar Tree, Amazon, Craft store

Trinket tray-Dollar Tree

Paint Brush-Hobby Lobby

Square Plaque-Dollar Tree

Waverly White Chalk Paint-Walmart

FolkArt Brushed Silver Metallic Paint-Walmart

FolkArt Sterling Silver Metallic Paint-Walmart

FolkArt Gunmetal Gray Metallic Paint-Walmart

FolkArt Sequin Black Metallic Paint-Walmart

Cricut Air 2-Michael’s Craft Store

Oracal 651 White Vinyl-Michael’s Craft Store

Cricut Red Holographic Sparkle Vinyl-Michael’s Craft Store

Let me Introduce myself

38900385_10156706740627698_7640064336395763712_o72198842_10157743013827698_801889863249952768_o


My name is Melissa McGuire and I turn 40 in just a few days. I have been married to my husband Lawrence for over 18 yrs and we currently live in Kentucky with our three boys. Aidan is our hockey player and is 15 years old. Connor is our tech kid and is 11 yrs old. Jesse is our youngest and gives a run for our money at 6 yrs old. I am currently a stay at home mom and I am very excited to start this new adventure with this blog.

I have been a crafter all my life. It all started with my mom. Then in 2004, my husband deployed and we had a brand new baby. I wanted a way to keep track of the milestones that our son was making.  I was looking for something that he could look though when he got back. That is where I found my love of scrapbooking and paper crafting. I would use whatever I could get my hands on to put in a scrapbook. It was something I enjoyed and I was good at it. From there, each time my husband deployed I would make small books and other crafty things with our kids’ pictures on it to send him. My husband would get creative fun things in the mail to keep his spirits up.

About 5 years later, I found stamping and card making! That ignited a whole new creative passion for me. I love making cards and stamping images. Companies like Hero Arts and Lawn Fawn are just a few of my favorite. I also love anything Tim Holtz related. There are so many great companies that put out great products that I wish I could try them all.

My newest adventure in crafting is turning Dollar Tree or thrift items into works of what I consider art. I even get things from the craft stores or places like Target and Walmart and change them up to fit the decor in my home or make things for the different holidays. It’s crafting on a budget and a lot of fun.

I am excited to show the things I create and teach others how to make them. I love that I can help people make a simple craft that looks like something expensive you would get at a place like Kirkland’s. These crafts are easy and inexpensive. Some quick and some take some time. I also plan to do different crafts with different materials and give alternatives to help even the newest crafter.

So welcome to Yellow Butterfly Craft Designs and let’s get crafty!!