Pot of Gold!

I know this post was suppose to be out last week but I have sick and unable to work on crafts or the blog.  So my deepest apologies and I will try to keep things on more of a schedule.  Now lets get to crafting!

St. Patrick’s Day is coming soon and it is one day we always celebrated in our home because it is my husbands birthday.  That makes St. Patrick’s Day another holiday we decorate for.

IMG_4874

I found these coins at the Dollar Tree and they are my inspiration for my projects.  I loved the idea of making a pot of gold to hang on the wall.  Dollar Tree also had a wooden pot of gold that I knew would be perfect for the base of my craft.

Supplies

First and for most you need gold coins.  I used all 3 bags of these coins making the pot of gold and the bonus craft.  Like I stated earlier, I found the wooden pot of gold at Dollar Tree but if you can not find it you can use foam board.  Cut it into the shape of a pot leaving some board at the top to be able to glue the coins to.

The paint I used was White Waverly Chalk Paint, black Chalk Board Paint, gold acrylic paint (which is not in the picture above), and some green water color paint.  The water color paint is optional.  It is what I had on hand since I could not find my green acrylic paint so I used it.  I also used scissors, paint brushes, Mod Podge and ribbon.


I started this project like I do most of my projects, by using the white chalk paint to prime the wood.  I then painted the pot part of the piece with black chalk paint and the top where the gold will go I painted gold.  The gold paint will look better showing though in case the coins do not cover all the wood.

Now lets get the coins ready to go.  I cut some of the coins.  I did not cut them all down the middle but I did several different points along the coins.  You can see it from the pictures.  I wanted to them be places along the edge where the coins would meet the pot to make sure they looked like they were coming out of the pot.  I then used my hot glue gun to start gluing the coins to the wood piece.  I did about three layers of coins to cover the wood piece and give some depth to the project.

A bit of white paint can do wonders.  I used the white chalk paint and a cheap brush to dry brush white streaks on the sides of the pot to give it a bit more of a 3-D effect.  If you get to much white paint on it, just go back over it in black.  Keep layering the paint until you are happy with the way it looks.

I thought the pot looked a bit plain.  I found these window clings at Dollar Tree and thought they would be the perfect addition to the pot.  I painted a thin layer of Mod Podge on the back of the window cling with a short bristled brush.  Then I placed the window cling, Mod Podge side down, and pushed out any bubbles.  I went over the edge of the cling with the paint brush without any added Mod Podge to make sure the edges were sealed down and then let them dry.  You can add as many clings as you want.  This method will also work if you find free printables on line and cut them out.  Just make sure the layer of Mod Podge you add is to the back and is very thin.  If not it will bubble.  Also if the paper is thin, make sure to be very careful with it or it will rip.

IMG_4881

The final step is to add a piece of ribbon on the back with some hot glue.  This will serve as the hanger for the project.

IMG_4892

This is the finished project.  I love it!  It is a one of a kind piece and looks great hanging up on my wall.  It was also fun and easy to make.

Bonus Craft!

I had several coins left over and decided I loved the idea of making another garland.  This garland I wanted to be different though.  I always see garland with beads and I just made one like that for Valentine’s Day.  So with this one I used the coins and ribbon instead.

Supplies


For this bonus project you will need thin ribbon, and coins.  I also used a piece of a wooden wreath I had on hand.  A few other supplies I used were scissors, a hot glue gun, and a silicon mat.  If you do not have a silicon mat you can use wax paper.

I started by lining up the coins on the silicon mat.  Each side of the coin is different so I tried to alternate the sides to make it more pleasing to the eye.  I lined up four to five coins at a time to be able to do more at one time.  Then I put a dot of hot glue on each coin and laid the ribbon on top of the coins in the glue.  After that I took another coin and put it on the top of the coin and ribbon like a sandwich.  I repeated this step until I ran out of coins.

Now I needed something to go on one end of the garland.  Looking around my craft room I spotted a wooden wreath with clovers on it that I bought for another project.  I just want the banner from the wreath for the other project so I took some strong scissors and cut off one of the clovers from it.  I picked the one with the hole in it so that I could attach it to my garland.  I painted it green with the metallic green water color paint I had.  Then I tied it to one end of the garland.  For the other end  of the garland, I made a tassel.

IMG_4891

Here is the final bonus project.  It is perfect and does not look like all the other garlands out there.  It is a great touch to my entry way decor.

I hope you have all have a wonderful week and that you are looking forward to spring.  I have one more St. Patrick’s Day project and then we are on to Easter!

Thank you for joining me!

Melissa McGuire

Supplies

Wooden Pot of Gold- Dollar Tree

3 Bags of Gold Coins- Dollar Tree

White Waverly Chalk Paint- Walmart

Black Chalk Board Paint- Target, Waverly Chalk Paint at Walmart has one called Ink

FolkArt Gold Metallic Acrylic Paint- Walmart

Water Color Green Paint- Hero Arts, Use what ever green paint you have on hand

Paint Brushes- Hobby Lobby

Ribbon- Walmart, Hobby Lobby, Michael’s

Window Clings- Dollar Tree

Mod Podge, Dollar Tree

Tim Holtz Scissors- Hobby Lobby

Surebonder Hot Glue Gun- Hobby Lobby, Amazon

Surebonder Hot Glue Sticks-Hobby Lobby, Amazon

Silicon Mat- Amazon


Figures Perfect for 3-Tiered Trays

The one thing I have found a love for, is decorating 3-tiered trays.  I find it difficult to find figures that are small enough to fit in the trays and not take them over.  So I was on the hunt for Valentine’s Day figures to fill out my 3 tiered trays.

Supplies

DSC_0554

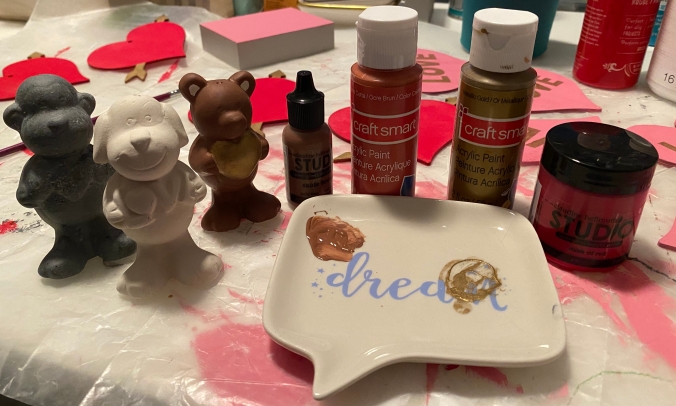
The main thing that you will need are these little figures from the Dollar Tree.  They each come in a package with paint.  You will also need paints in the colors you want, paint brushes, paint dishes and something to sit the figures on while they dry.

DSC_0560

The first thing you will do is pull the tops off each figure.  These figures come with hangers on them but since we are using them to stand it trays, you can pull the hangers off of them.  They come out pretty easy with a little bit of tugging.  Once that part is done, it is onto the painting.

The Project

IMG_4775

You do not need to prime these figures.  They are made of plaster so they hold onto the paint well.  I started with the base colors of brown and rust color for two of the animals.  I wanted the bear and dog to be traditional colors.  From there I wanted the monkey to look galvanized.  I used the method that I used a few weeks ago on some plaques to achieve that affect.    The colors you use are completely up to you.  Use your creativity and think outside of the box.  I did the galvanized monkey because it matches my decor better and I wanted something that did not scream out that it was for Valentine’s Day.

Now to create some interest and contrast, I painted the items in the animal’s hands and the insides of their ears a different color.  I love how the red and gold pop.  The monkey is awesome with the red hearts, ears and nose because it really stands out against the way it is painted.  I used enamel accents to dot on their eyes to make them stand out.   It gives them a finishing touch.  Enamel accents is, what I would consider, an extra craft supply.  It is not something you need to have.  I use them very little so it is not something you need to run out and buy.   You can use black paint or even a black marker to make their eyes stand out.

These are so cute!  They make the perfect little addition to any Valentine decor.  It is one of those things that are simple and easy to do.  You can use what ever colors you want and this can be done for any holiday.

Hope you all enjoyed this craft and have a great week.

Melissa McGuire

Supply List

Figures- Dollar Tree

Paint- Any colors you want.  Walmart, Michael’s and Hobby Lobby are great places to get              paint and also some Dollar Trees have paint too.

Paint Brushes- Walmart, Hobby Lobby, and Michael’s

Enamel Accents- Michael’s but this one is not necessary.  You can use black paint or even                                  a black marker.


Hearts in a Row

One thing that is fun to do, and makes a simple impact each holiday or season is a garland.  These can be hung or draped anywhere.  They can be made out of several different things and be any length to go with what ever space you have to put them in.

IMG_4779

I found wooden hearts at the Dollar Tree a few weeks ago and thought they would be perfect for a garland.  I have a big hallway that leads into our kitchen and it is the one place that I love to decorate for the different holidays.  My husband gave me this big red truck for Christmas, so that is hung in the hallway.  While it takes up a lot of space on the wall, that wall still needs a bit more.  I thought different kinds of garland would go perfect there each holiday.  Since Valentine’s Day is coming up first, I decided to start with that garland.

Supplies

The things you will need for this garland are pretty easy to get.  I used these wooden hearts from the Dollar Tree.  One set of 5 has an arrow through them and the other set of 5 has the word LOVE on them.  Each package also contains twine to tie them where ever you want.  Other supplies you will need is what ever paint colors you want to you.  I used Waverly White Chalk Paint, Chalk Board Red Chalk Paint, and FolkArt Metallic Gold Paint.  The other things I used were twin and paint brushes that I had on hand.

Lets Get Started

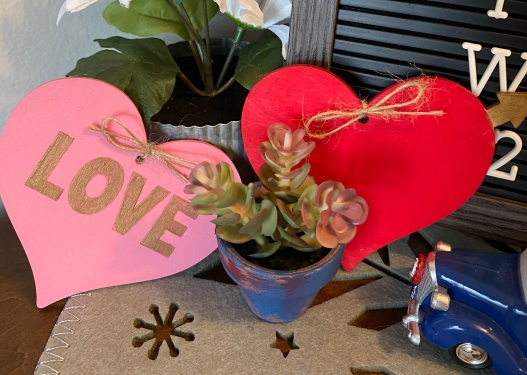
I started by painting the hearts with arrows red leaving the arrow part alone.  I then mixed some white chalk paint in with the red to make the pink color you see in the picture.  Then I painted the hearts with the word LOVE on them pink.  It took two coats of paint to cover all the hearts front and back.  At this point I planned on using the back side of the hearts so you could not see the LOVE word on them.  Like usual though I changed my mind.

I decided I wanted some kind of a contrast color on the arrows so I chose an acrylic metallic gold.  The arrows took 3 coats of paint to cover.  I only painted the front side of the arrows to save some time.  The back of the arrows I painted red.  Now if you want all your hearts facing the same way make sure that you chose a side and paint all the hearts that way.

DD2D1DDF-159A-44D1-85CF-5202AC39DB85

This is where I changed my mind.  I saw on a YouTube video where someone had colored in the word LOVE on their hearts and I really liked it.  So for this I used that same acrylic metallic gold paint.  Now it took four to five coats to cover over the pink paint.  Sometimes changing you mind can give you more work, but I think that it was completely worth it.

Remember those small pieces of twine that were in the package of the hearts, this is where you are going to use them.  If what you are using for your garland does not come with anything to tie it together with, you can use twine or even ribbon to tie you garland together.

I started this all by measuring my twine across the space that I am hanging my garland.  I measured an extra 12 inches on the end of that twine so that I could tie loops in it to hang it on the wall.  I am using command strips to hang it.  Then I picked my middle point and started tying the hearts on one at a time.  I knew I wanted an odd number of hearts so I made sure that I put the heart in the middle that I wanted to use more of.

IMG_4779

This is the finished product.  I made sure the hearts were evenly spaced apart and that there was room at the end of each side of the twine before the loops for some visual interest.  I also tied my hearts on tight to the twine.  You could leave them loose.  There are several ways you could do this.  You would only use one kind of heart or you could leave the wood plain instead of painting them.  Make them match your style!

Bonus

IMG_4786

I had a few hearts left over and decided to use them as decor.  I tied the twine around them because I do not like leaving the hole empty and it gives these hearts a bit more of a rustic feel.


Thank you for joining me again and I hope you love this garland like I do.  On Friday we will be looking at how to make little figurines for a 3-tiered tray!

Melissa McGuire

Supplies

2 Kinds of Wooden Hearts- Dollar Tree

Waverly White Chalk Paint- Walmart

ChalkBoard Red Chalk Paint- Tuesday Morning

FolkArt Metallic Gold Paint- Walmart

Paint Brushes- Hobby Lobby

Paint Trinket Tray- Dollar Tree

Twine- Hobby Lobby