Valentine’s Day is right round the corner. While I do not decorate big for Valentine’s Day, I do like having some Valentine’s Day decor up in our home. Once the Christmas decor is put away, the house looks so empty. Winter decor can be pretty bland depending on what colors you decorate with. So Valentines decor goes up soon after New Year in our house to add some color to the blah winter. This year though I needed some new decor and inspiration. Facebook and its crazy amount of adds came to the rescue!

I found a piece on Facebook and thought it would go great with the faux galvanized plaques I did a few days ago. It was a wooden plaque with beads strung across the inside of it. I was very excited to make this project and a bonus project with beads. I had never used wooden beads before. It was fun. Lets get started.
Supplies
")
")

Some of the things you will need are twine, skewers, and a paint brush. You will also need beads and a drill. There are a few options for beads. You can get plain wooden beads or get beads that are already colored. If you get wooden beads you might need paint if you want to paint them like I did. I purchased 2 sizes of beads for some variety.
Lets Get Started
")
")
The first thing I did was string the wooden beads onto the skewers. This makes them much easier to paint and they do not roll all over your work surface. I also found a way to prop the skewers up so that the beads were hanging in the air and not touching my work surface. From there I started with the red chalk paint and painted 8 of the small beads.


I did not have any pink chalk paint. So I mixed the red chalk paint that I had left in my dish with some white chalk paint to create the pink shade I wanted. I also got out some Popsicle sticks to help roll and stabilize the beads as I painted them because I found it was messy to use my fingers to do this. After I painted my 8 small beads pink, I painted 8 of the larger beads white. Then I let them all dry completely.

While my beads were drying, I drilled a small hole in the side of my plaque. The top of my plaque already had a hole in it but if yours does not, you will need to drill one in the top of the plaque too. This is to put the twine though so we can drape it across the plaque. Make sure to use light pressure and go slow with the drill because the material of the plaque is very delicate.

Once the beads were dry I took 5 of the smaller ones and strung them on the twine. You can use which ever beads you want, in any color you chose. I filled my twine with the beads but you could leave some of the twine showing. If your twine starts to fray as you are pushing it though the beads, use a small piece of tape to wrap around the end of the twine to give it more stability.

After you get your beads strung on the twine, thread the twine though the holes of the plaque. You can tie knots or bows with the twine to hold it onto the plaque.

This is my finished project. It is so cute and just what I was looking for!
Bonus Project
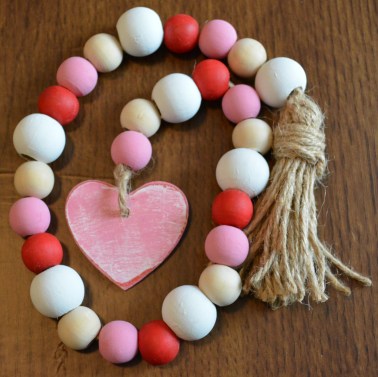
I had several beads left over and thought it was the perfect time to make a Valentine’s bead garland. Bead garlands have been very popular lately but they are very expensive. I was able to make one for almost a fourth of the cost.

Making the garland was a piece of cake. I started off by stringing the rest of my beads on the twine. I did not cut the twine off the roll yet because I was not sure how much twine I would need. I used all the beads I painted except for one white one and I also added in some plain wooden beans that were all natural.

I had a heart left over that I scraped off one of the plaques I galvanized. I got my drill back out and drilled a small hole in the top of the heart. This would finish off one end of my bead garland. I painted the heart with white chalk paint and the pink paint I had left over from painting the beads. Then I sanded the edges of the heart to make it a bit more rustic. I tied it on to my strand of beads.

On the other end of the twine I cut about 5 inches past the beads. I then took another piece of twine and wrapped it around my hands several times. This will serve at the tassel for the garland. Once I had wrapped the twine around my had about 15 times, I slide it off my hand and started wrapping the bunch of twine with another piece of twine to hold it together like a tassel. Leave a big loop at the bottom of the bunch and a small loop on the top. You will use the small loop to tie the tassel to the other end of the bead garland. The bottom, bigger loop of twine, you will cut the loop apart and then shape up the bottle of the tassel. Tie the tassel onto the string of beads and you have your garland.

This garland can add a pop of color to any 3-tiered tray or even a letter board. The other great thing is that you can make this as long or as short as you want. It is one of those crafts that is completely customizable with the colors, length, bead size and what you put on the ends. You can have a one of a kind garland that is perfect for your home any time of the year.
Thank you for joining me today!
Enjoy your week!
Supplies
Waverly White Chalk Paint- Walmart
Chalkboard Paint- Tuesday Morning
Skewers- Dollar Tree
Paint Brush- Hobby Lobby
Twine- Hobby Lobby or Dollar Tree
Square Plaque- Dollar Tree
Wooden Beads- Hobby Lobby
Faux Galvanized Plaque Tutorial
