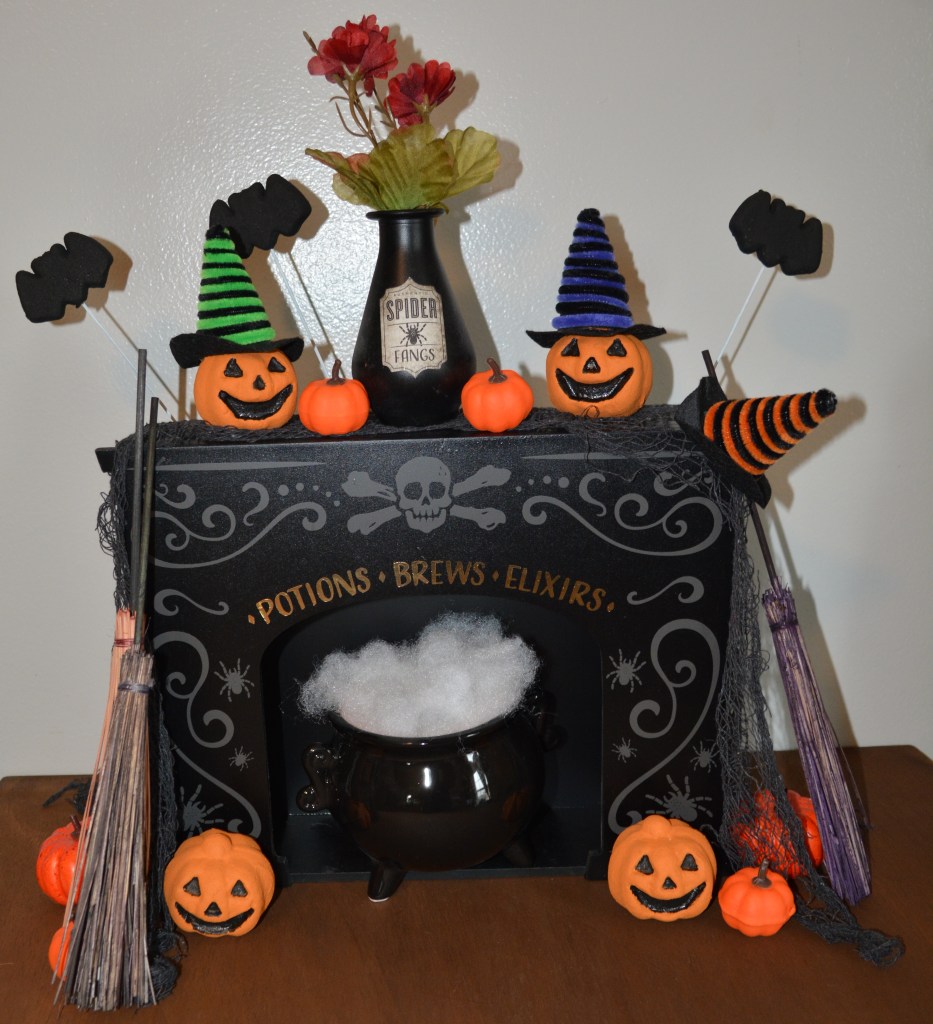
SURPRISE!! I have one more Halloween post for you. There is not a lot of DIY to this but it is super cute!! This piece from Target looked like a fire place to me. (You will see me use one for Christmas decorations in a few weeks.) I had to see what I could do with it. I love how it turned out.
Lets Get Started
Supplies
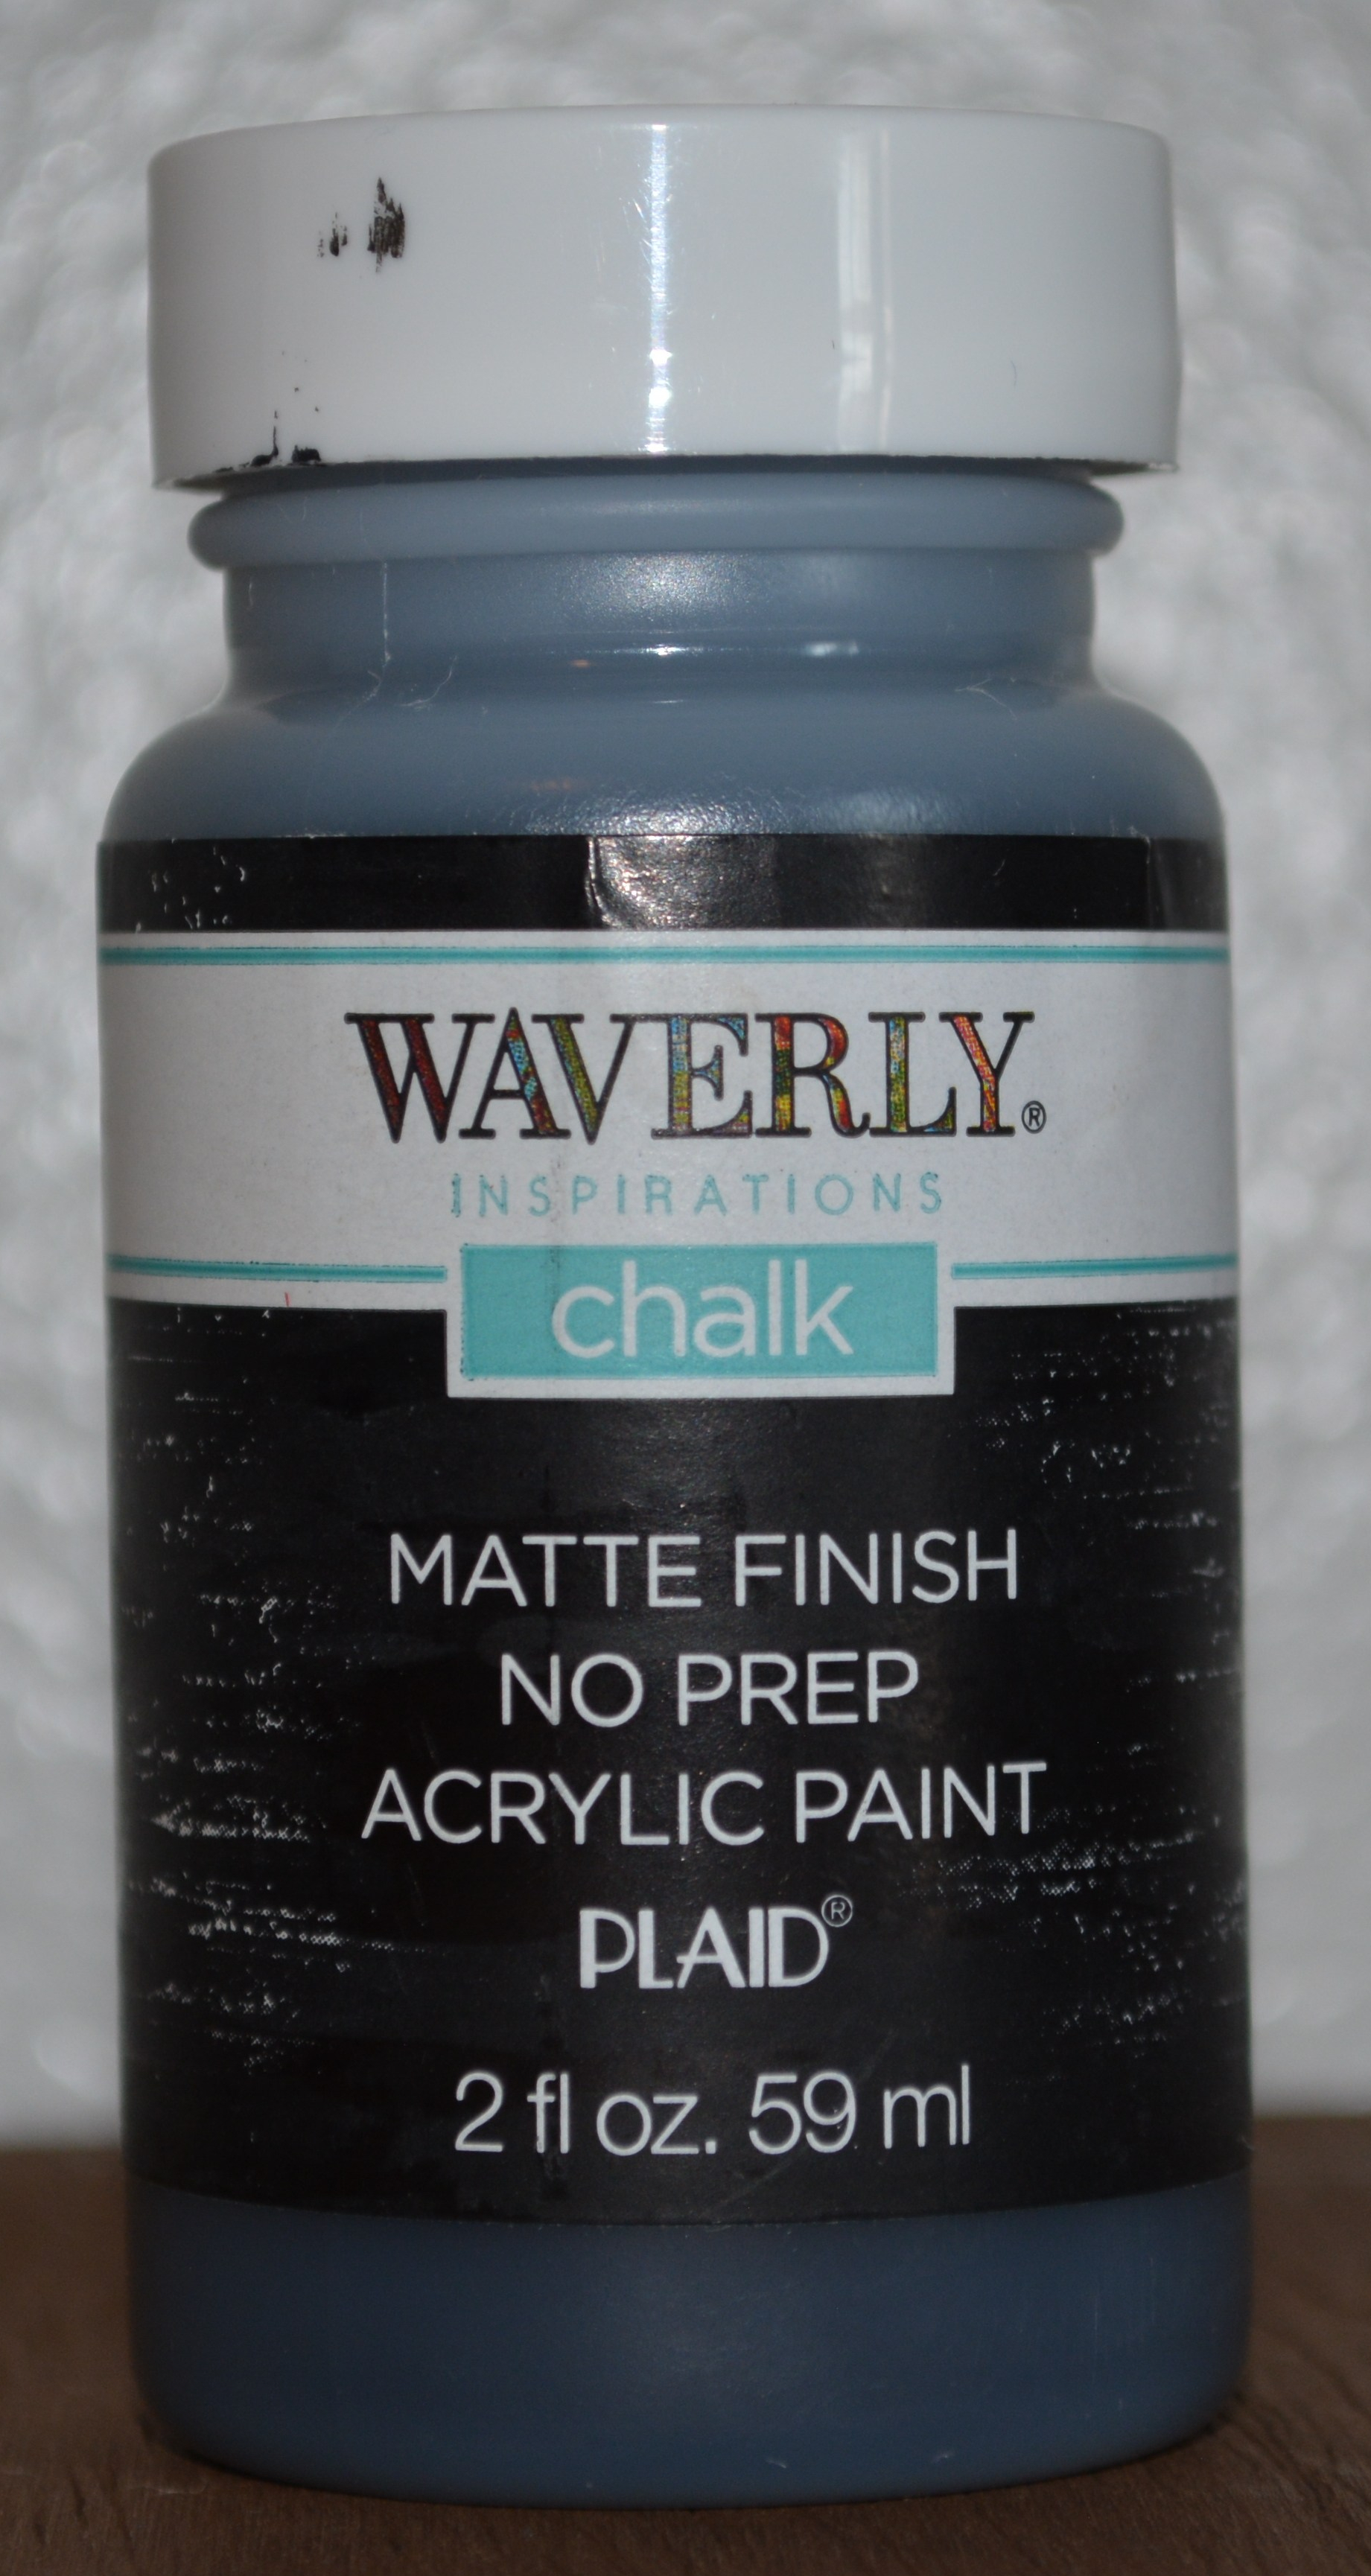
The supplies that you will need are some white pumpkin picks, mini brooms (I had black, orange, and purple), black netting, bat picks, and witches hats all from Dollar Tree. I used some Waverly Chalk paint in Ink, White, and Pumpkin along with some paint brushes. You will need some glue. I used hot glue. The most important thing is the fire place which was from Target.
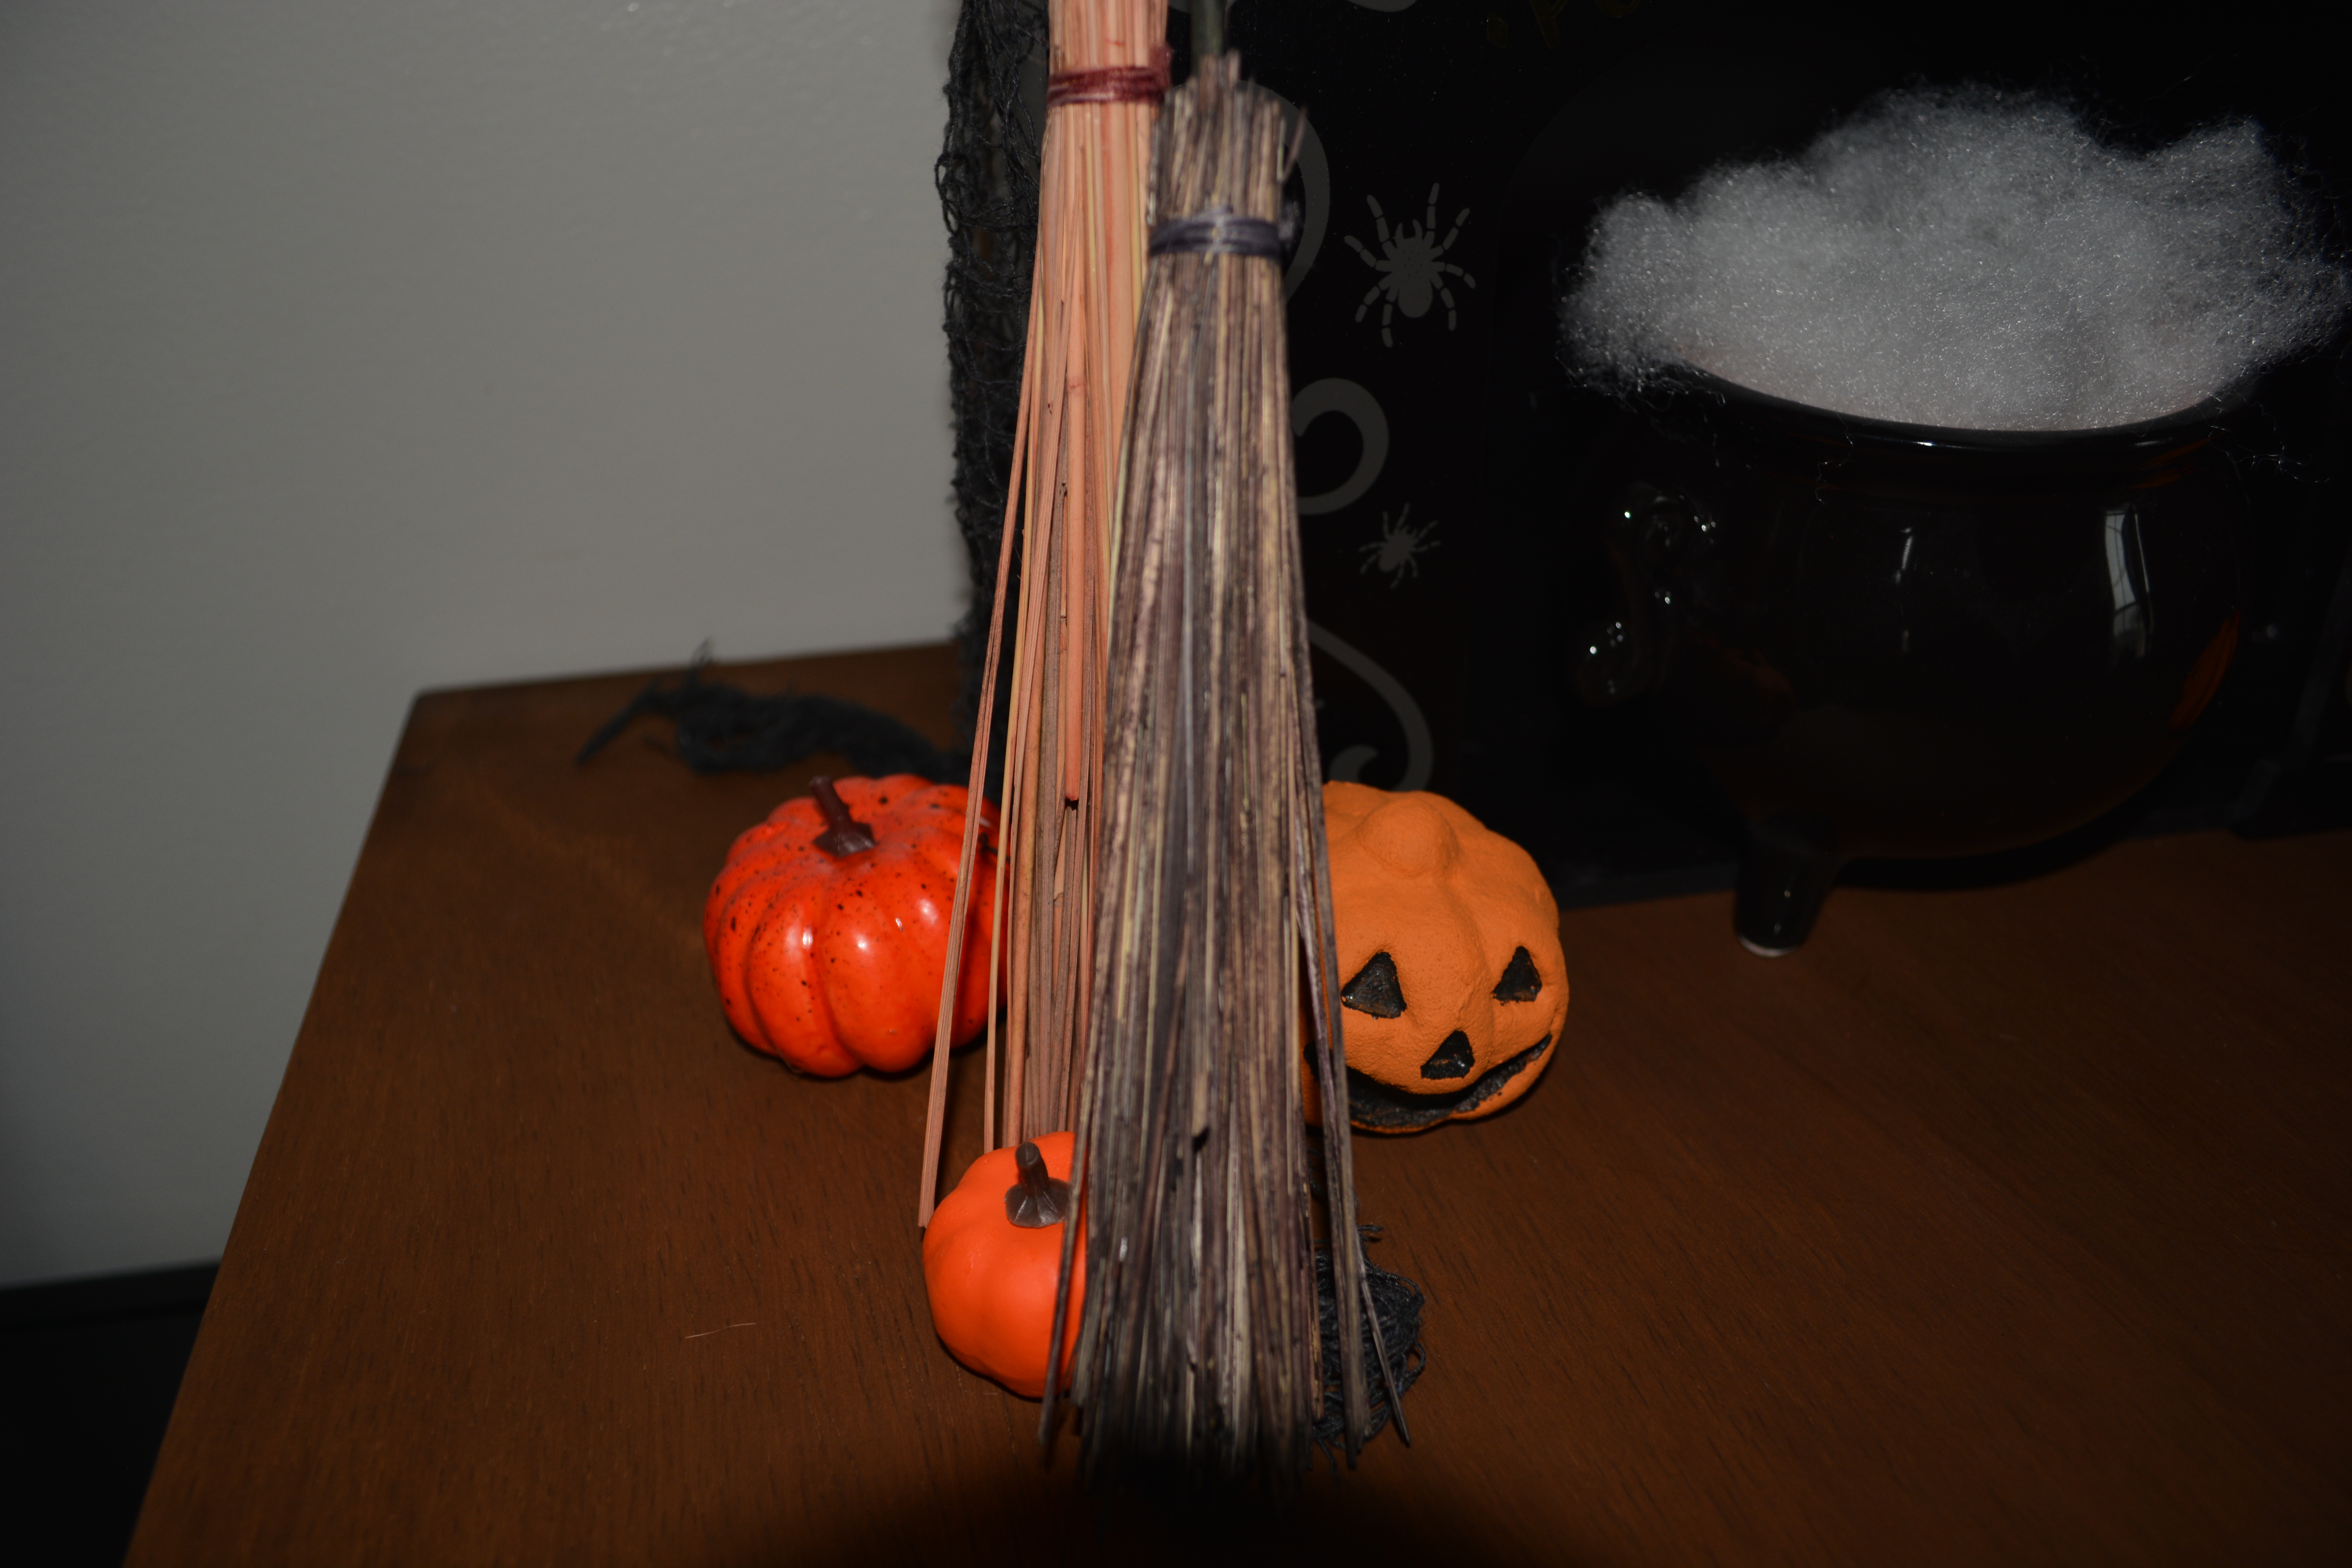
Some extras I added were the caldron, some white fluff, and different size pumpkins.
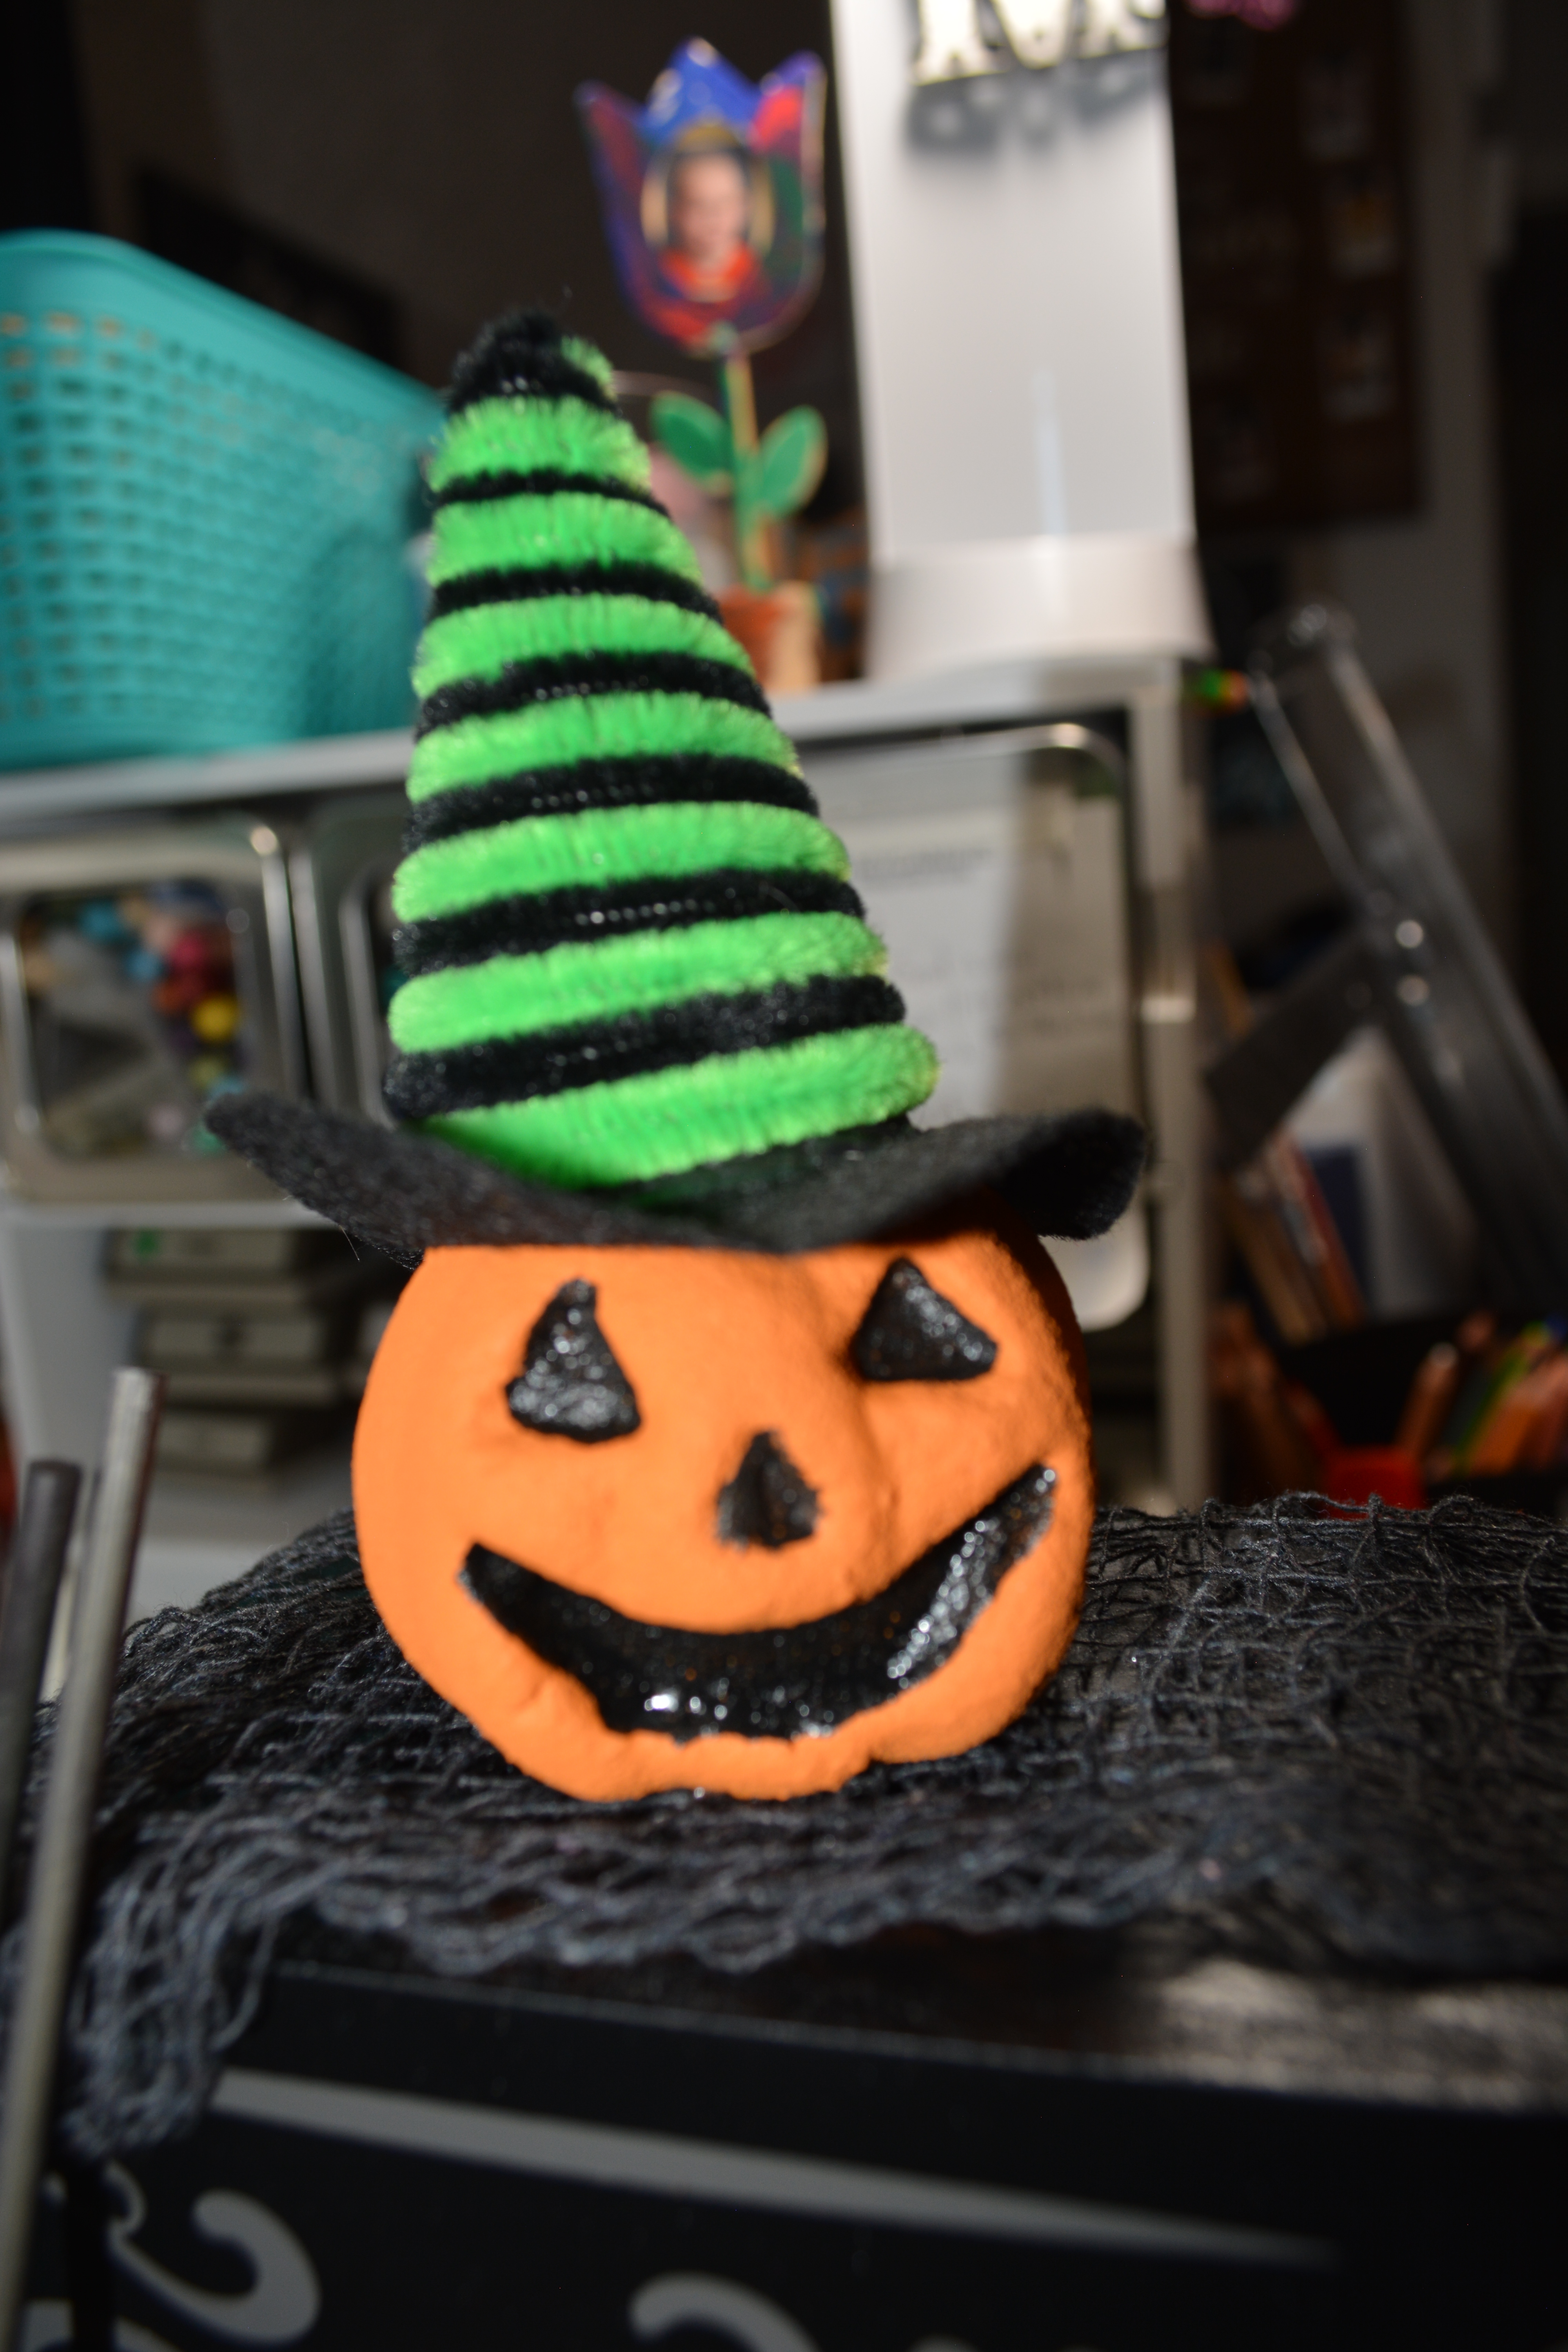
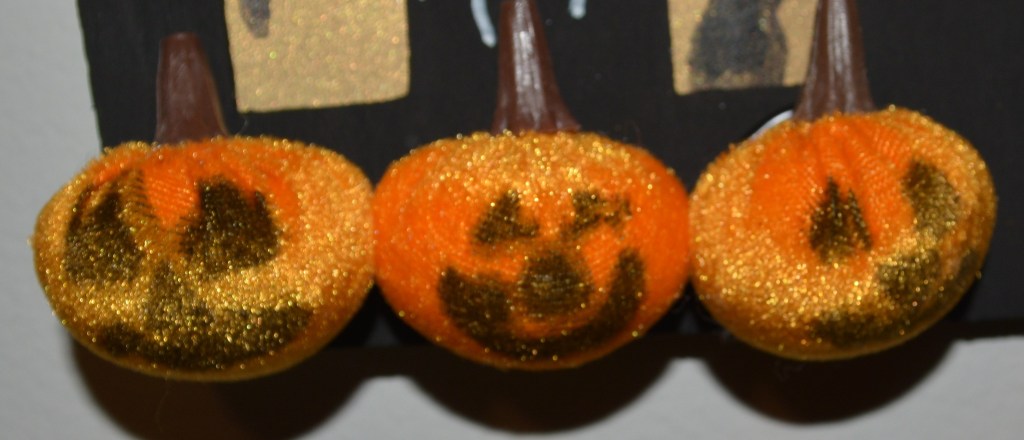
The first thing I did was start painting the pumpkin and bat picks. The 4 pumpkins got a good coat of Waverly Chalk Paint in Pumpkin. Once they were dry, I painted the jack-o-lantern faces on them with Waverly Chalk Paint in Ink.
I painted the bats with Waverly Chalk Paint in Ink and the sticks of the bats with Waverly Chalk Paint in White.
That is about it for the DIY part of this project. The rest is assembling it all.
I started with draping the black netting over the fire place using hot glue on the back of the fire place to hold it on. Next I glued witches hats on two of the pumpkins picks and took them off their sticks. Then glued the pumpkins to the top of the fire place. I glued the last witch hat on the corner of the fire place like someone had hung it there.
The last thing I glued on was the bats. I put three of them on the back of the fire place like they were flying around. I placed the brooms leaning on the fire place in a few different places and put some tiny pumpkins and a few bigger ones around. There was something missing from the mantel of the fire place. I found this potion bottle that I turned into a vase and added some red flowers that were let over from another project. Finally I added pillow filler to the caldron.
That is it!! I LOVE this so much. It is very different. When I look at it I think of the movie Hocus Pocus. Each of the brooms and hats are 3 different colors. So cute!
Thank you for joining me today. Please Like, Share, Comment, and Subscribe!
Melissa McGuire
Supplies
Fire Place- Target
Caldron- Target
White Pumpkin Picks- Dollar Tree
Bat Picks- Dollar Tree
Black Netting- Dollar Tree
Mini Brooms- Dollar Tree
Various Pumpkins- Dollar Tree
Flowers- Dollar Tree
Potion Bottle- Target
Witches Hats- Dollar Tree
Fluff from Pillow
Waverly Chalk Paint in Pumpkin, Ink, and White- Walmart
Paint Brushes- Anywhere
Surebonder Hot Glue Gun and Hot Glue Sticks- Hobby Lobby
It’s time for another Tool Tuesday. Today we are going to look at paint. There are several different kinds of paint and different finishes. I use paint almost every time I craft. I have my favorites and I can not wait to share them with you!
Paint Finishes
The first thing to look at is the finish of paint. When you are looking at the finishes of paint, it is helpful to think about what you would put on the walls of your house. What finish do you prefer? For my walls I like something easy to clean but for my craft projects I prefer a flat or matte finish.
Here is a great list of the different finishes of paint. For most projects I use a flat or matte finish paint. It has a rustic and vintage feel to it. Flat paint is thicker than most and covers very well. The only downside to it is that it is not easy to clean.
From there, the rest of the finishes can be cleaned and wiped down. The coverage is different though and will take more coats of paint to cover your projects. Depending on the brand, the paint can be hard to put on and get it to cover what you are painting.
It is hard to put glossy paint over the top of glossy paint. Most of the time you need to either sand down and clean a glossy surface before adding a glossy paint over the top of it. The other option is to use a primer paint. then go in with the glossy paint over that. Primer will also make sure what ever paint you put on with stick.
Brands of Paint
My all time favorite paint is Waverly Chalk Paint made by the company Plaid. It is sold at Walmart or online and is cheap. I use the White chalk paint as a primer on most of my projects. It makes ever other paint look brighter and cover better.
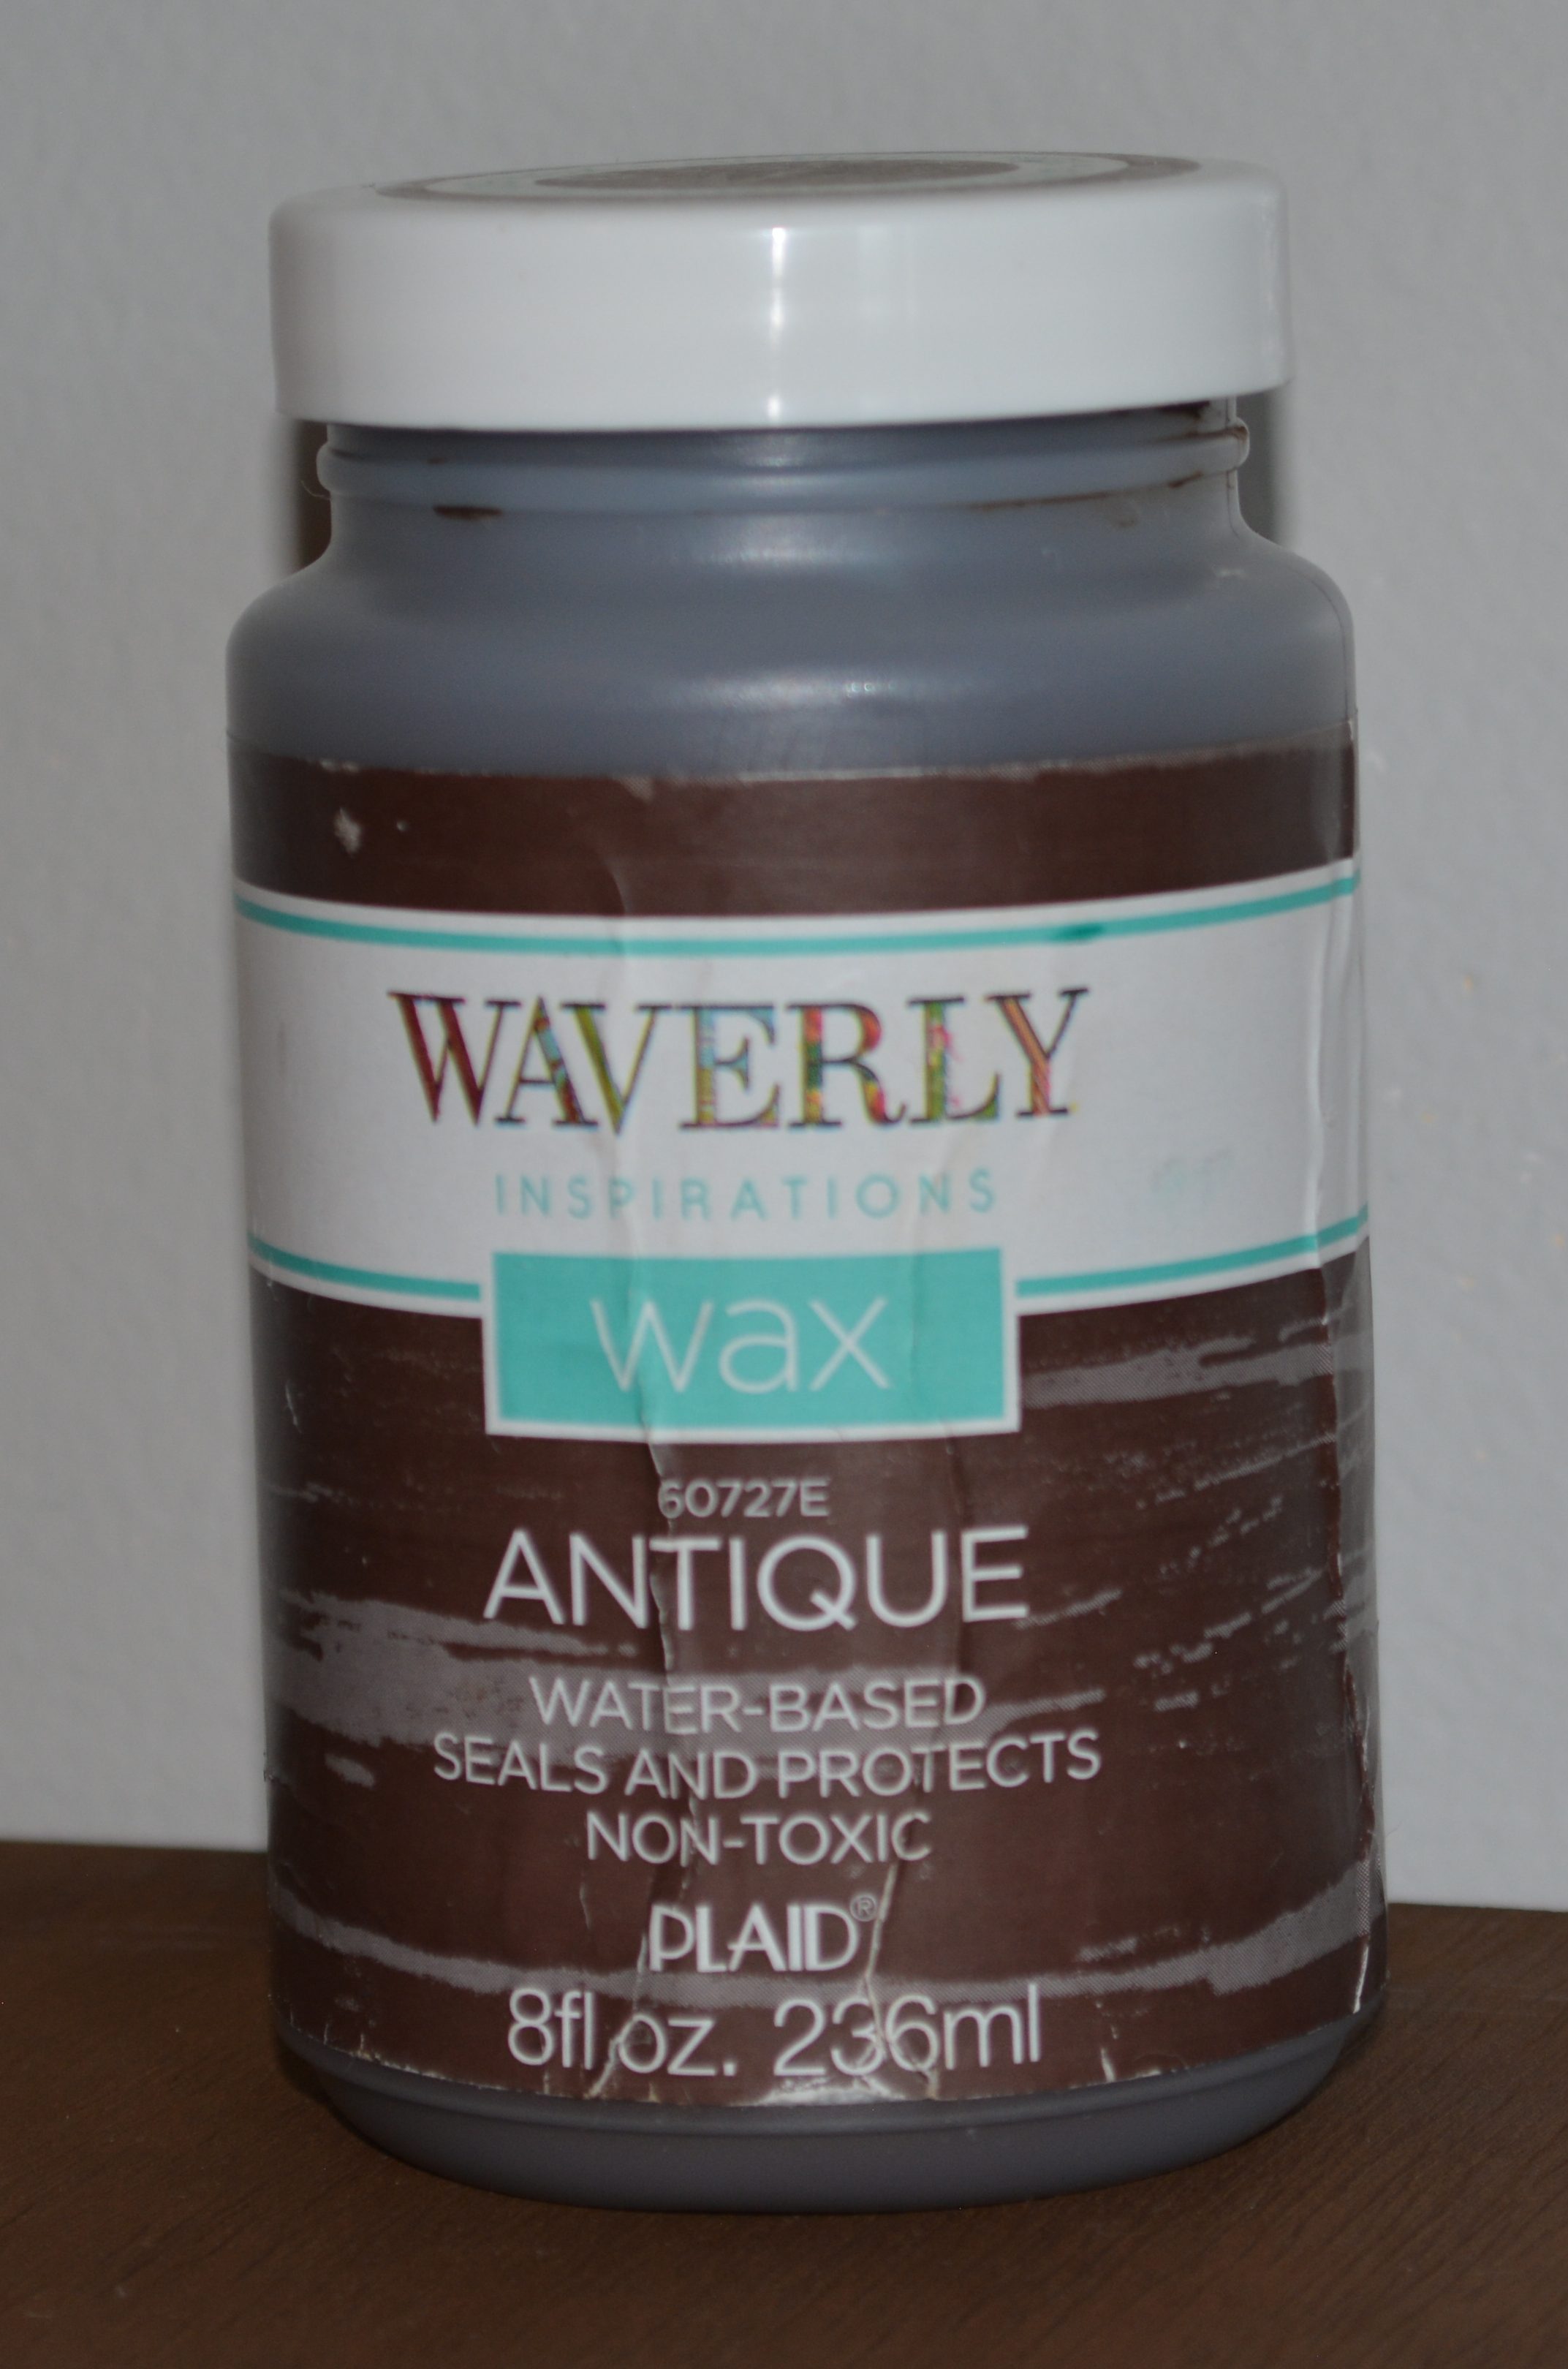
Waverly makes several different colors of chalk paint and also a few different waxes. I use the Antique Wax a lot. It can cover as a regular paint or you can water it down and it applies and gives the look of a stain without all the mess.
Let’s talk about some brands of acrylic paint. Apple Barrel makes a pretty good acrylic paint. It is cheap and there are some many colors to chose from. They are good paints for your money. I remember doing crafts with my mom as a kid and using Apple Barrel paints to do our projects. They have been around a long time.
Another brand of acrylic paint I am starting to use is by a company called Arteza. Their products are great quality. The paint is thick and covers most of the time with one coat which is great. I order this paint from Amazon but they also have their own website. Most of their products come in sets so you get lots of colors for your money.
Folk Art is another good company for paint. I really like their glitter and metallic paints. They are wonderful. I like that they have several shades of their metallic paints because that helps with blending when you are doing different techniques.
Most of these companies make several different finishes of paint so you have to first decide what you want your project to look like. Then from there pick your color of paint. The good thing is that most of these companies make small bottles of paint and they are reasonably priced so you can try a few different kinds.
This is just a small break down of paints. Do your research because all crafters are different and all have information to offer.
Thank you for joining me today. Please Like, Comment, Share, and Subscribe!
We have been in Fall for a while but I am just getting around to posting some of the Fall crafts I have created. Unfortunately Covid is throwing me for a loop and I have some lingering affects from having the virus. That means I can’t do all the things I want. Things will just be posted a little later than I wanted.
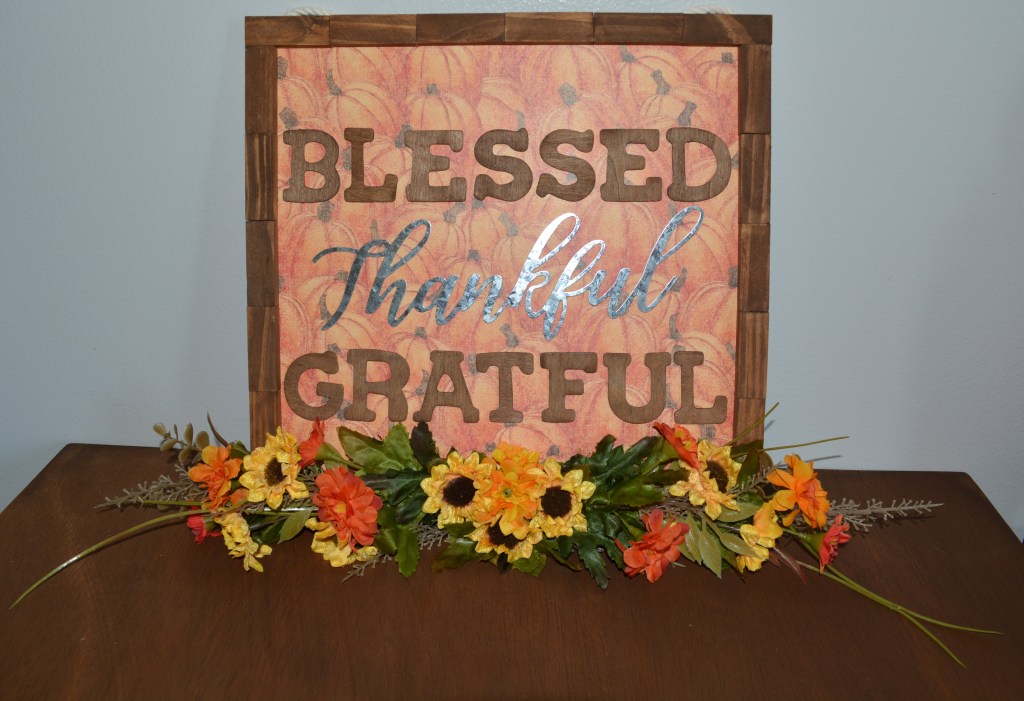
Let’s start off Fall with this wall hanging. This was a fly by the seat of my pants craft. That means I did not have a whole lot planned out when I started it. Things got made up on the way. The good thing is that I completely love what I created. This is a craft you have to put a bit of time into because things have to dry. It is worth the effort though.
Let’s Get Started
Supplies
The first supply I pulled out for this craft was this square sign from Dollar Tree. I thought scrapbook paper would make the perfect background on the sign. I get a majority of my paper from Hobby Lobby especially if I am buying it by the sheet. I picked out the pumpkin paper for this one. The final thing I picked out was the Thankful metal sign which is also from Dollar tree.
As I was working, some of the other supplies I pulled out were wooden letters and Tumbling Tower Blocks but from Dollar Tree. I used hot glue and liquid glue to put the project together. To stain the wood pieces I used Waverly Wax in Antique, and a paint brush. I used rope as the hanger. The final thing I used was fake Flowers from Dollar Tree and Hobby Lobby.
The first thing I did was take the Waverly Wax in Antique and put it in a separate dish, and added lots of water to it to make it like a stain. Then I painted two coats of the stain on the letters and Tumbling Tower Blocks. The words I decided to add to this were Blessed and Grateful along with the metal Thankful.
I then used hot glue to glue the pumpkin scrapbook paper onto the sign. Good thing is that you do not have to scrape the glitter off of the sign because no one will see it. I trimmed down and paper that was hanging over the edges.
Once everything was dry I laid it all out to see how things looked.
After I had the words laid out, I used liquid glue to hold them in place. For me, it is easier to use liquid glue because I can not move fast enough to place things down before hot glue dries especially on the metal words. It also makes it to where I can move the letters around a bit to make sure they are straight.
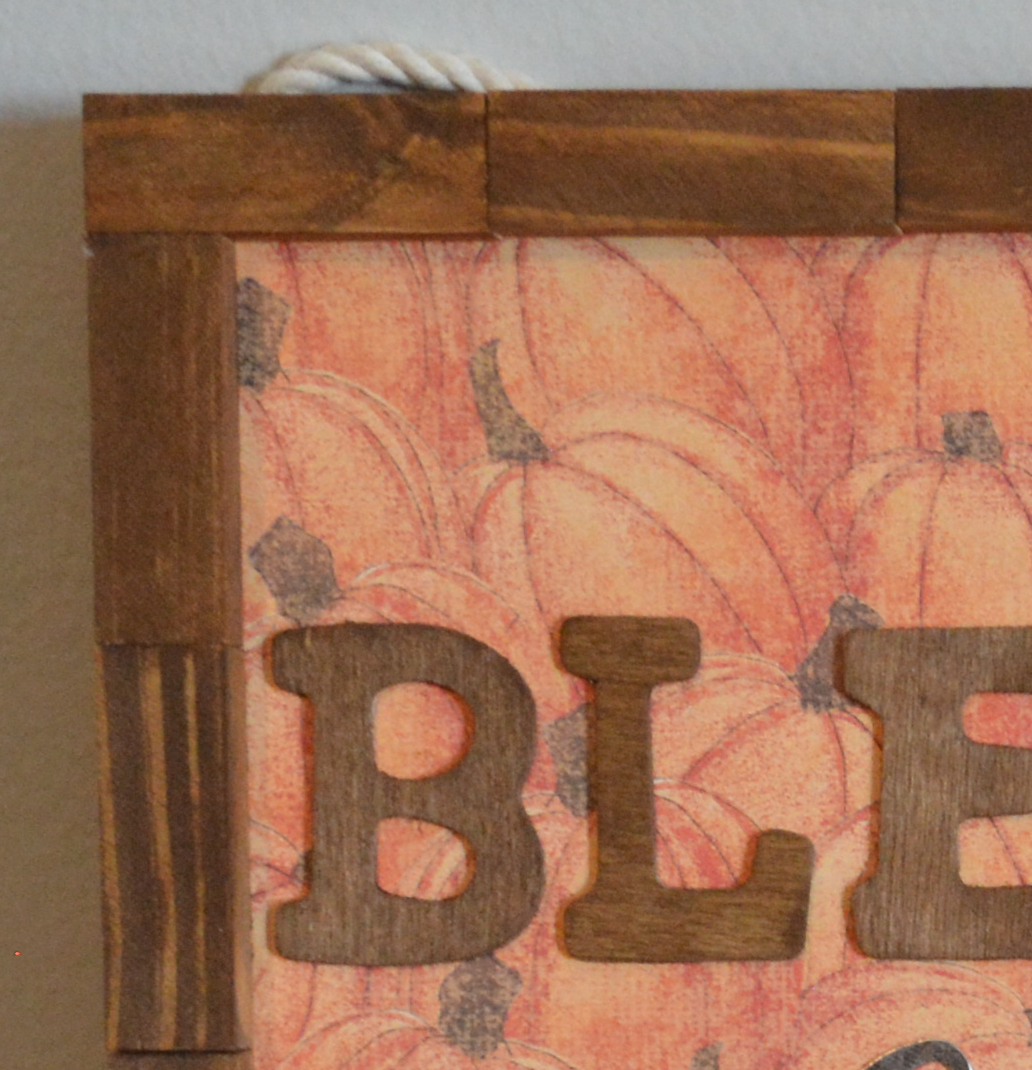
Once the words were glued on, I added the stained Tumbling Tower Blocks around the edges with hot glue. I used these to look like a frame around the sign.
Once I put all the blocks around the edges I thought the sign still looked like it needed something. I have several flower pieces on my desk and started arranging them at the bottom of the sign. When I was happy with it I used hot glue to glue them down.
The final step is to add a rope hanger to the back. Use lots of hot glue to do this since the sign might be a bit heavy with the flowers on it.
Here is the finale project. I love the mix of the metal and the wood. The colors are very Fall inspired. This is hanging on one of my doors on my first floor and I have had several compliments on it.
Thank you for joining me as we roll into Fall crafting. Please Like, Share, Comment, and Subscribe!!
Have a wonderful weekend!
Melissa McGuire
Supplies
Wooden Sign- Dollar Tree
Scrapbook Paper- Hobby Lobby
Waverly Wax in Antique- Walmart
Liquid Glue- Hero Arts
Tumbling Tower Blocks- Dollar Tree
Wooden Letters- Dollar Tree
Metal Thankful- Dollar Tree
Paint Brush- Anywhere
Flowers- Dollar Tree and Hobby Lobby
Rope- Hobby Lobby
Surebonder Hot Glue Gun and Hot glue Sticks- Hobby Lobby
I want to thank everyone for checking out my 5 days of Halloween last week. I also should inform you that I tested positive for Covid about a week and a half ago and I was down for a good three days. I am feeling much better but my energy is still way down so I will do my best to get posts out on time. Thank you your patience and support! Now onto Tool Tuesday.
Welcome to another Tool Tuesday. You might be wondering why you are seeing pictures of stores for this week. Well we have to have places to get our tools at right? So I only saw it fitting to tell you about all the places I shop for all my crafting needs.
I get craft supplies from all kinds of places and it is not limited to just craft stores. Any store you walk into can have something you can craft with. For example, grocery stores have things like salt for snow or painting techniques, tin foil, parchment paper, wax paper, and any other number of things. A hardware store has wood and sandpaper along with all kinds of paint and brushes. The possibilities are endless.
Dollar Tree is a great place to get craft supplies from. Some stores have what is called a Crafters Corner and it is filled with different supplies. They now care paint, brushes, wood pieces, foam tape, glue sticks, canvases, glitter, stickers, felt, glue and more. Each season they are starting to get in wood pieces too for crafting. Mason jars are another great thing to find at Dollar Tree along with seasonal flowers. It is a one stop shop especially if you are on a budget!
Don’t get me wrong, I will still shop at craft stores because the have the best variety. With places like Hobby Lobby and Michael’s there is always a coupon to help with the cost which is great. They will have larger selection of the types of products you might be looking for. For example, if you are looking for acrylic paint, you will find several different brands, sizes, colors, and finishes. This is what makes craft stores great. They have things for all types of crafting.
Let’s talk about online shopping. You can shop Hobby Lobby and Michael’s online and have it shipped to you or the store and you pick it up. During Covid though I have used Amazon A LOT!! They have anything you could be looking for. It is easy and if you are a PRIME member, you get two day free shipping. I have notices though that a lot of the craft supplies are from China and I try to stick with U.S. based companies unless I’m in a pinch. Amazon is a great option though.
Paper Crafting
If you are a paper crafter like me, Hobby Lobby and Michael’s is great and all, but I want stuff that is different and paper that is a bit better quality. My favorite place to shop is Heroarts.com. They have great stamps and inks. I also like butterflyreflectionsink.com The lady carries a huge assortment of stamps and inks. Also a lot of patterned paper and tools. She does sales too from time to time. I am picky about what I buy to paper craft with, so these are two of my all time favorite places to get stuff from. I get a My Monthly Hero Kit every month from Hero Arts. It is the only company I have a subscription with because they are U.S. based and all around great company to deal with. That is how much I back the company.
Other Places
I am always on the lookout for things to craft with. Clearance from places like Kirkland, Rural King, and the At Home store are great ways to pick up stuff to redo at a cheap price. I also get things from Target and Walmart. Both carry great craft sections and the Target Play Ground has things all the time for DIY projects. Walmart is where I buy ALL my chalk paint because I believe it is the best paint for your money.
I hope this gives you an insight into the places I shop for my craft supplies. It is where I buy all my tools to show you for Tool Tuesday.
Thank you for joining me! Please Like, Share, Comment, and Subscribe!
Welcome to day 5 of the 5 days of Halloween!! Happy Friday!! We are going to pick up where we left off yesterday. We were talking about decor that can be used for two different holidays. This decor is meant to be fast and easy to put together and look very cute in your home! It will also save on your storage space!
Let’s Get Started
Project #1
Supplies
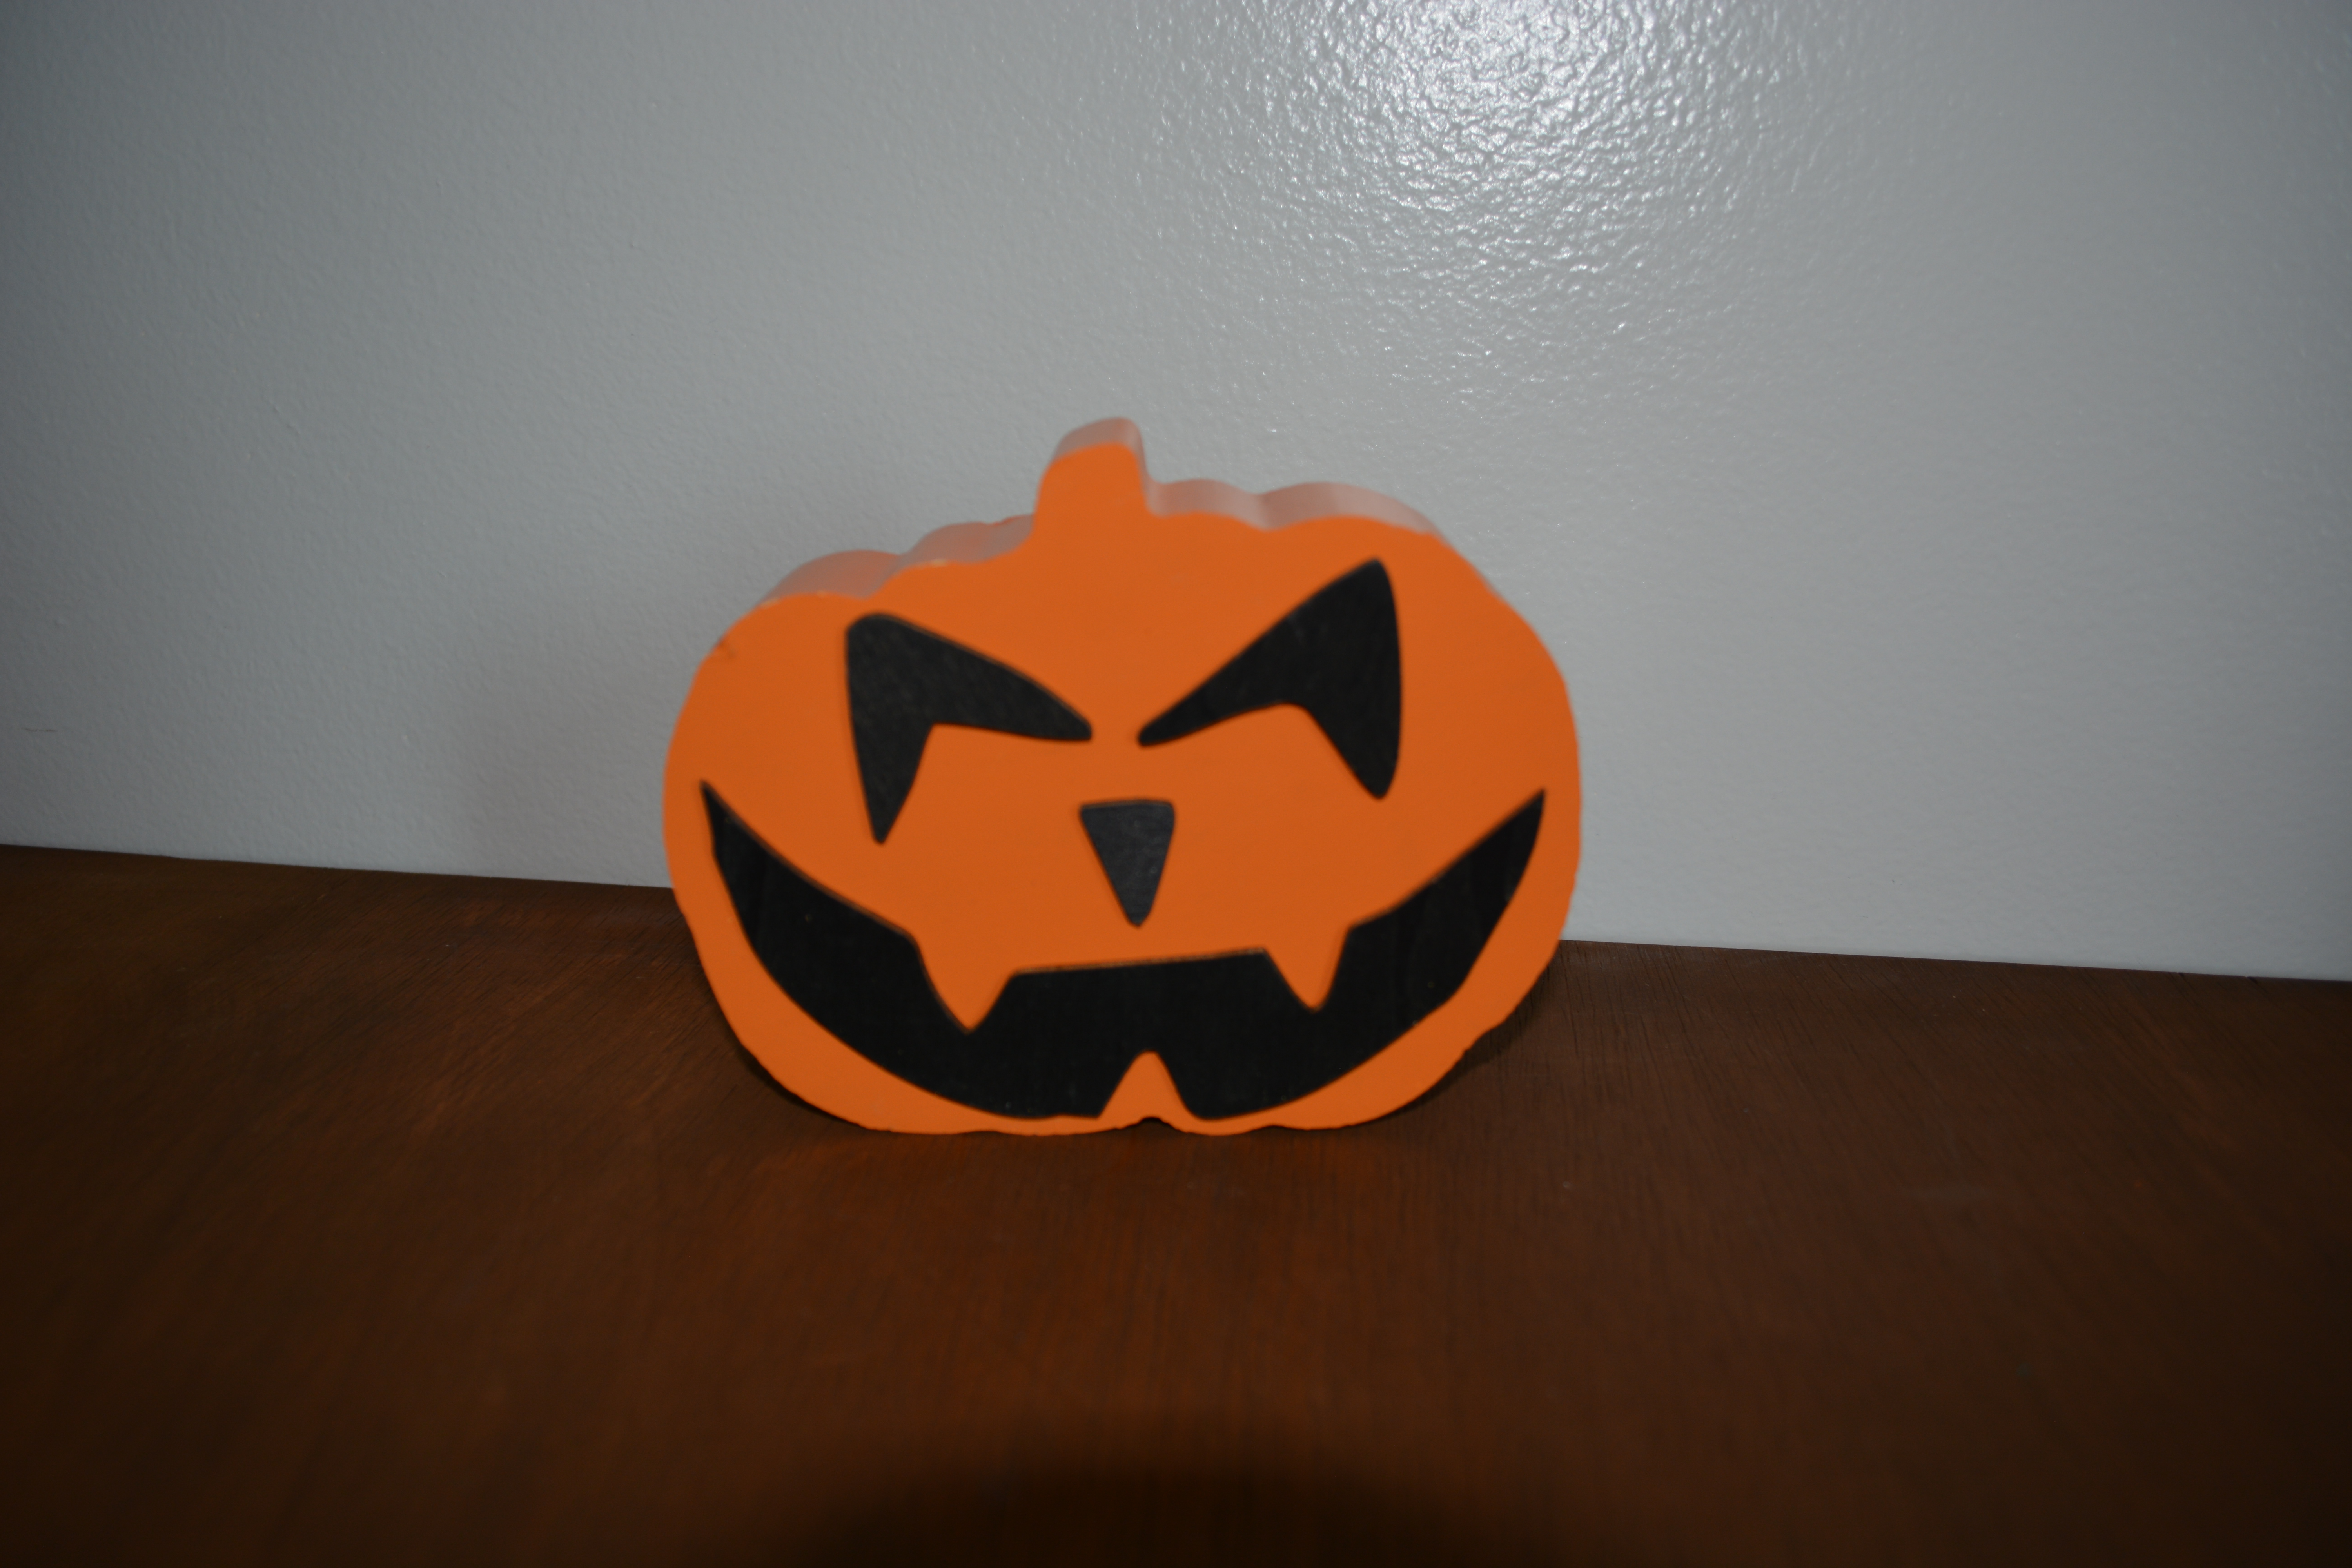
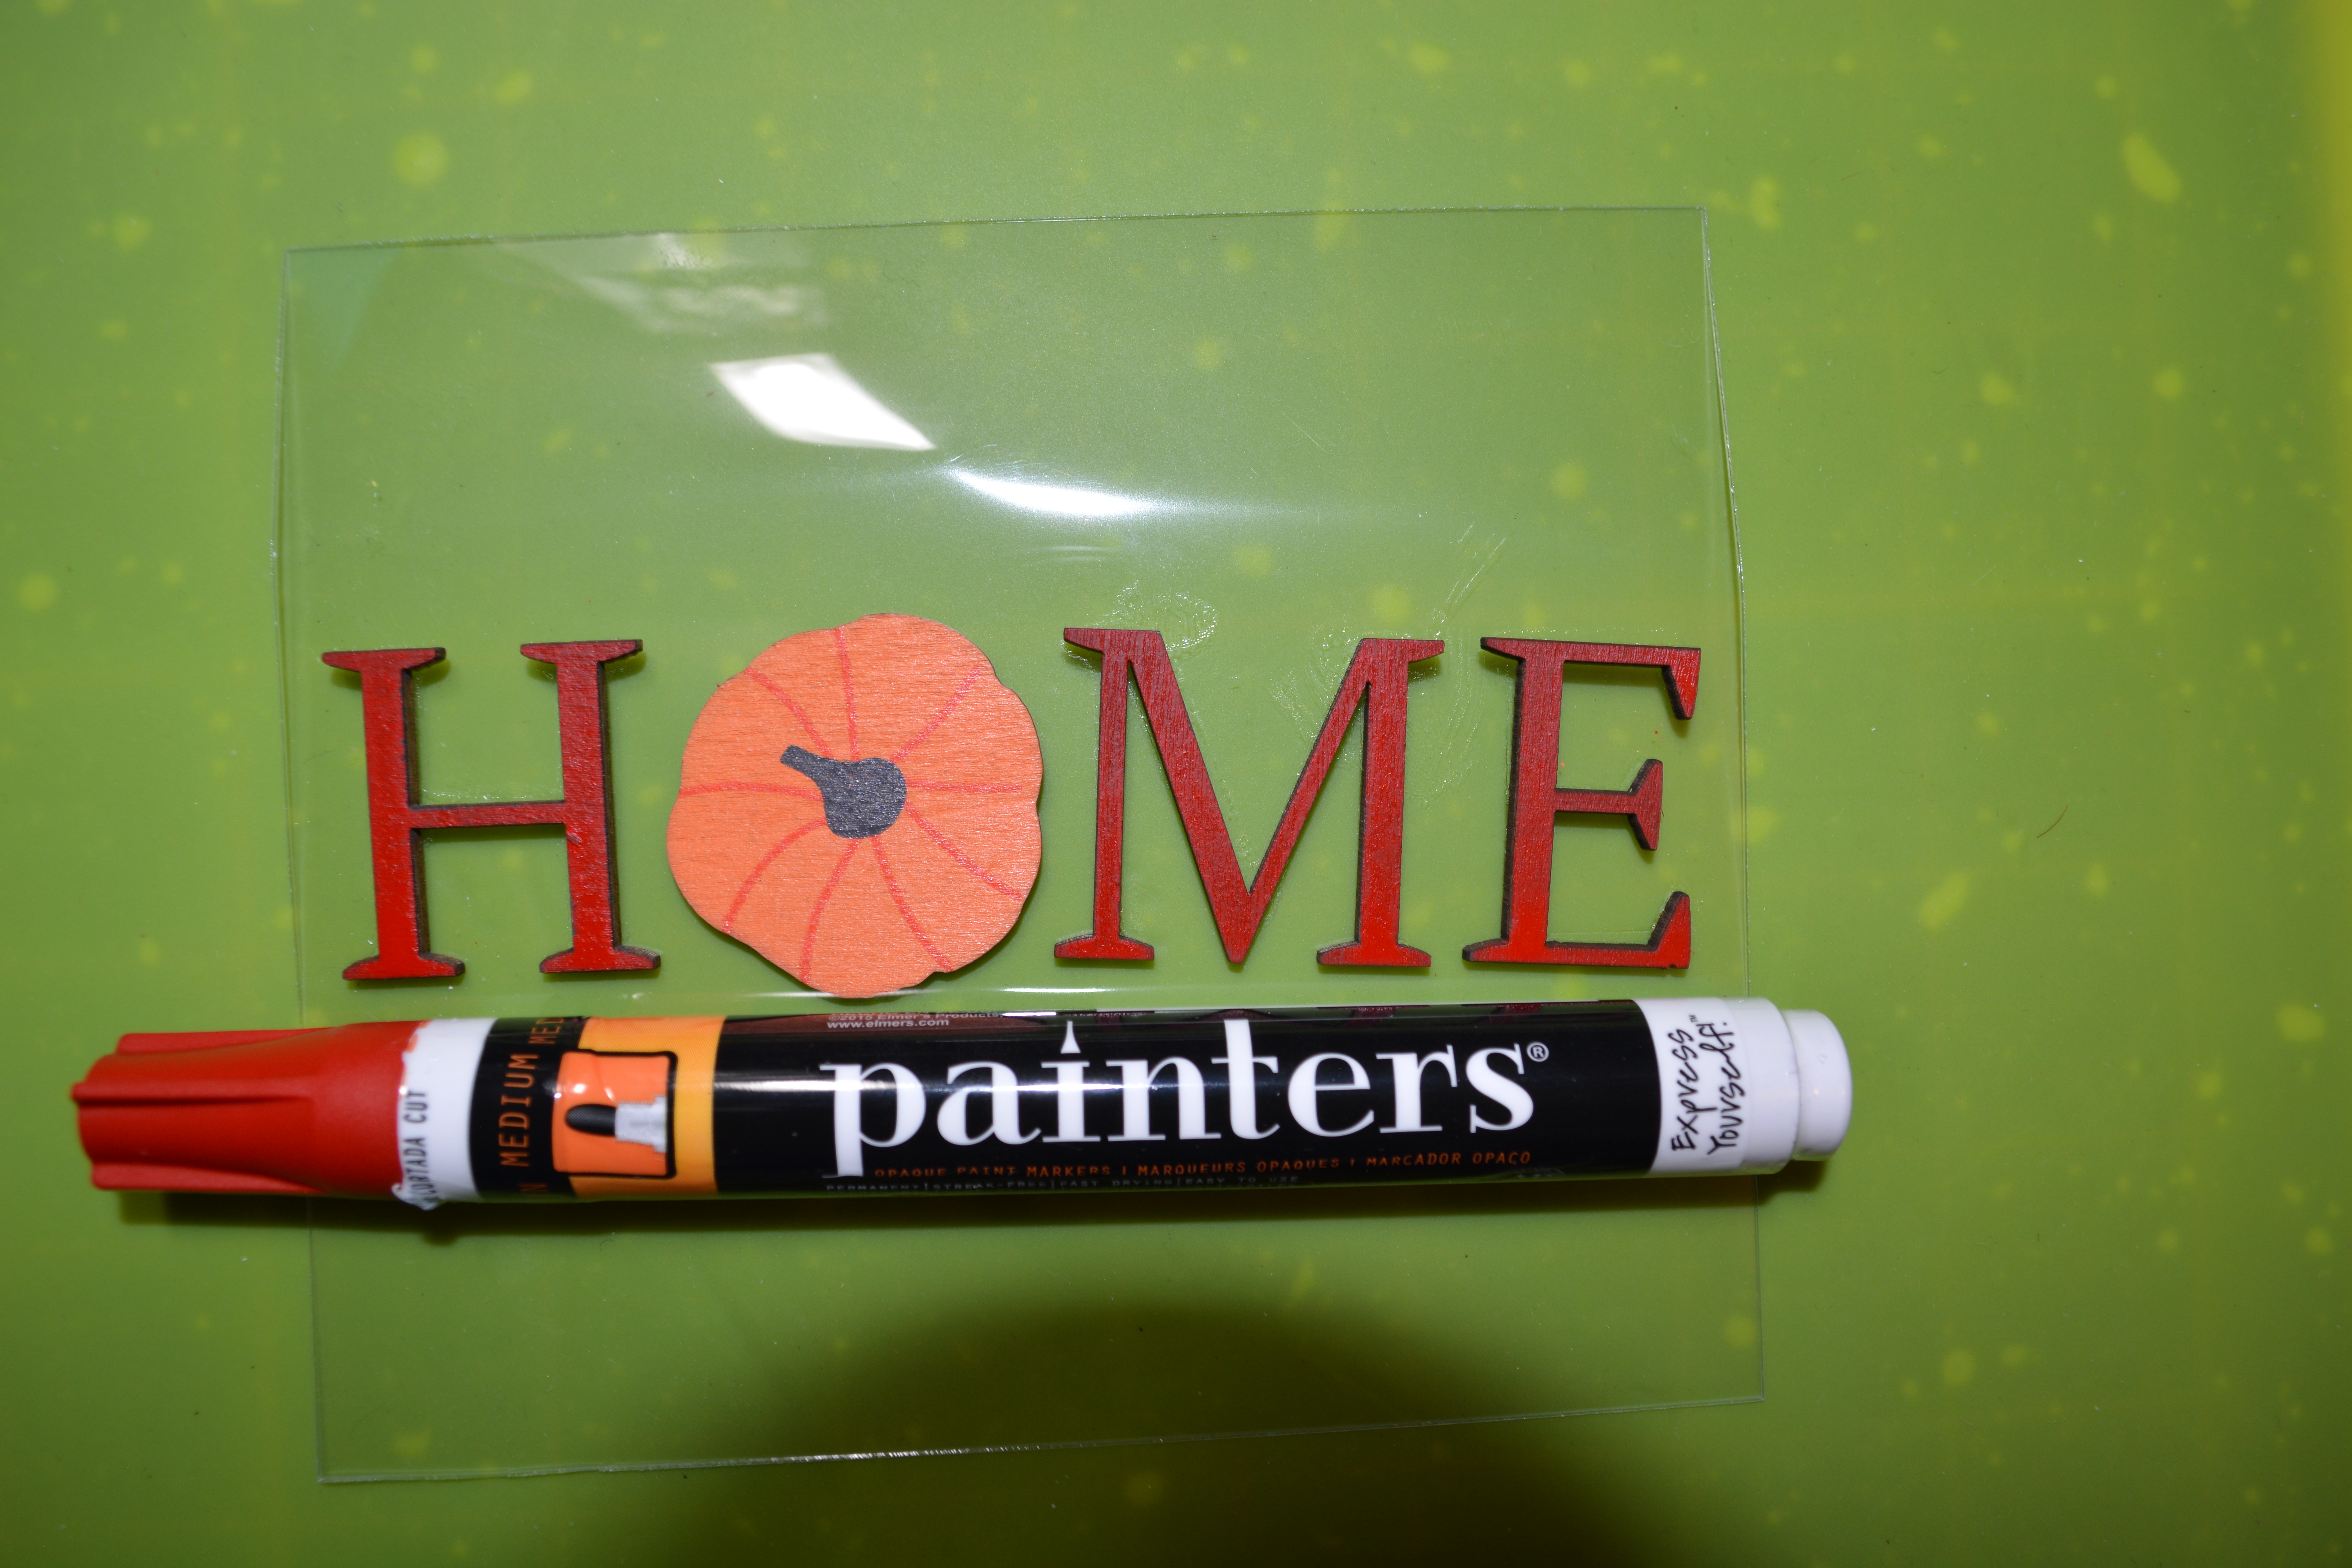
This first project is brought to you by Target. They come out with wooden figures ever year. This year they had pumpkins, turkeys and apples. (When you see things like the apples, pick them up for teachers gifts) The HOME words and the jack-o-lantern face are also from Target.
I also used some Waverly Chalk Paint in Pumpkin, and a red paint pen. You might want to have some liquid glue on hand and a paint brush.
So do you want to know how easy this is!!?? On the side of the pumpkin without the lines I painted it with the Waverly Chalk Paint in Pumpkin. While that dried, I mixed some of the pumpkin paint with water and lightly brushed it over the side of the pumpkins with the lines on it. It will wash over like a stain so you can still see the wood grain.
As my pumpkin dried, I moved on to the HOME stickers. The letters in this were brown and they did not pop off the pumpkin like I wanted them to. Through some trial and error I figured out he best way to paint the letters was to use a paint pen. So I painted them red with the paint pen,
Finally, I stuck the letters on the side of the pumpkin with the lines. If they do not stick, use some liquid glue. On the fully orange side of the pumpkin I put the jack-o-lantern face on it.
This pumpkin would look great as a focal point, or in a 3-tiered tray. It is one of the easies crafts I have ever done. When you are shopping in places like Target, look and see what can be put together quickly. You will be very happy with your decision!
Project #2
Supplies
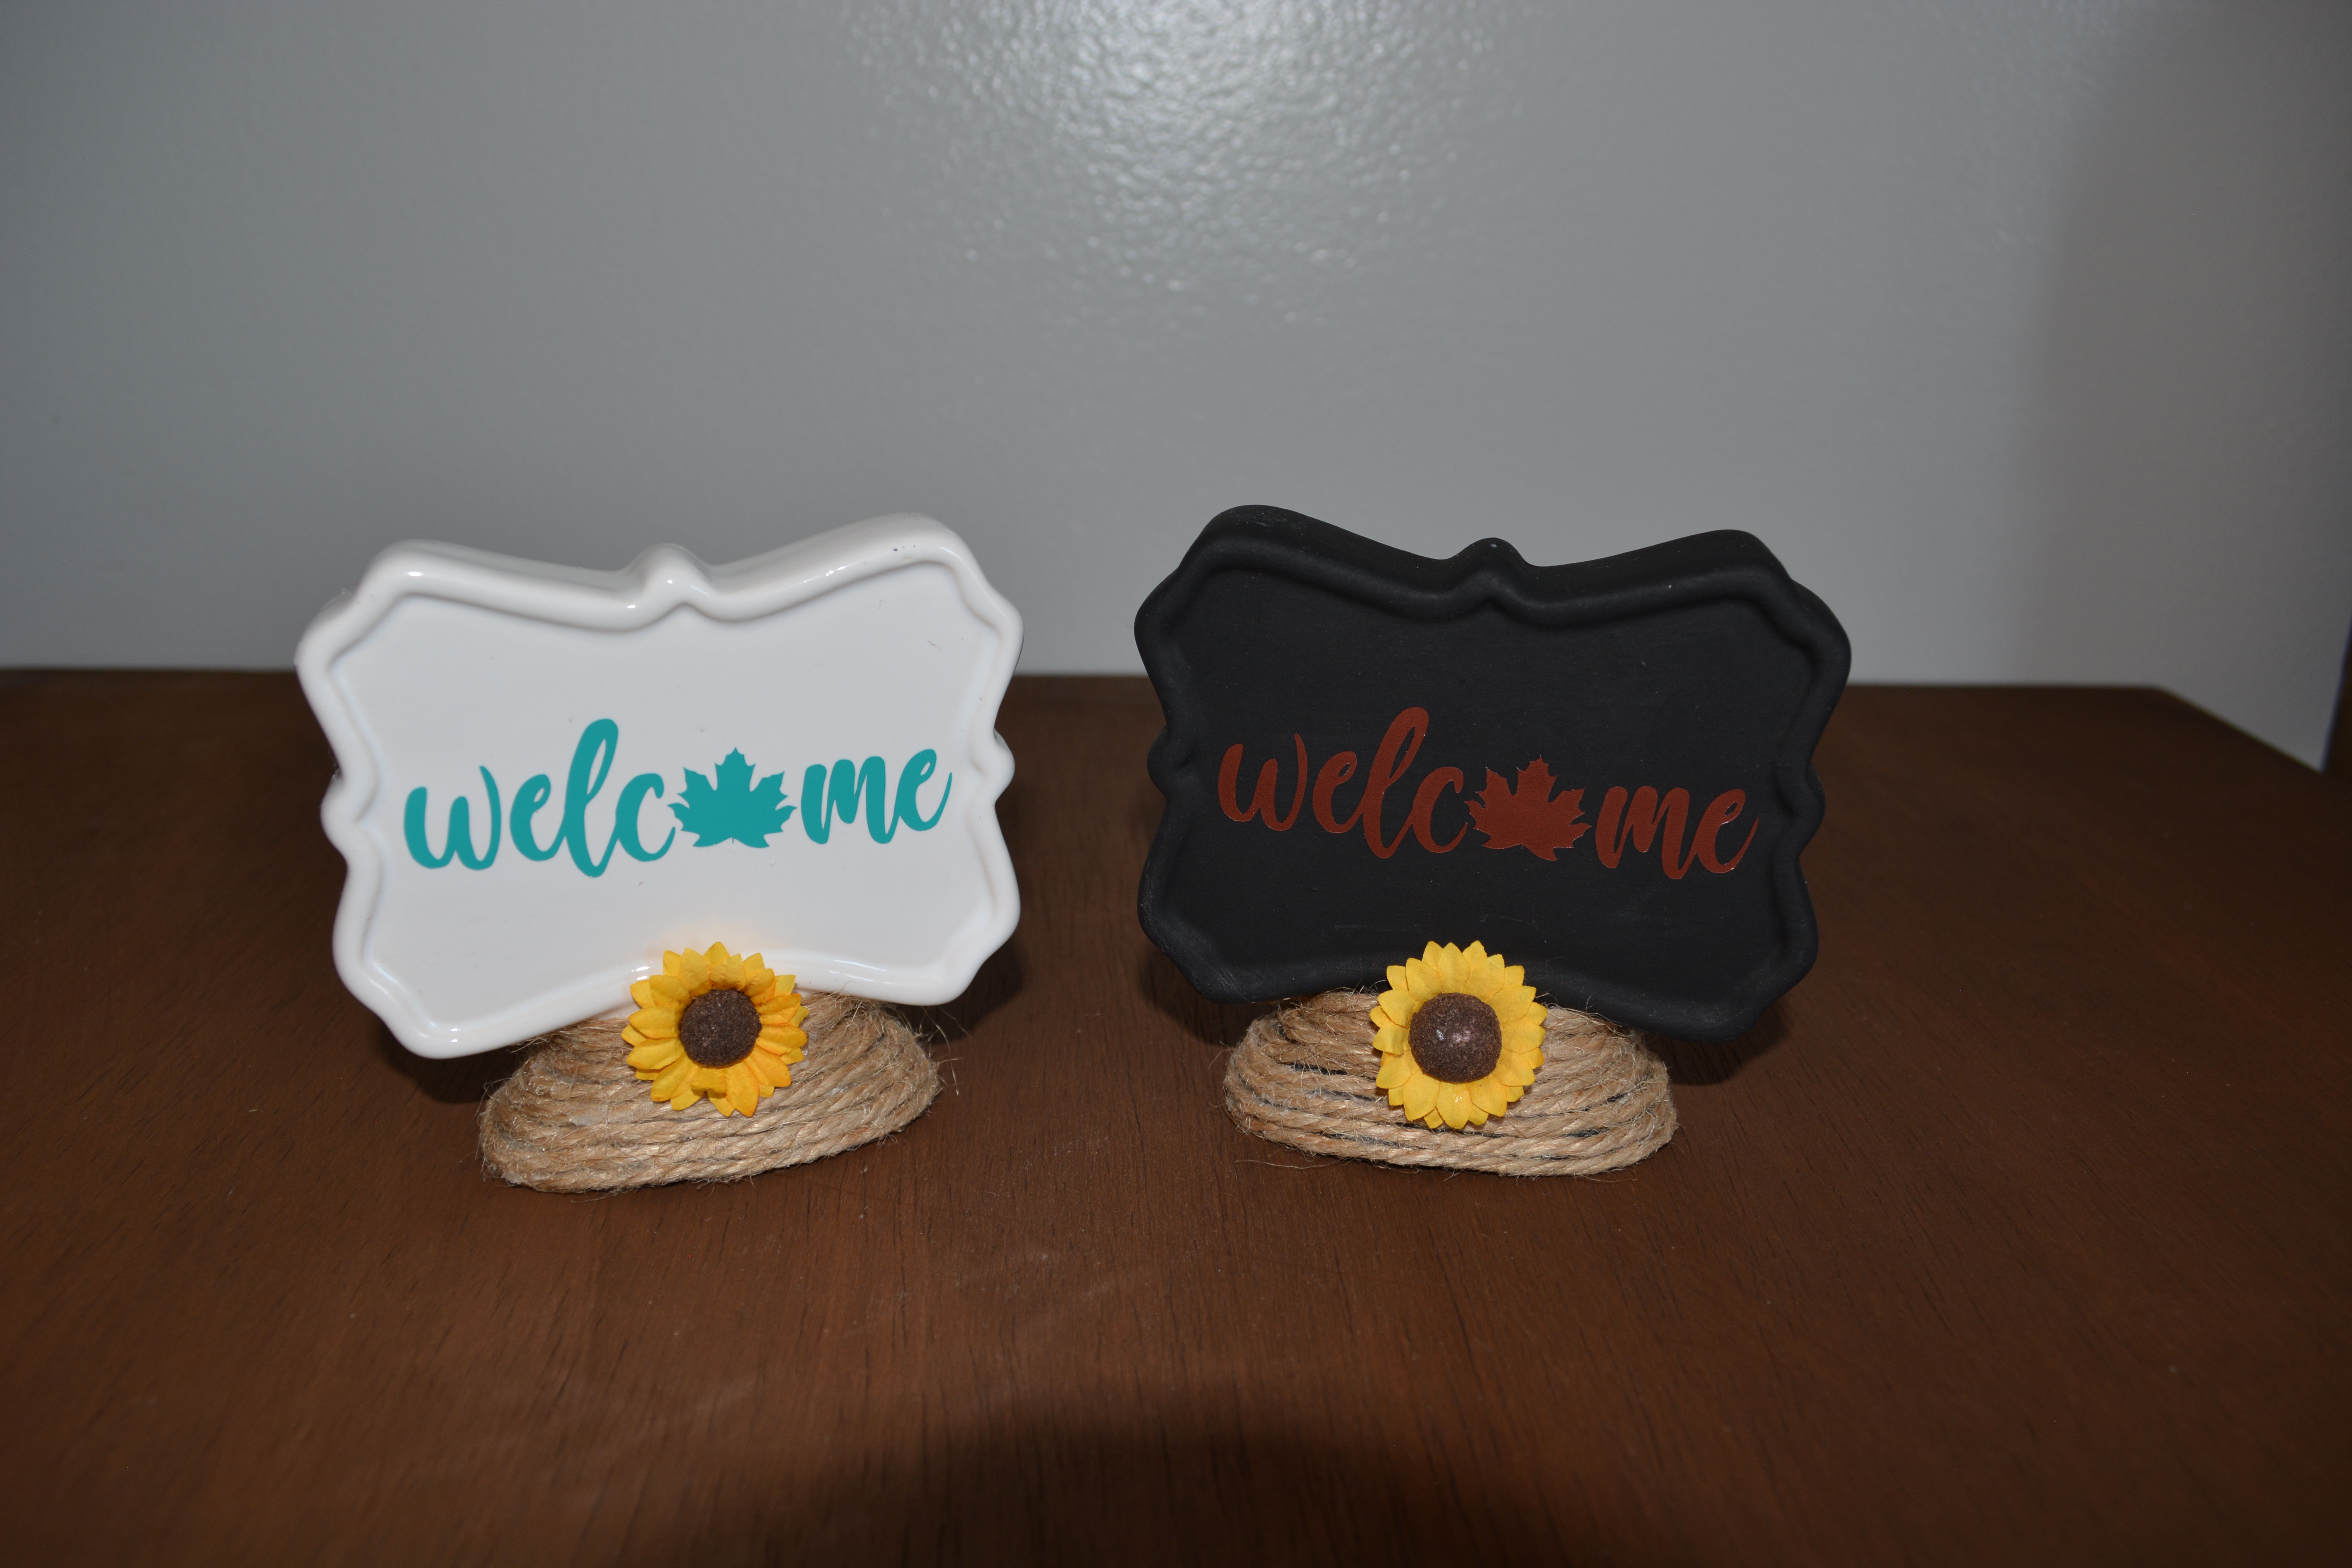
Project #2 is just as easy as the first! You will need one of these wooden pumpkins from Dollar Tree. The words are from Target. The paint I used was Waverly Chalk Paint in Ink and Pumpkin. The only other things I used was a paint brush and some ribbon.
Start by painting the front and the back of the sign in Waverly Chalk Paint in Pumpkin. Once that is dry, paint the face that is raised up on the pumpkin with Waverly Chalk Paint in Ink. If you could not find the pumpkin with the face already on it, then draw one on with a Sharpie marker or cut out paper or felt and glue it on the pumpkin.
On the other side I places these vinyl stickers on it from Target. I thought the pumpkin still looked a bit plan so I added a bow.
How easy was that!? This is a very simple wall hanger that adds some color to a room. It is also very easy to store away once the holidays are done.
Project #3
Supplies
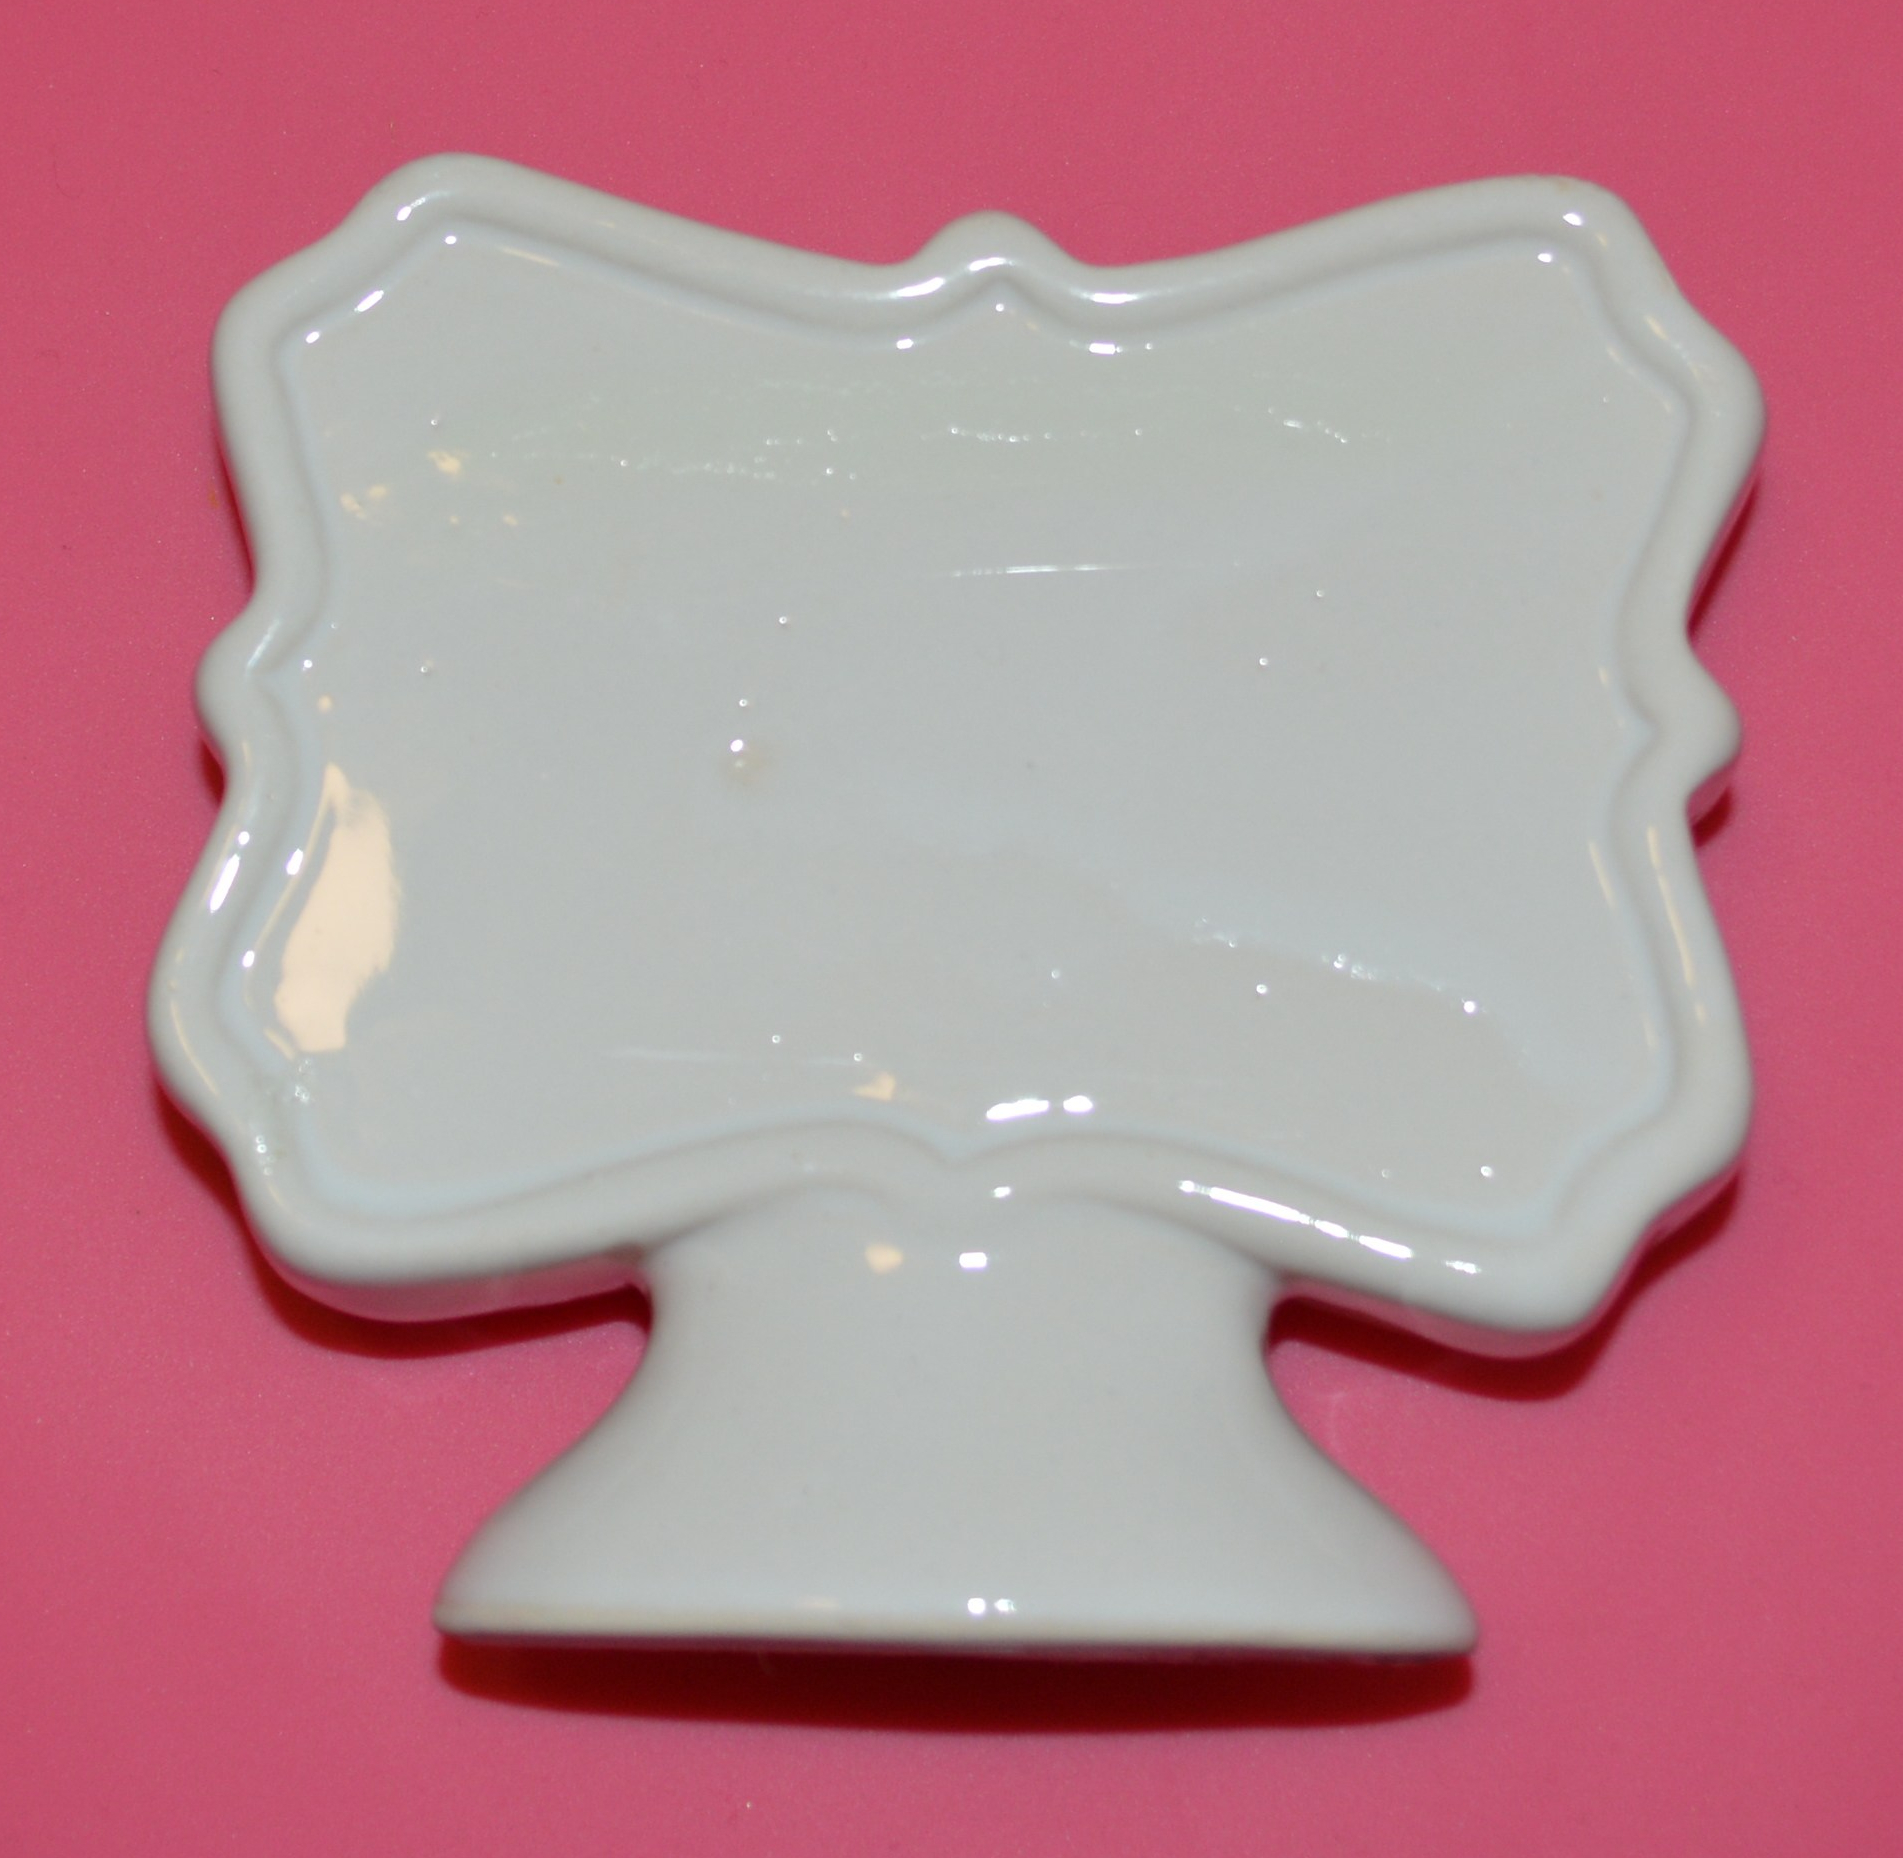
This third project uses these little stands from Dollar Tree. They are in the wedding section. I also used some Waverly Chalk Paint in Ink, some flowers from Dollar Tree, a ghost sticker from Dollar Tree, some twine, paint brush, and hot glue gun. To add words to this project, I used my Cricut and some 651 vinyl.
To start this project I painted one of the stands with Waverly Chalk Paint in Ink. This took a few coats because the stands are very glossy. I really like the more matte look and wish I would have painted the white one with white paint.
Next I added the words to the stands. I used 651 vinyl that I cut from my Cricut. Most of the time I get my SVGs off of Etsy or the Cricut design studio. If you do not have a cutting machine, you can use stickers or glue on a free printable.
Finally, I used hot glue and added twine to the bottom of the stand. I started gluing the end of the twine to the bottom of the stand. Then I began wrapping the twine around and around. I would put hot glue anywhere I felt the twine was not holding. After that I put a flower on one side of the sign and a ghost on the other.
These make me so happy. They would be so cute on an entry table. Since they are small they do not take up a ton of room. The possibilities are endless for these and you can customize them very easily.
I want to wish you a great and happy Friday. Have a wonderful weekend and come back next week for a new Tool Tuesday and we are moving into fall. Christmas crafts are coming too!!
As always Please Like, Share, Comment, and Subscribe!
Have a wonderful weekend!
Melissa McGuire
Suppies
Project #1
Wooden Pumpkin- Target
HOME and Jack-o-lantern Face- Target
Waverly Chalk Paint in Pumpkin- Walmart
Paint pen- Walmart
Liquid Glue- Anywhere
Paint Brush- Anywhere
Project #2
Wooden Pumpkin Sign- Dollar Tree
Waverly Chalk Paint in Pumpkin- Walmart
Waverly Chalk Paint in Ink- Walmart
Word Stickers- Target
Ribbon- Anywhere
Paint Brush- Anywhere
Surebonder Hot Glue Gun and Hot Glue Sticks- Hobby Lobby
Project #3
Mini Stand- Dollar Tree
Waverly Chalk Paint in Ink- Walmart
Twine- Anywhere
Flowers- Dollar Tree
Ghost- Dollar Tree
Paint Brush- Anywhere
Surebonder Hot Glue Gun and Hot Glue Sticks- Hobby Lobby
Welcome to day 4 of the 5 days of Halloween! We are almost through the week. I know for us it has been a long one.
Lets look at how we can double our decor without doubling the amount of things we have to store. I am all about saving space and getting as much out of my decor as possible. One of the best ways to do that is by having your decor preform double duty. This means that one side of you decor is one holiday and the other side is another.
This is great for people who have very little storage space in their homes or just do not want to put a lot of money into holiday decorations.
Let’s Get Started!
Project #1
Supplies
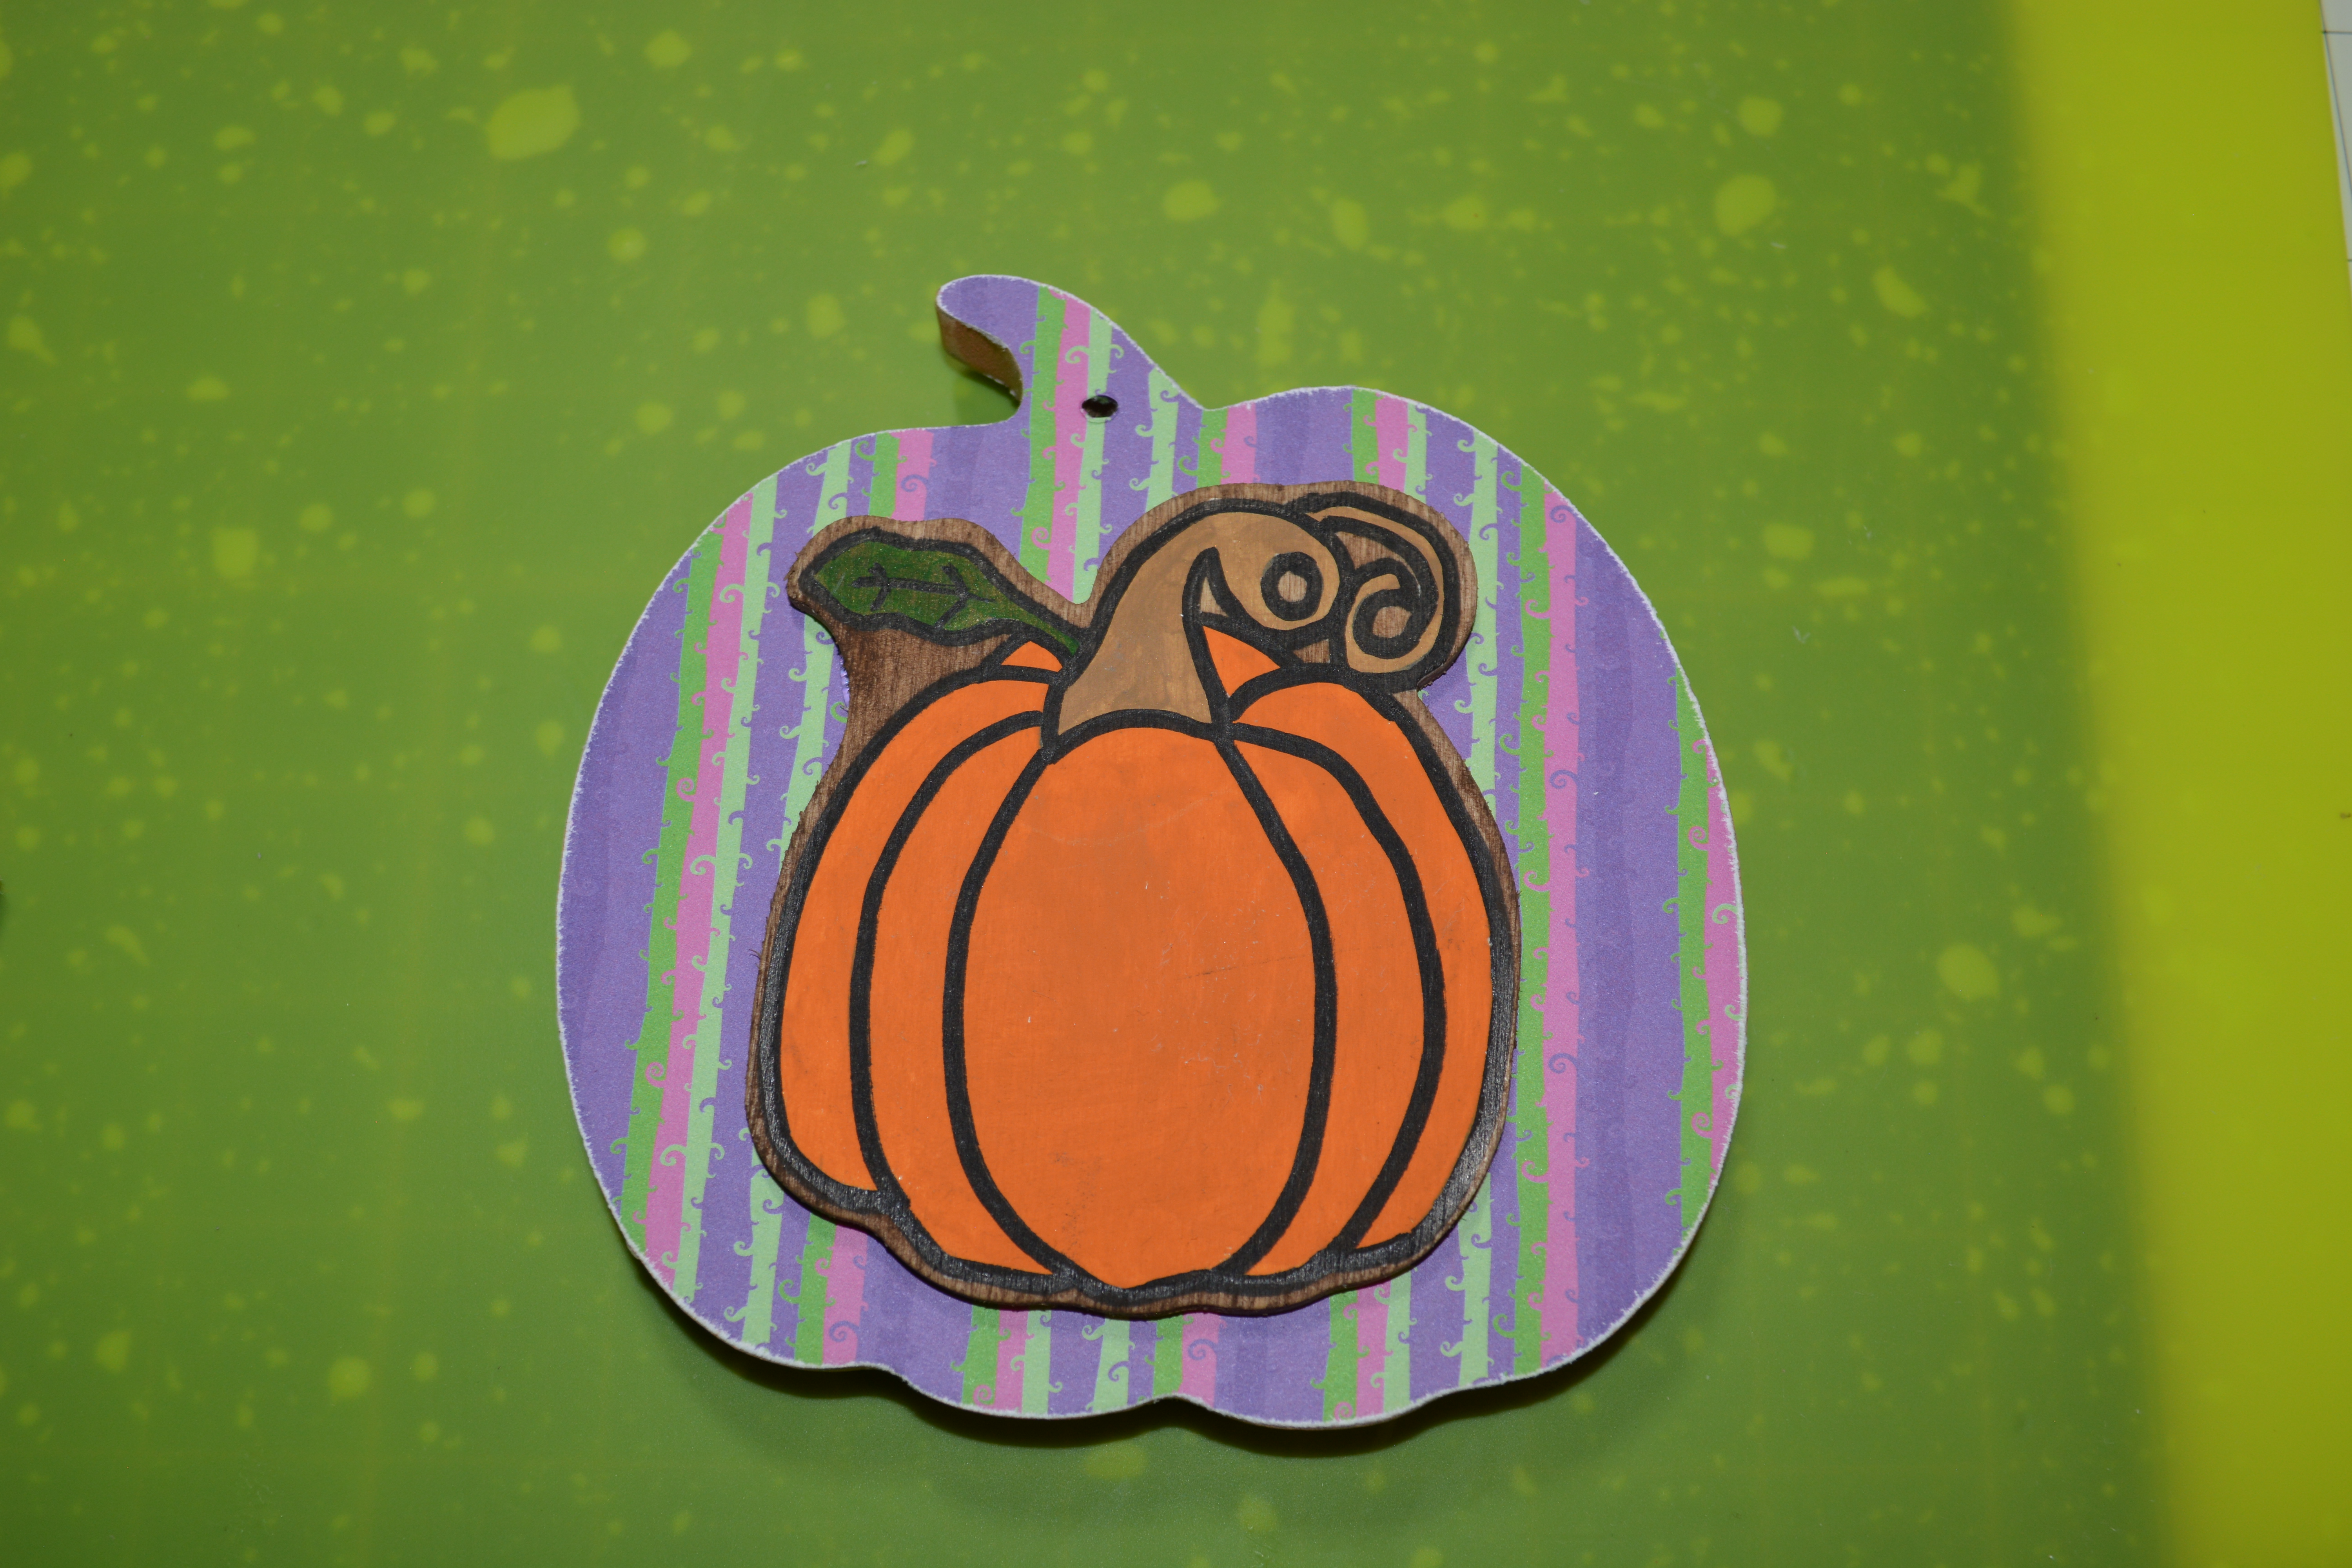
For this first project you will need some table top pumpkins. I got mine at Target. You will also need some embellishments to put on your pumpkins. I found the wooden turkey and pumpkin a few years ago at Michael’s Craft Store. You could use stickers or printables to put on the project or any other embellishments you have on hand.
Some other Supplies I used were scrapbook paper from Hobby Lobby. It is the best for your money. The goal is to get different patterns of different holiday paper. I used the wood grain paper for one side of the pumpkin and then Halloween for the other side. I also used Mod Podge, a paint brush, hot glue gun, sand paper and twine.
The first thing I did was cut my scrapbook paper down to a more manageable size. You can trace the pumpkin onto the paper and cut it out before you glue it down but I prefer to leave the paper bigger and sand off the edges later. I put a thin layer of Mod Podge down on the pumpkin and placed the paper down on top of the pumpkin making sure to smooth out the bubbles.
Once that was dry, I took my sand paper and sanded in a downward motion around the edges of the pumpkin. This will tear off the paper from the edge and give a clean and finished look. Then I did the same steps to add the paper to the other side of the pumpkins.
After that I glued on the pumpkin on one side and turkey on the other side. As for the other pumpkin, I wanted words on it. So I used my Cricut and 651 vinyl to add the words. In place of this you can use stickers, or free printables and glue them on.
Once I had the words and wood pieces on, I thought the pumpkins needed something more. My brain could not think of anything fun and creative to be honest. I knew I had to put something on them that could be seen from both sides sense these pumpkins were pulling double duty. It seems twine is always the answer. I put some hot glue at the base of the stem of the pumpkin and started wrapping the twine around the stem of the pumpkin. I did this all the way up until the stem was covered. This is something that added some texture to the pumpkin and also would look great no matter what side of the pumpkin was visible.
Here is a look at how they turned out. One side is done up for Halloween and the other side is done up for Thanksgiving. You only have two pumpkins to store away after the holidays and they are pulling double duty while they are out!
Project #2
Supplies
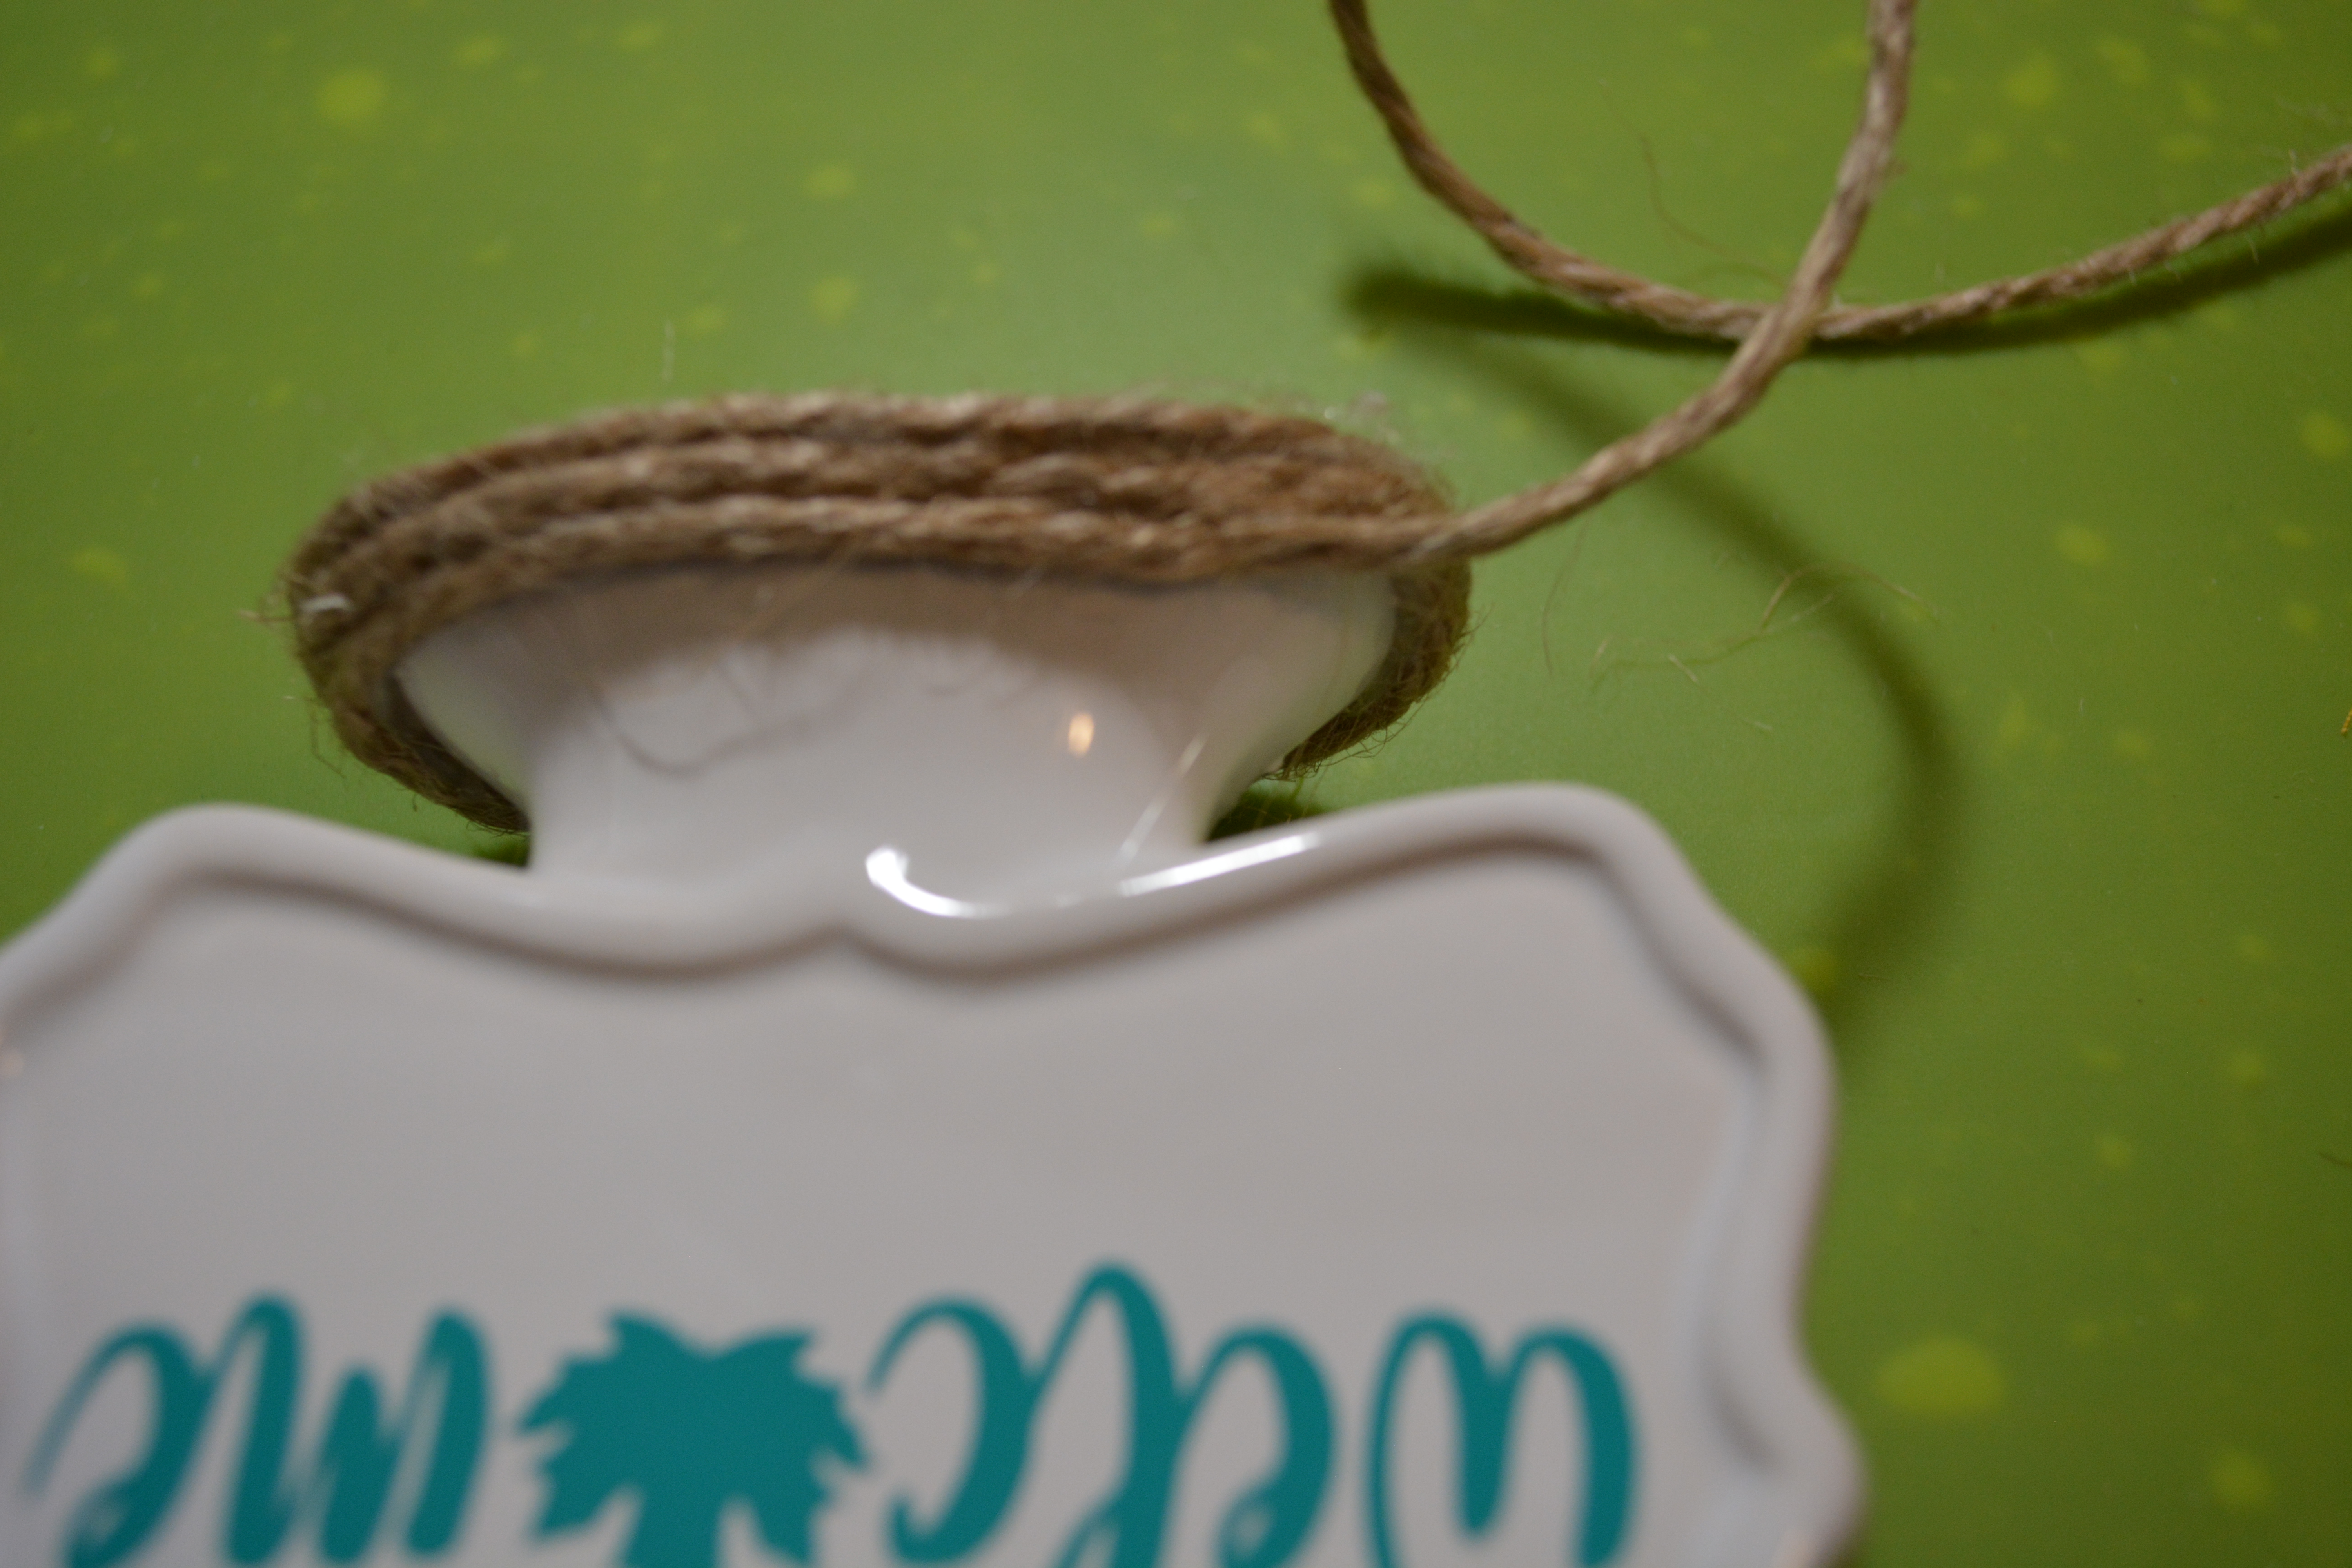
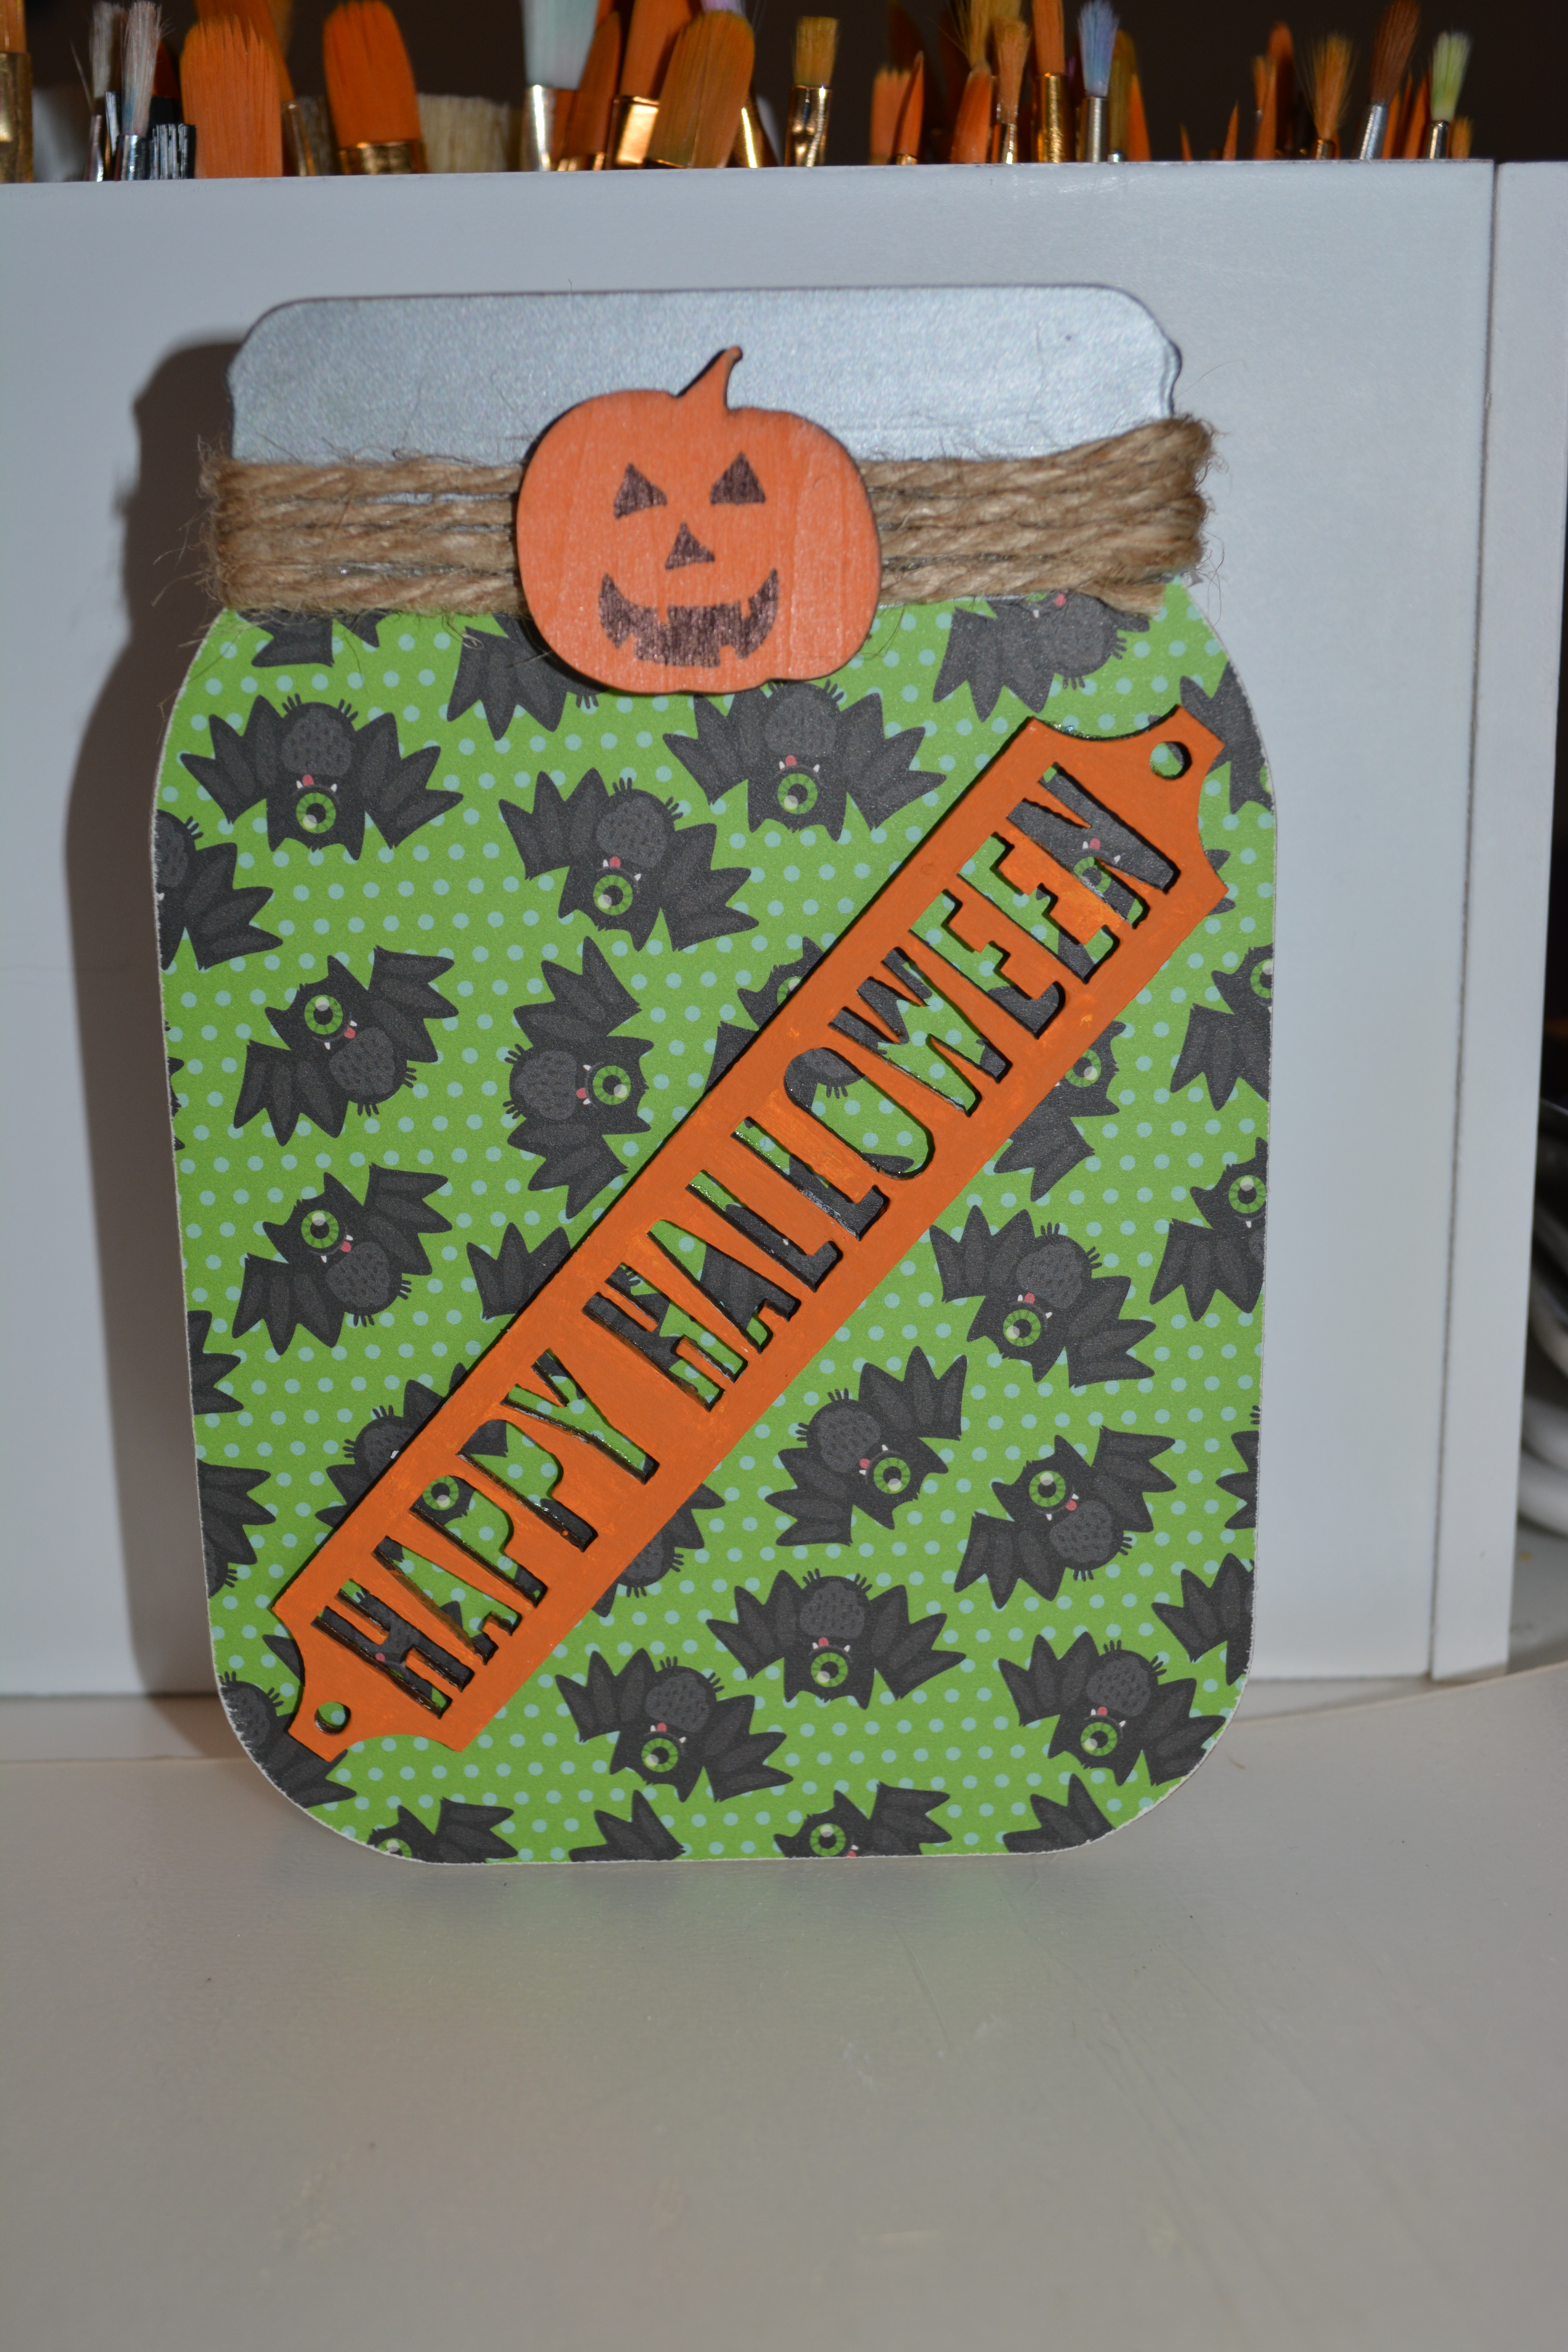
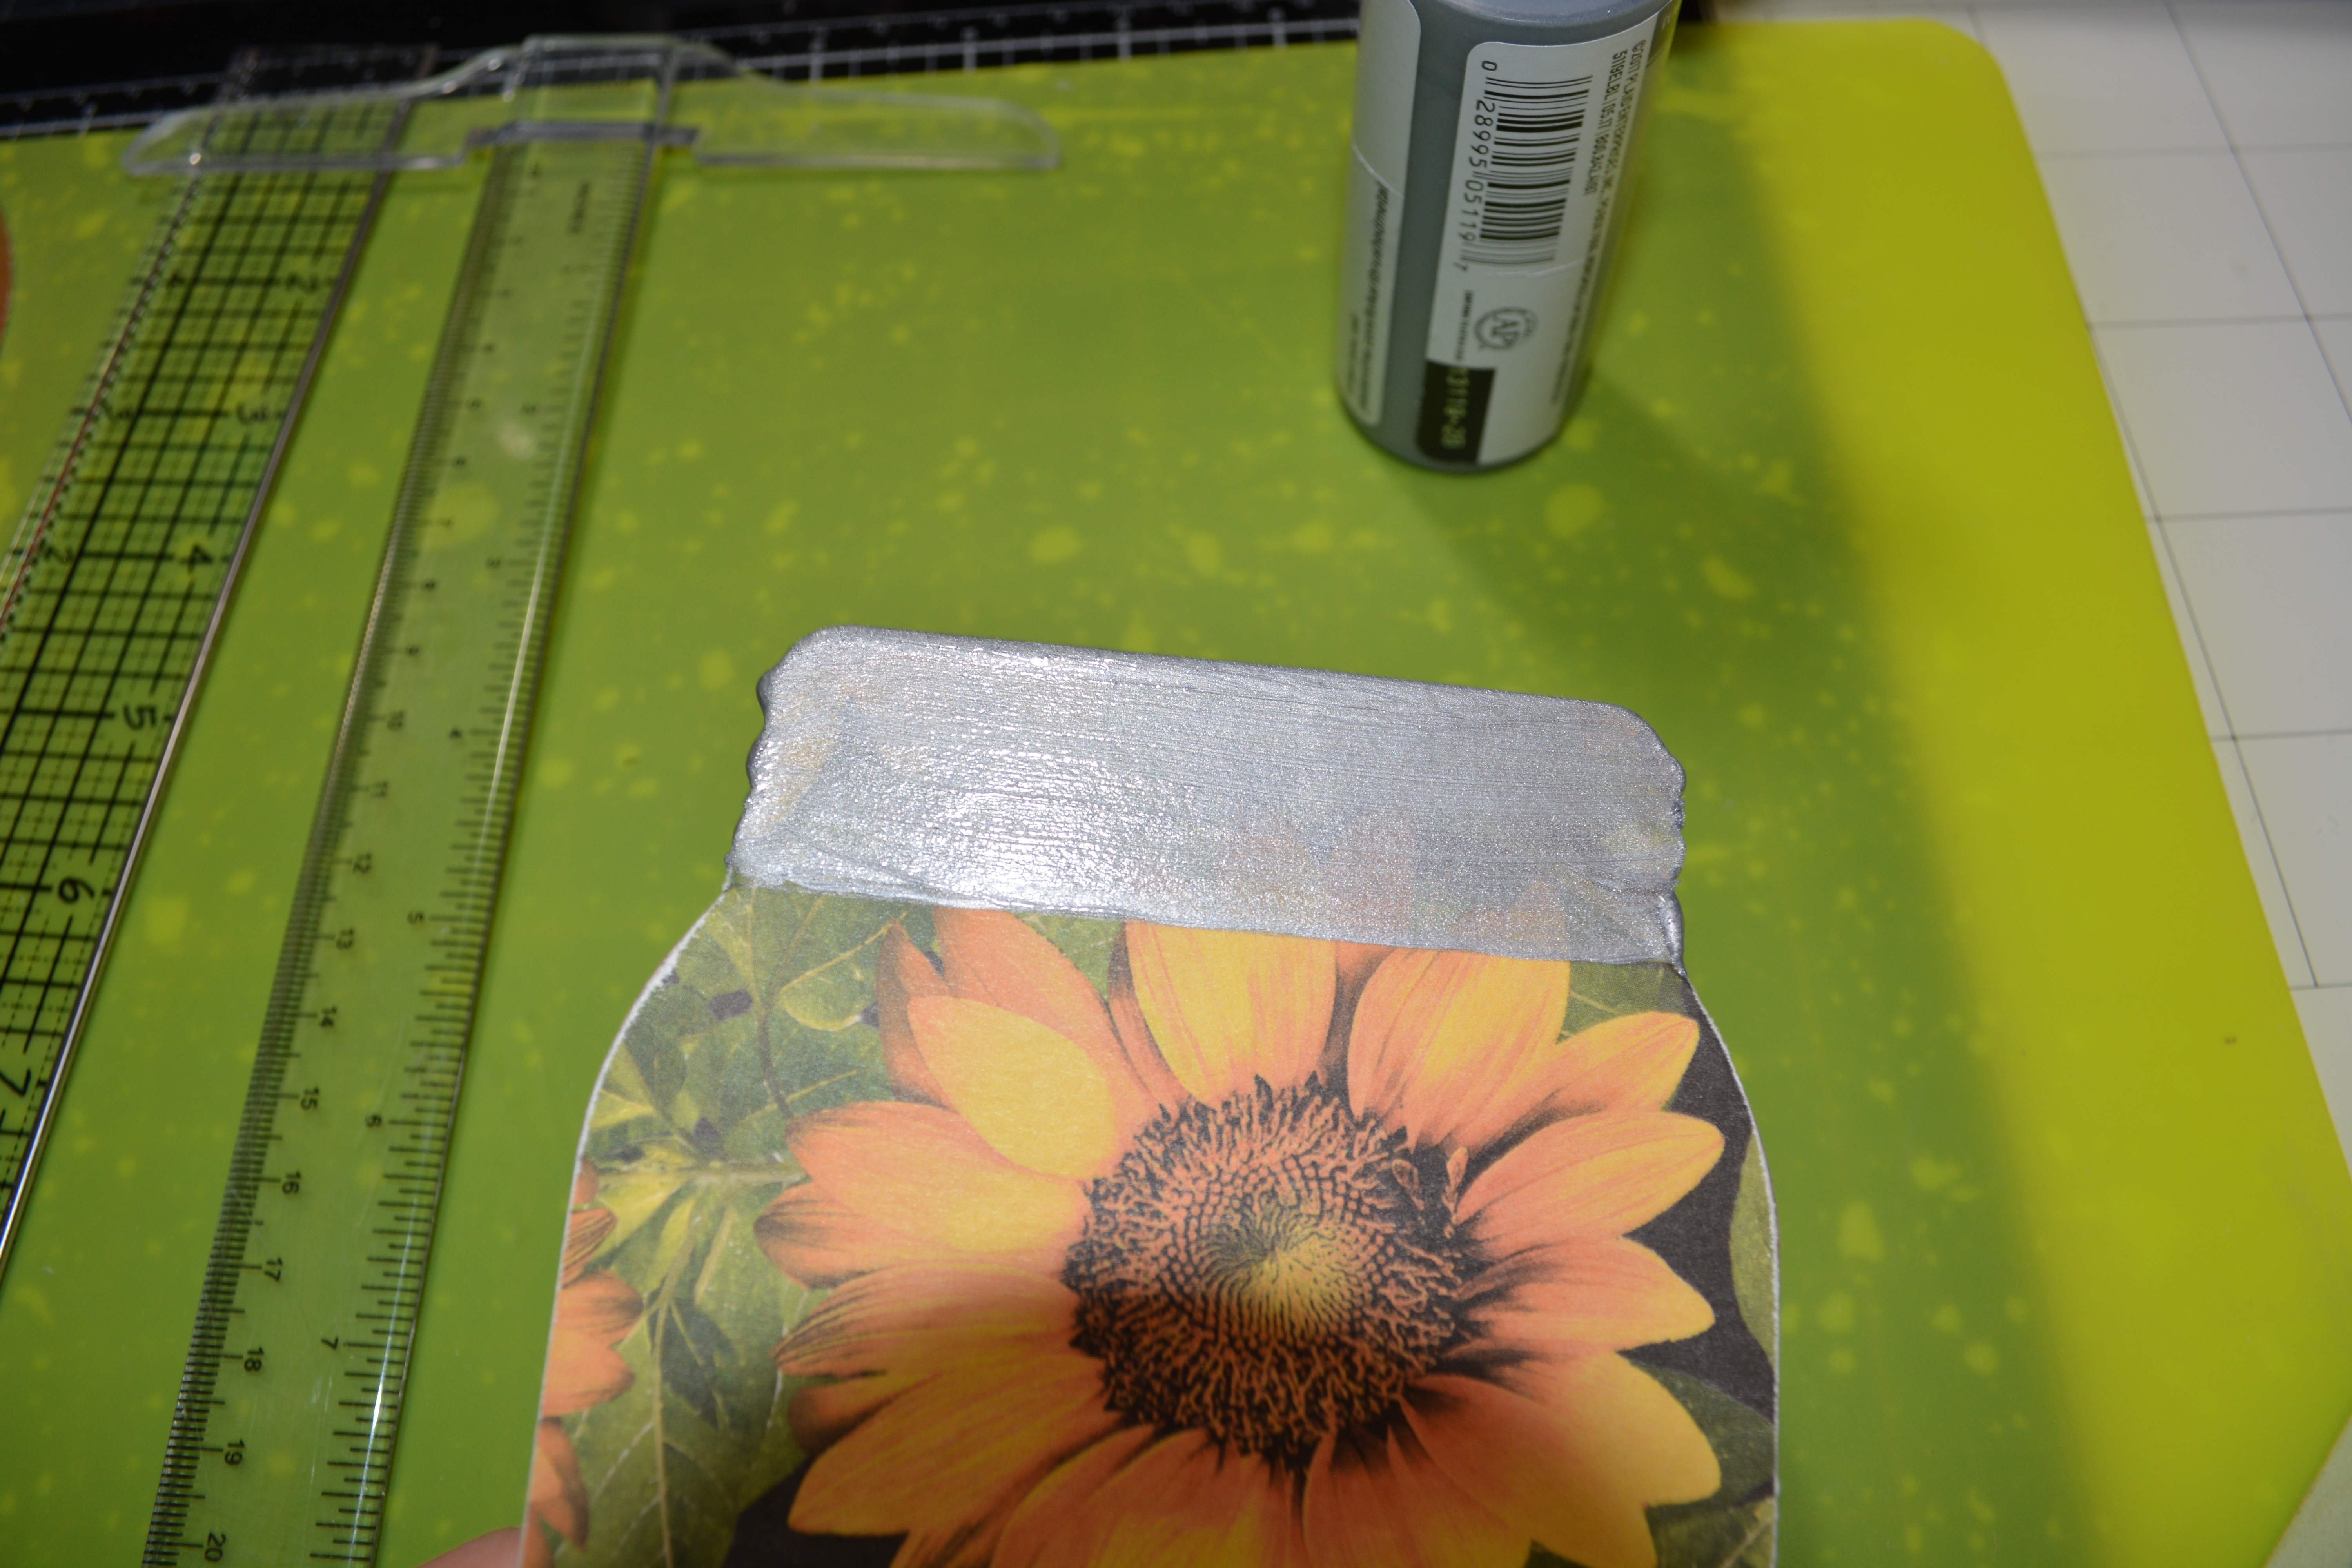
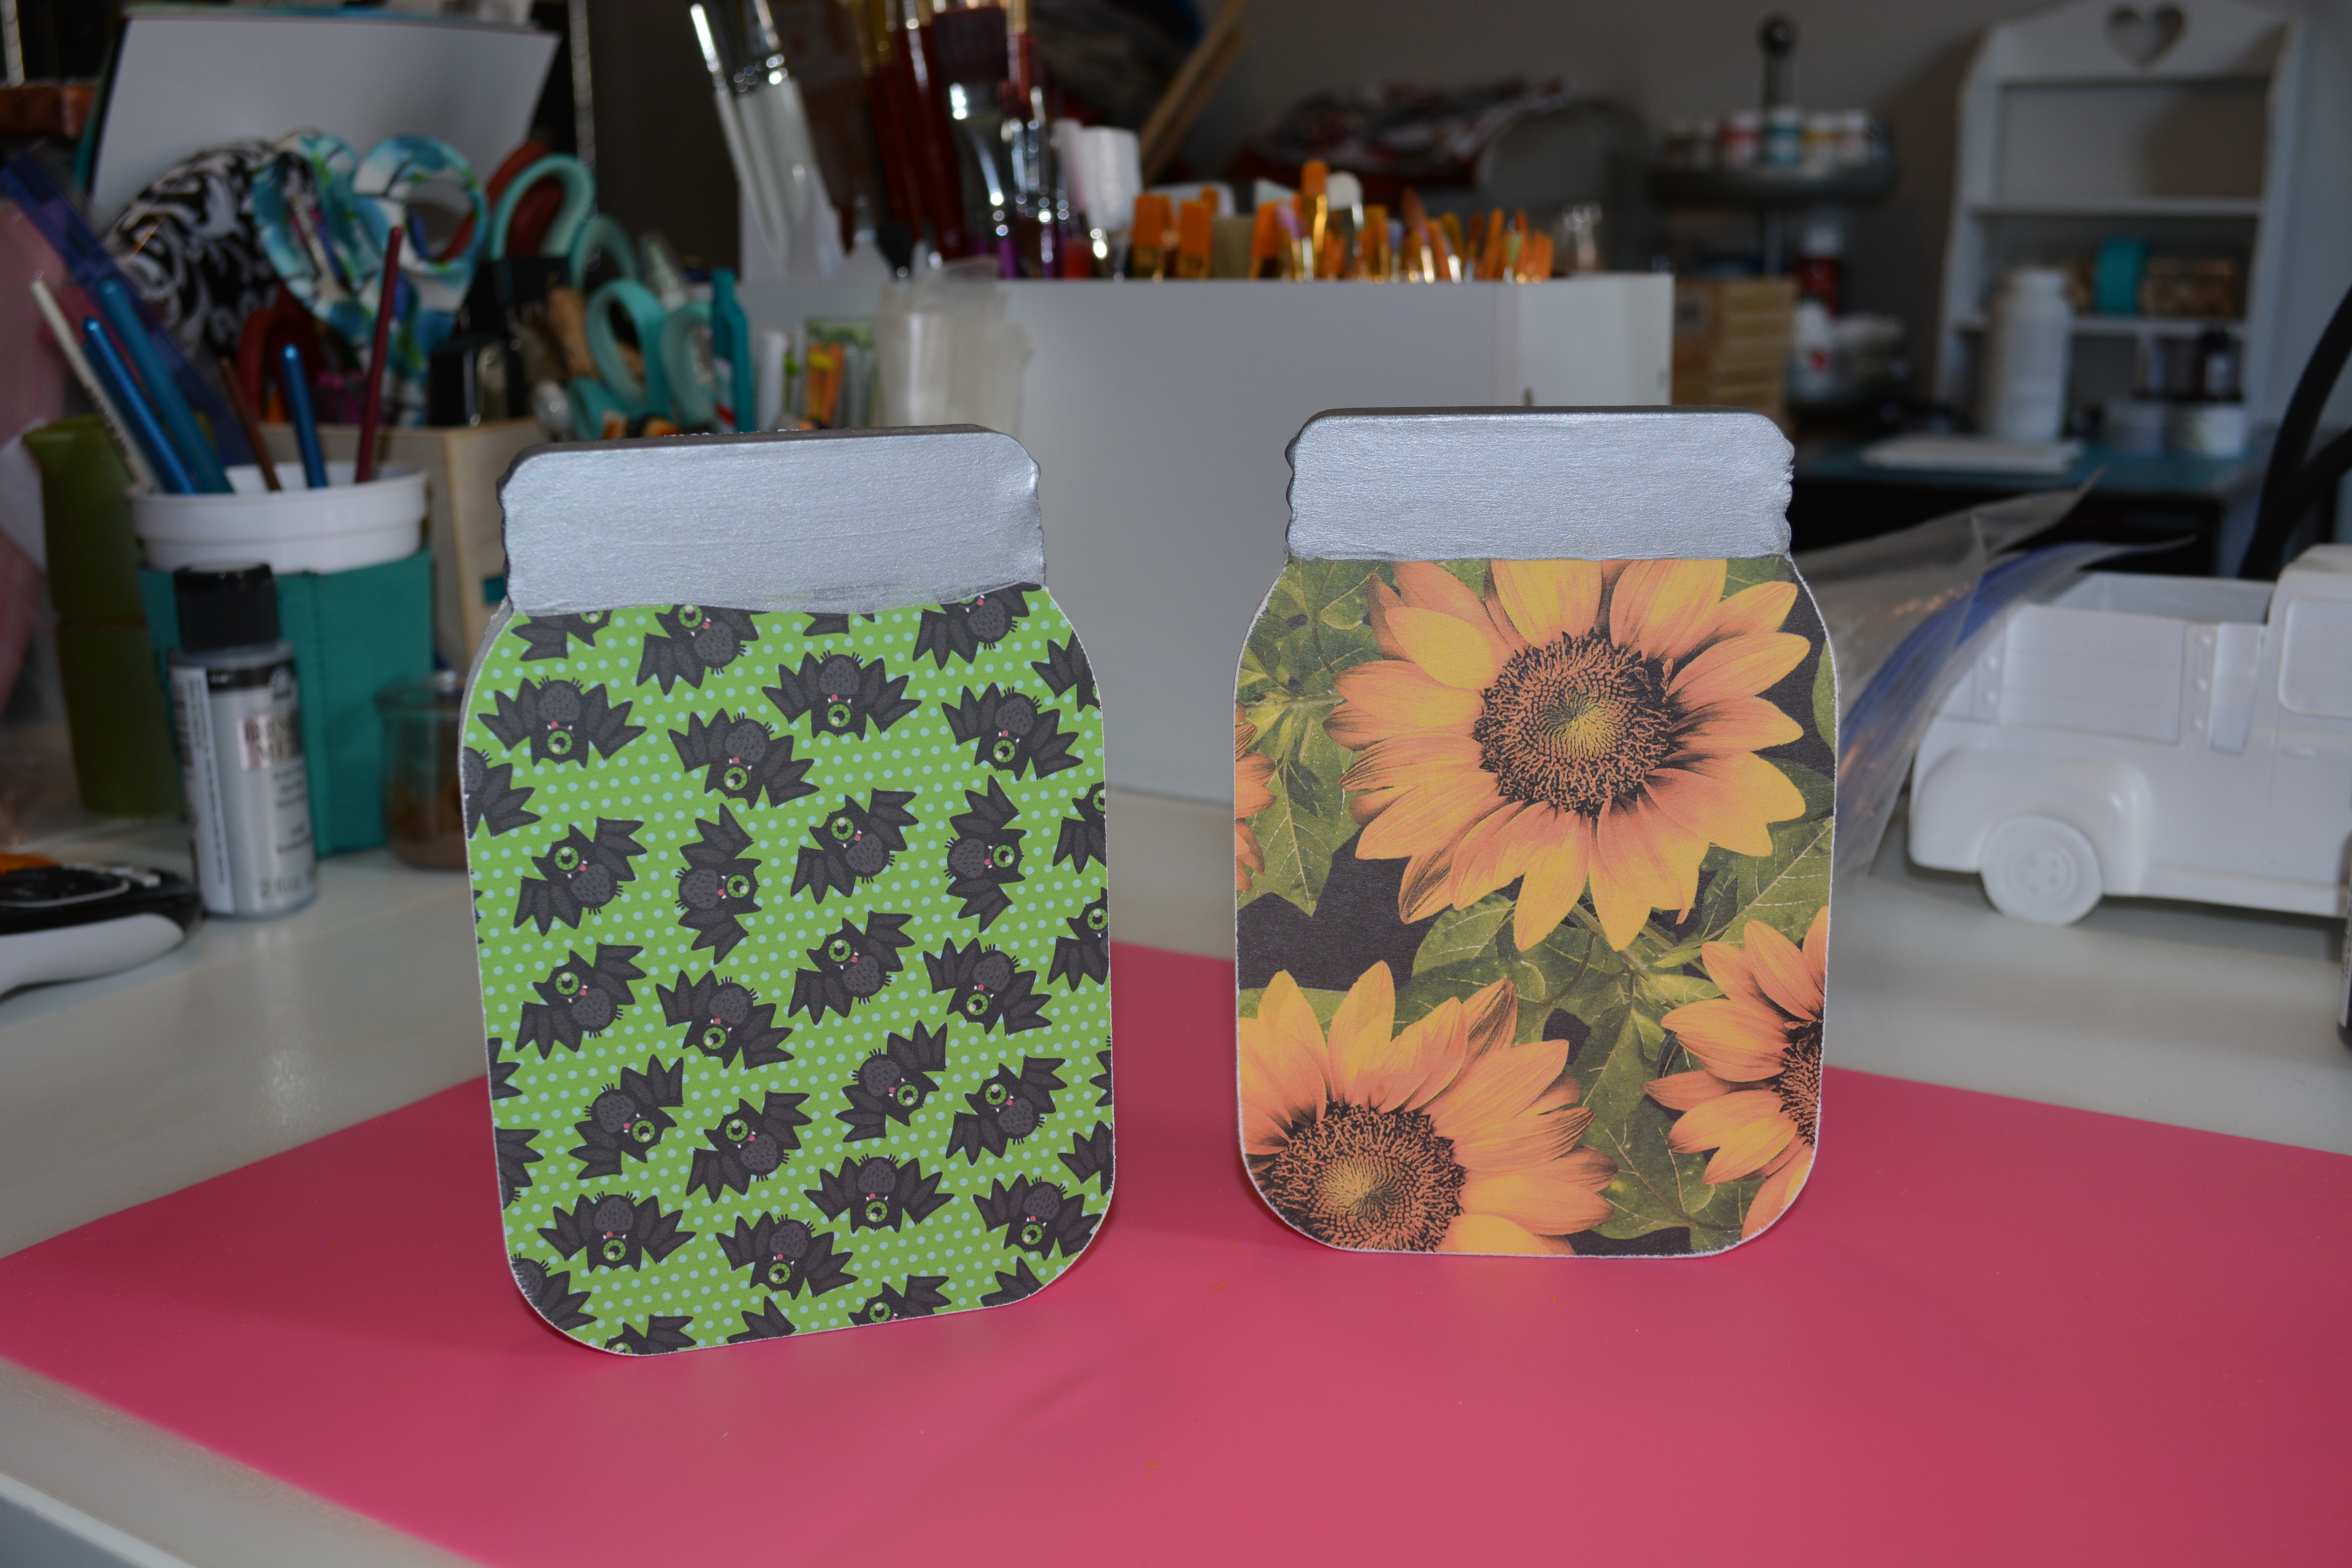
It might look like there is a lot to this next project but really it is the same steps as the last one. I used wooden mason jars I had on hand from last year from Dollar Tree. This goes to show you that you can use any kind of wooden base that you want. From there you need embellishments if you want them. I also used some silver paint, hot glue, scrapbook paper for different holidays, flowers, sand paper, Mod Podge.
The first thing I did with these wooden mason jars is to gently pull off the twine from the top and sand off the glitter. Sometimes with Dollar Tree stuff you can peal the paper off of the product to get the glitter off , but most of the time it is not that easy. Another way to get the glitter off that I just learned about is to spray Goo Gone on it and let it sit for a minute or two and scrape it off with a scraper. Then wipe it down with a damp paper towel or baby wipe. It works well without of the sanding mess.
Next I cut the scrapbook paper down to size. Then I painted a thin layer of Mod Podge on the the mason jars and places the scrapbook paper down top making sure to smooth out the bubbles. I let it dry then sanded the edges in a downward motion to get the extra paper off.
At this point, I did not like the top of the mason jars. It was covered in the paper and did not look like a lid. So I took some metallic silver acrylic paint and did three coats of paint on the top part of the jar so it would look like a silver lid.
Now it’s time for embellishments. For the fall jars I used pumpkins and wooden wards from Target. If I did not like the color, I used what ever paints I had on hand to paint them. Paint pens work well for this. I did the same with the with the Christmas jar. Hobby Lobby had these cute Christmas wooded pieces. I colored the little Santa and then added some cardstock and Merry Christmas with my Cricut and vinyl. Glue things on as you see fit. For these projects you are only limited by your creativity.
I added the twine back to the top of the mason jars and put twine bows on top of the twine. The other embellishment I added was the tops of flowers that I got from Dollar Tree.
Here are the finished jars. Each side of these jars are for a different holiday. Like I said before these cut down on storage and gives lots of options for any holiday or season. The paper and embellishments for this are endless. This can even been done for everyday decor.
I do hope this finds you all in good health. Please stay safe.
Thank you for joining me. Please Like, Share, Comment, and Subscribe!!
Have a wonderful Thursday!
Melissa McGuire
Supplies
Project #1
Wooden Pumpkins- Target
Scrapbook paper that are Different Patterns- Hobby Lobby
Mod Podge- Anywhere
Wooden Pieces- Michael’s Craft Store
Twine- Hobby Lobby
Cricut- Michael’s Craft Store
651 Vinyl- Michael’s Craft Store
Surebonder Hot Glue Gun and Glue Sticks- Hobby Lobby
Project #2
Mason Jars- Dollar Tree
Flowers- Dollar Tree
Wooden Pieces- Target
Silver Metallic Acrylic Paint- Walmart
Mod Podge- Anywhere
Scrapbook paper that are Different Patterns- Hobby Lobby
Twine- Hobby Lobby
Cricut- Michael’s Craft Store
651 Vinyl- Michael’s Craft Store
Surebonder Hot Glue Gun and Glue Sticks- Hobby Lobby
Welcome to day 3 of the 5 days of Halloween! We are going to keep this light and easy today. I know these days people do not have a lot of time to create and decorate. People still want their homes to look nice and like they put in a ton of effort. There are a few things that can help with that. One is small block decor and the other is flower arrangements. That is where these projects came from. These are easy, cheap and can really make a statement in your home.
Let’s Get Started!
Project #1
Supplies
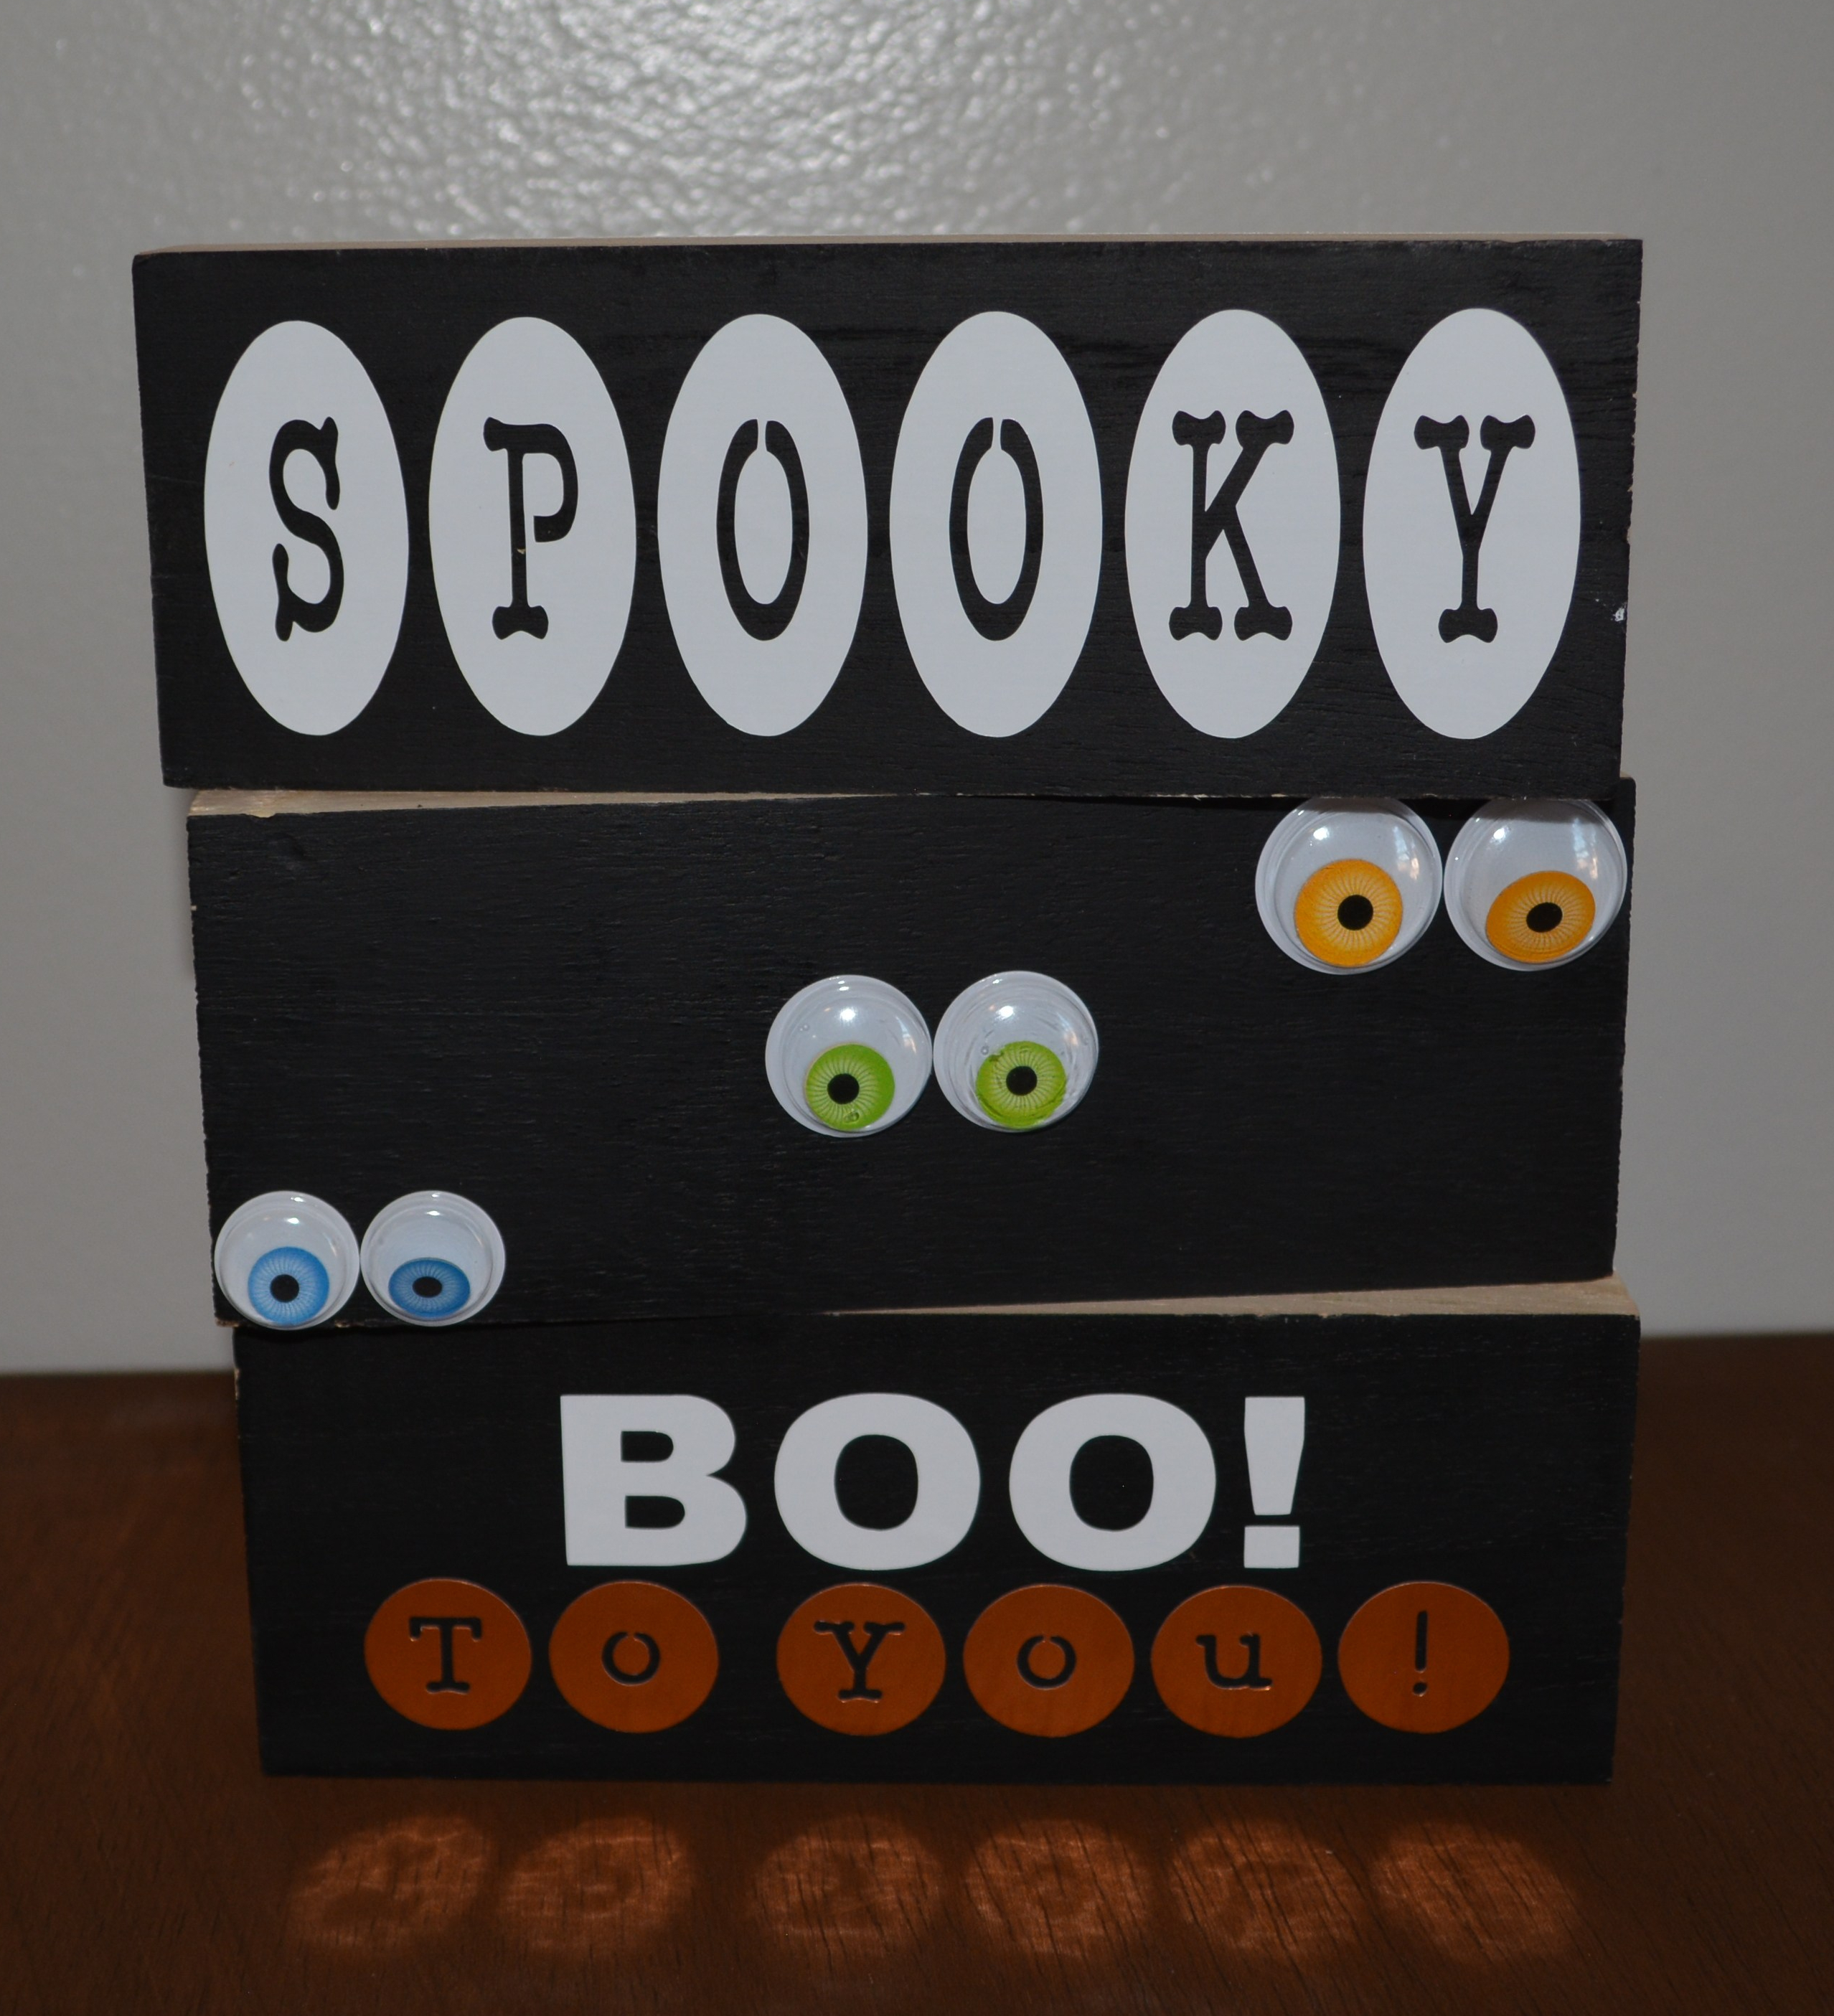
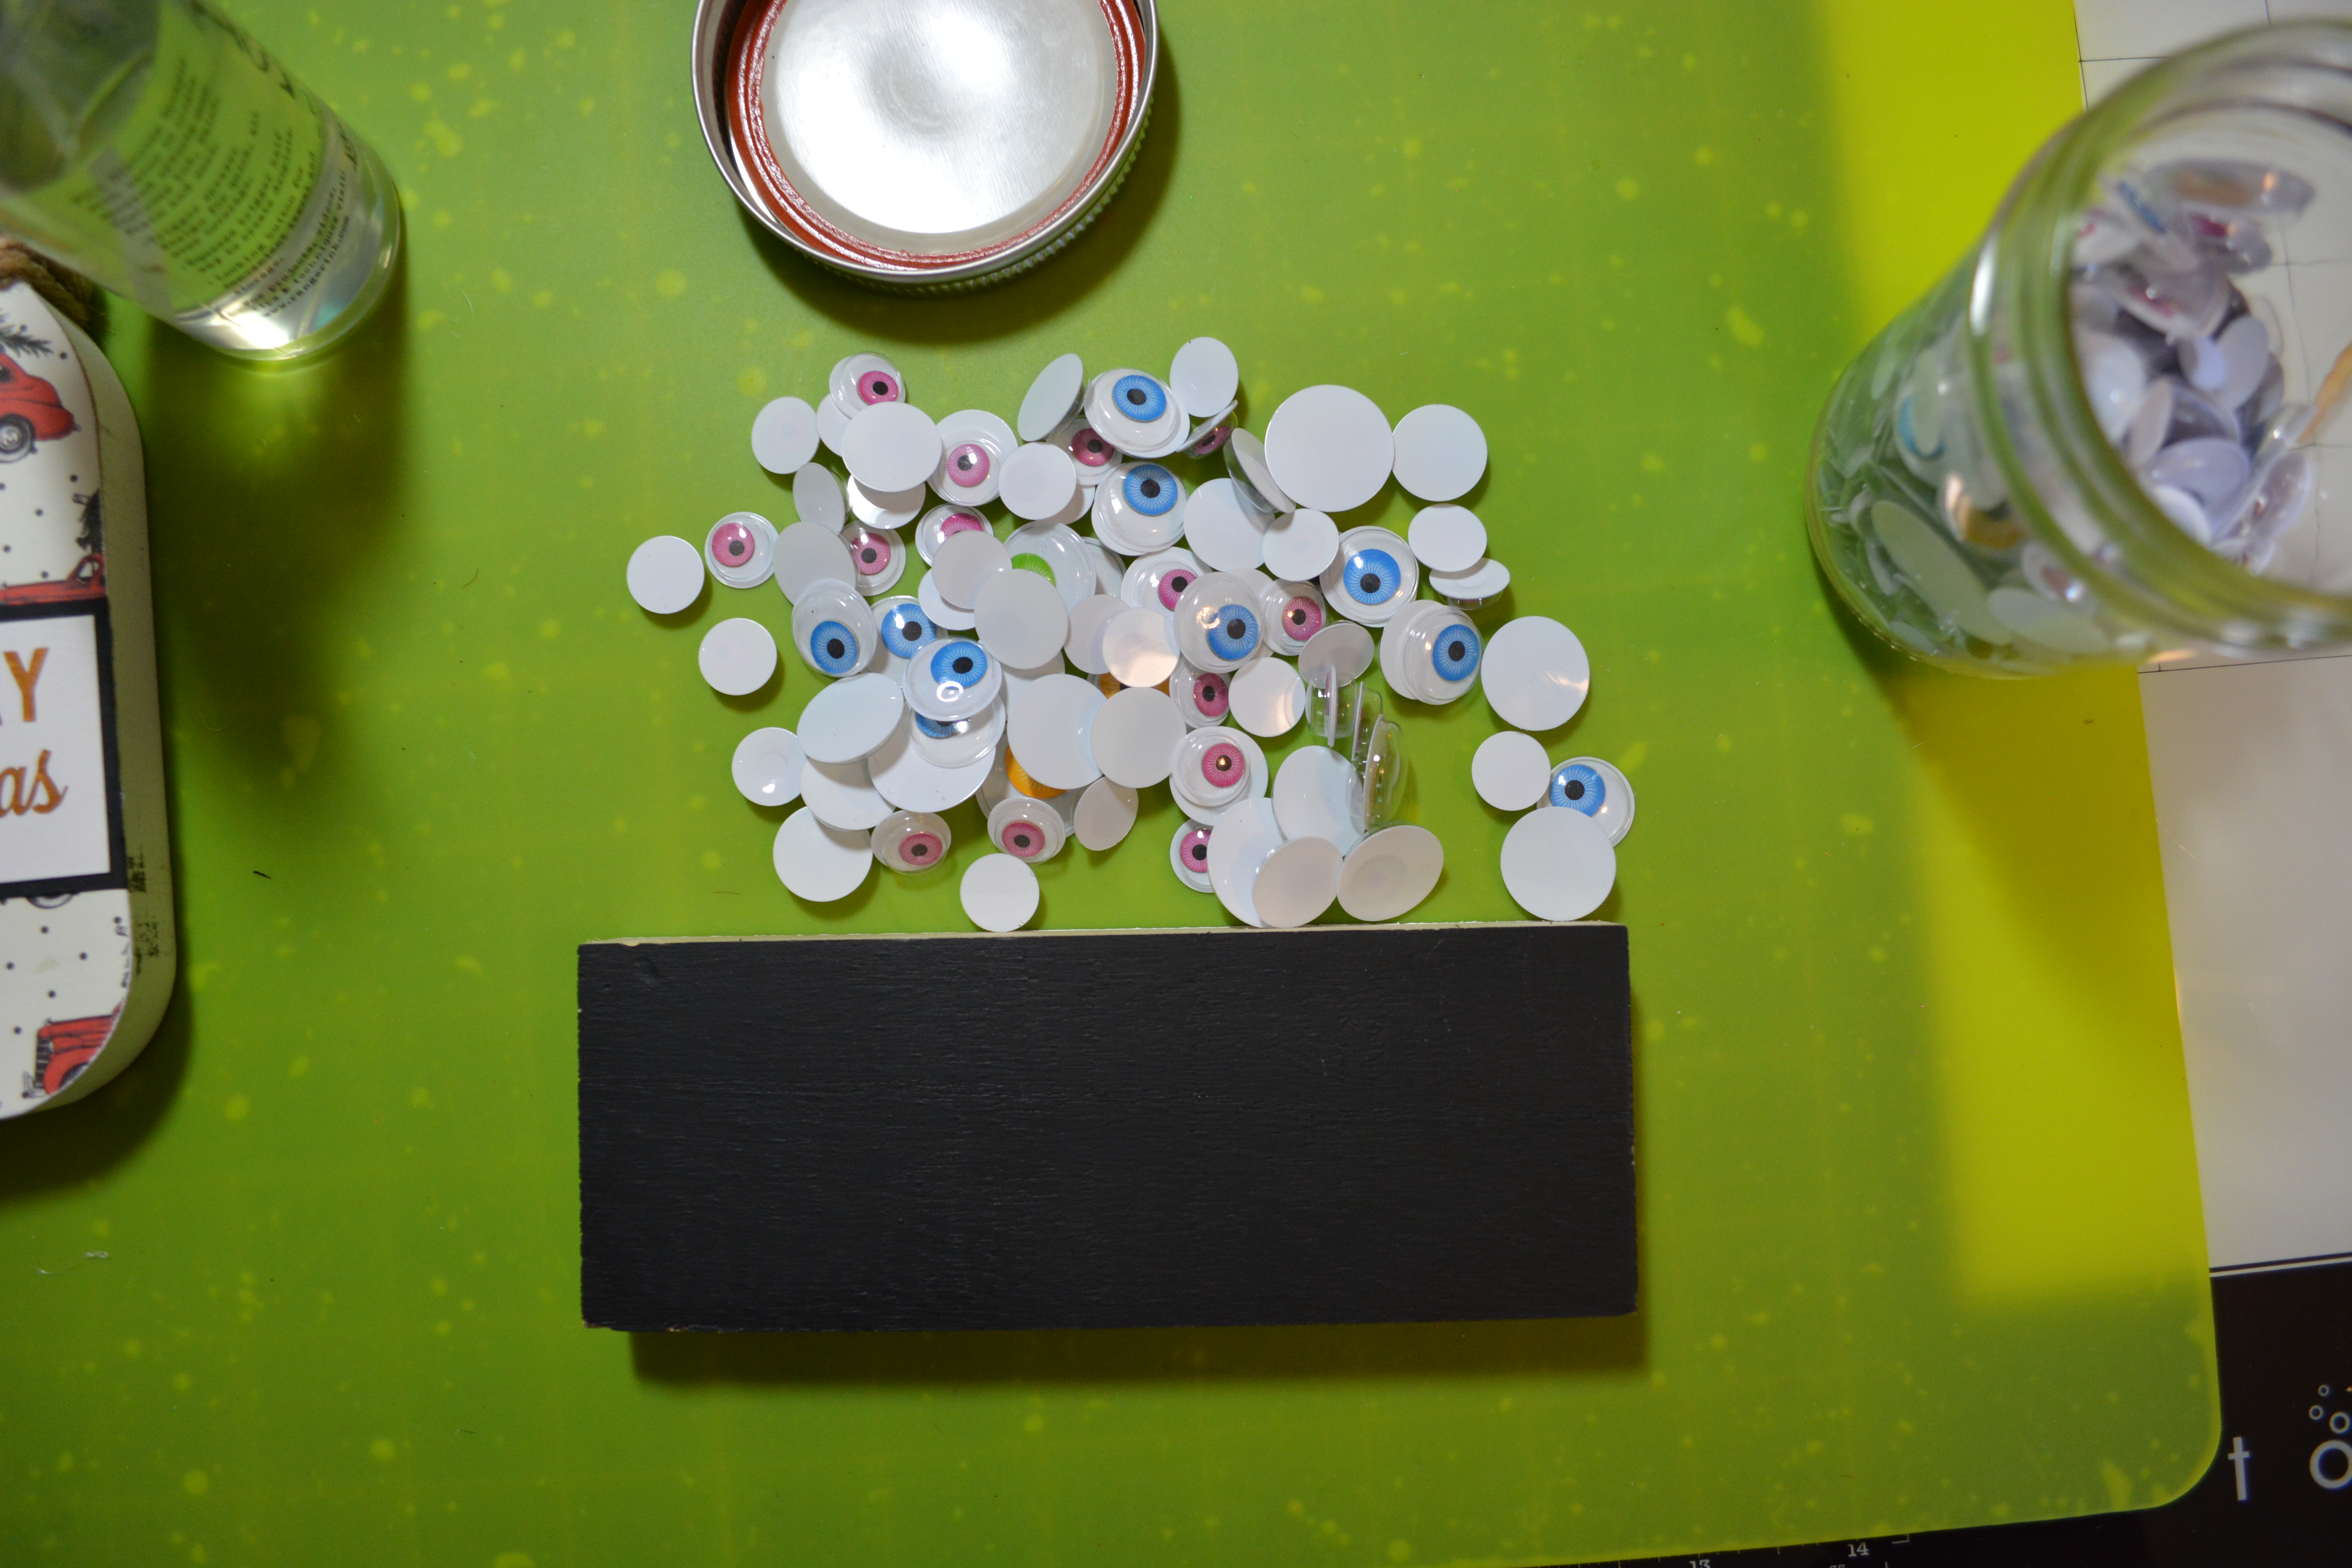
For this first project you will need some wooden blocks. I bought these on clearance after Christmas last year at Target. You can get what ever size blocks you want. These are 2×6. I also used googly eyes. As far as the writing on the blocks, I used my Cricut and some 651 vinyl. If you do not have a Cricut you can buy stickers or even print out words from your computer and glue them onto the block. You can even write on the blocks in your own handwriting!
I also used a paint brush and hot glue gun.
The back of these blocks were already black and just had a sticker on the back. I heated up the stickers and pealed them off. Then left the black alone. I did paint the front of the blocks with Waverly White Chalk Paint. Use what ever colors you want. Let that dry.
Next I typed and cut out the phrases on my Cricut and applied them to two of the blocks. This is where you can write on the blocks, glue on things you print out or use stickers. For the third block, I hot glued googly eyes onto it.
This blocks are simple and so cute. They would go great in a 3-tiered tray or on any small table scape. If you got bigger blocks the possibilities are endless.
Project #2
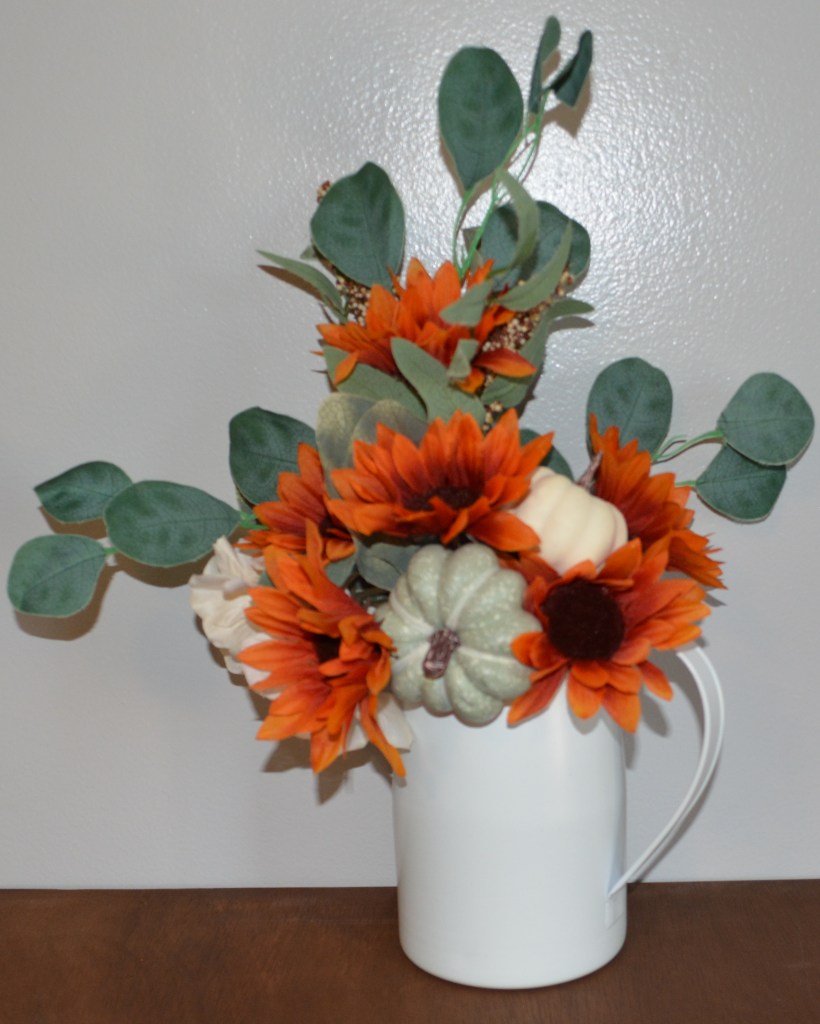
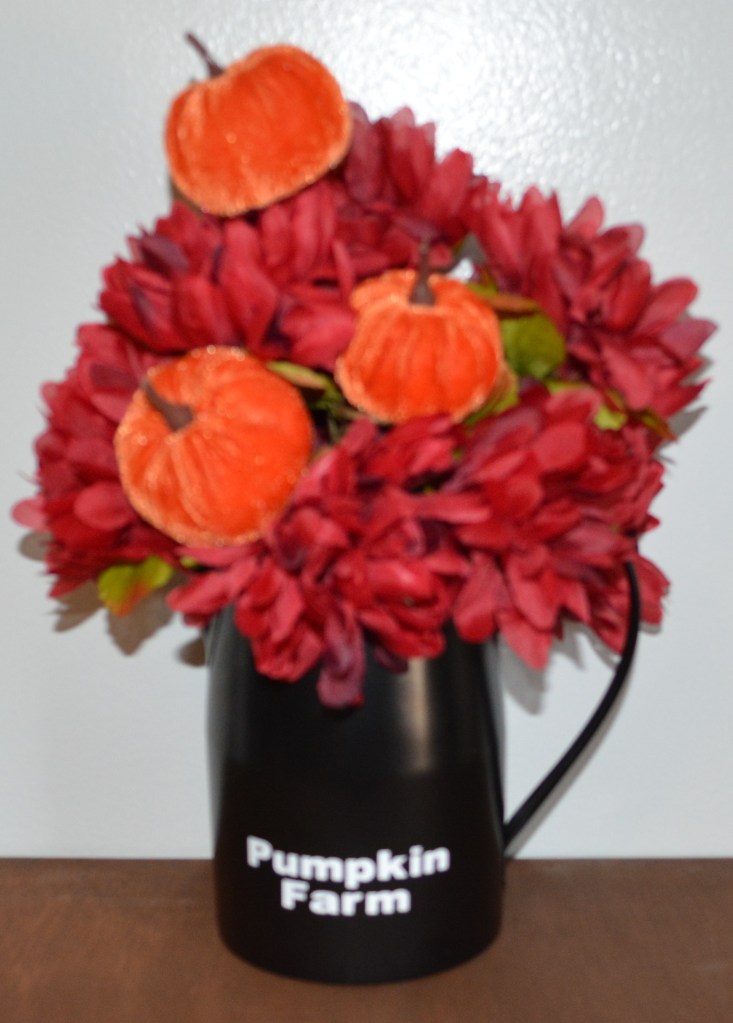
Supplies
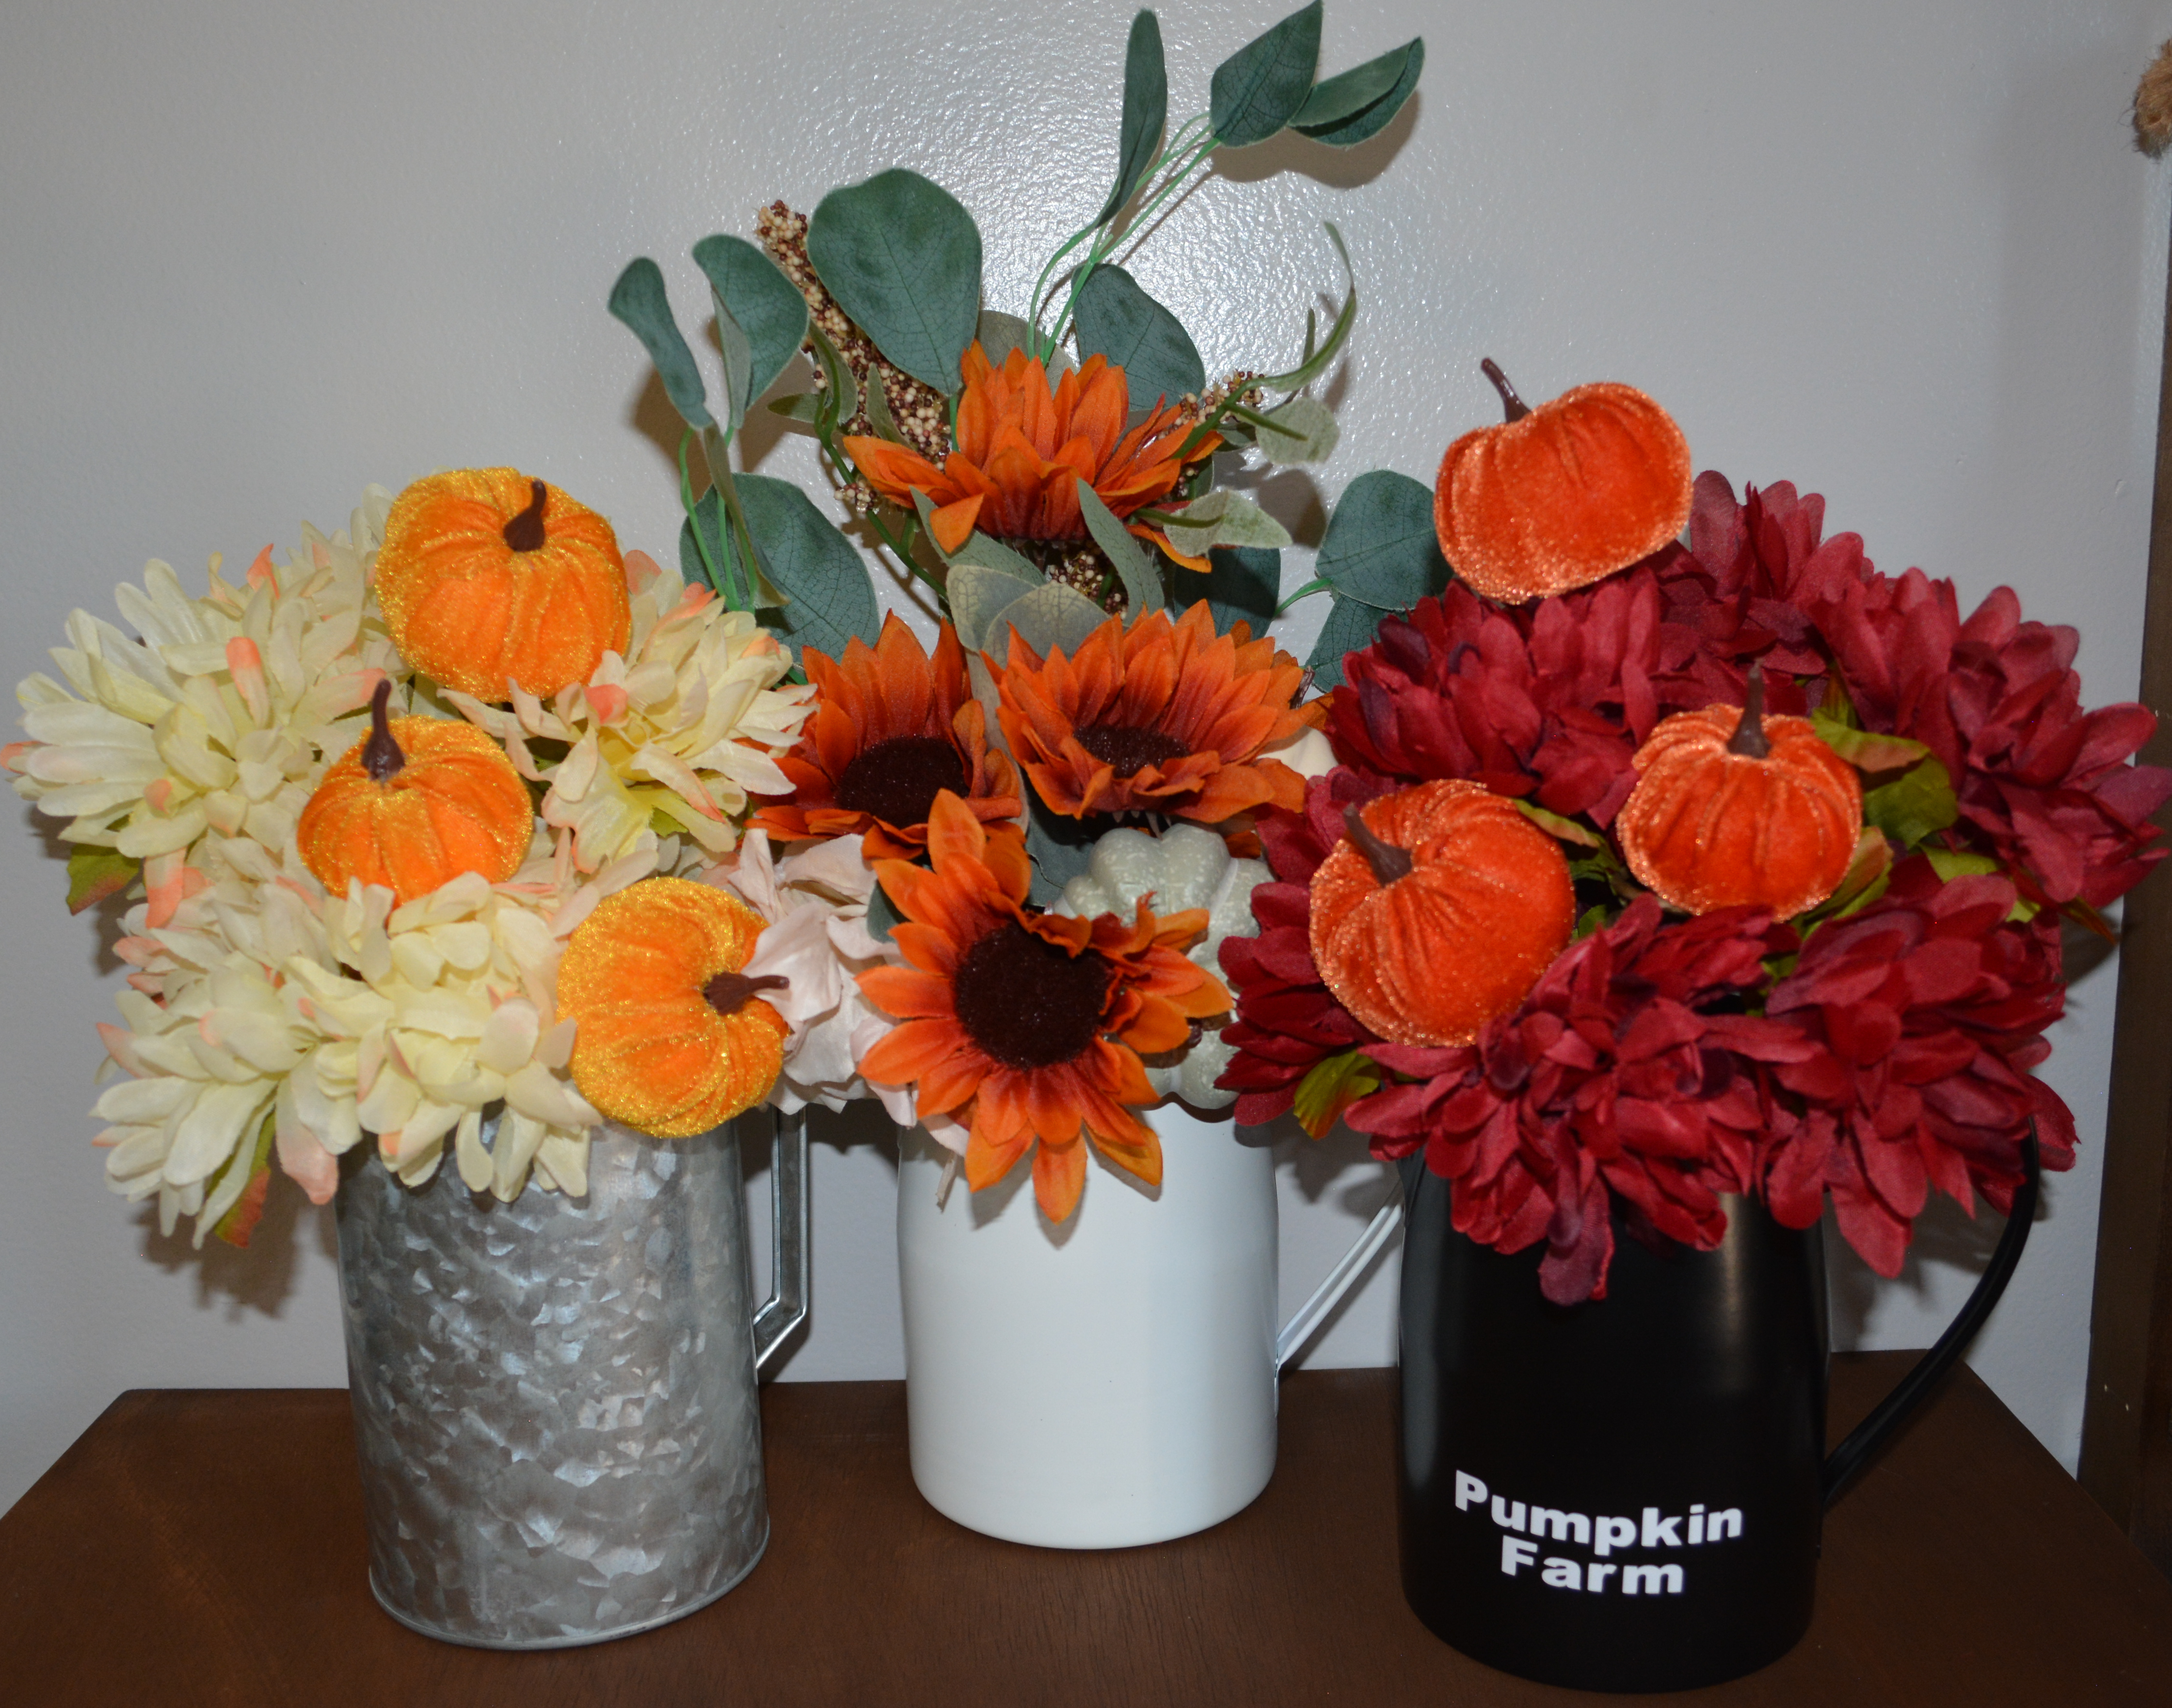
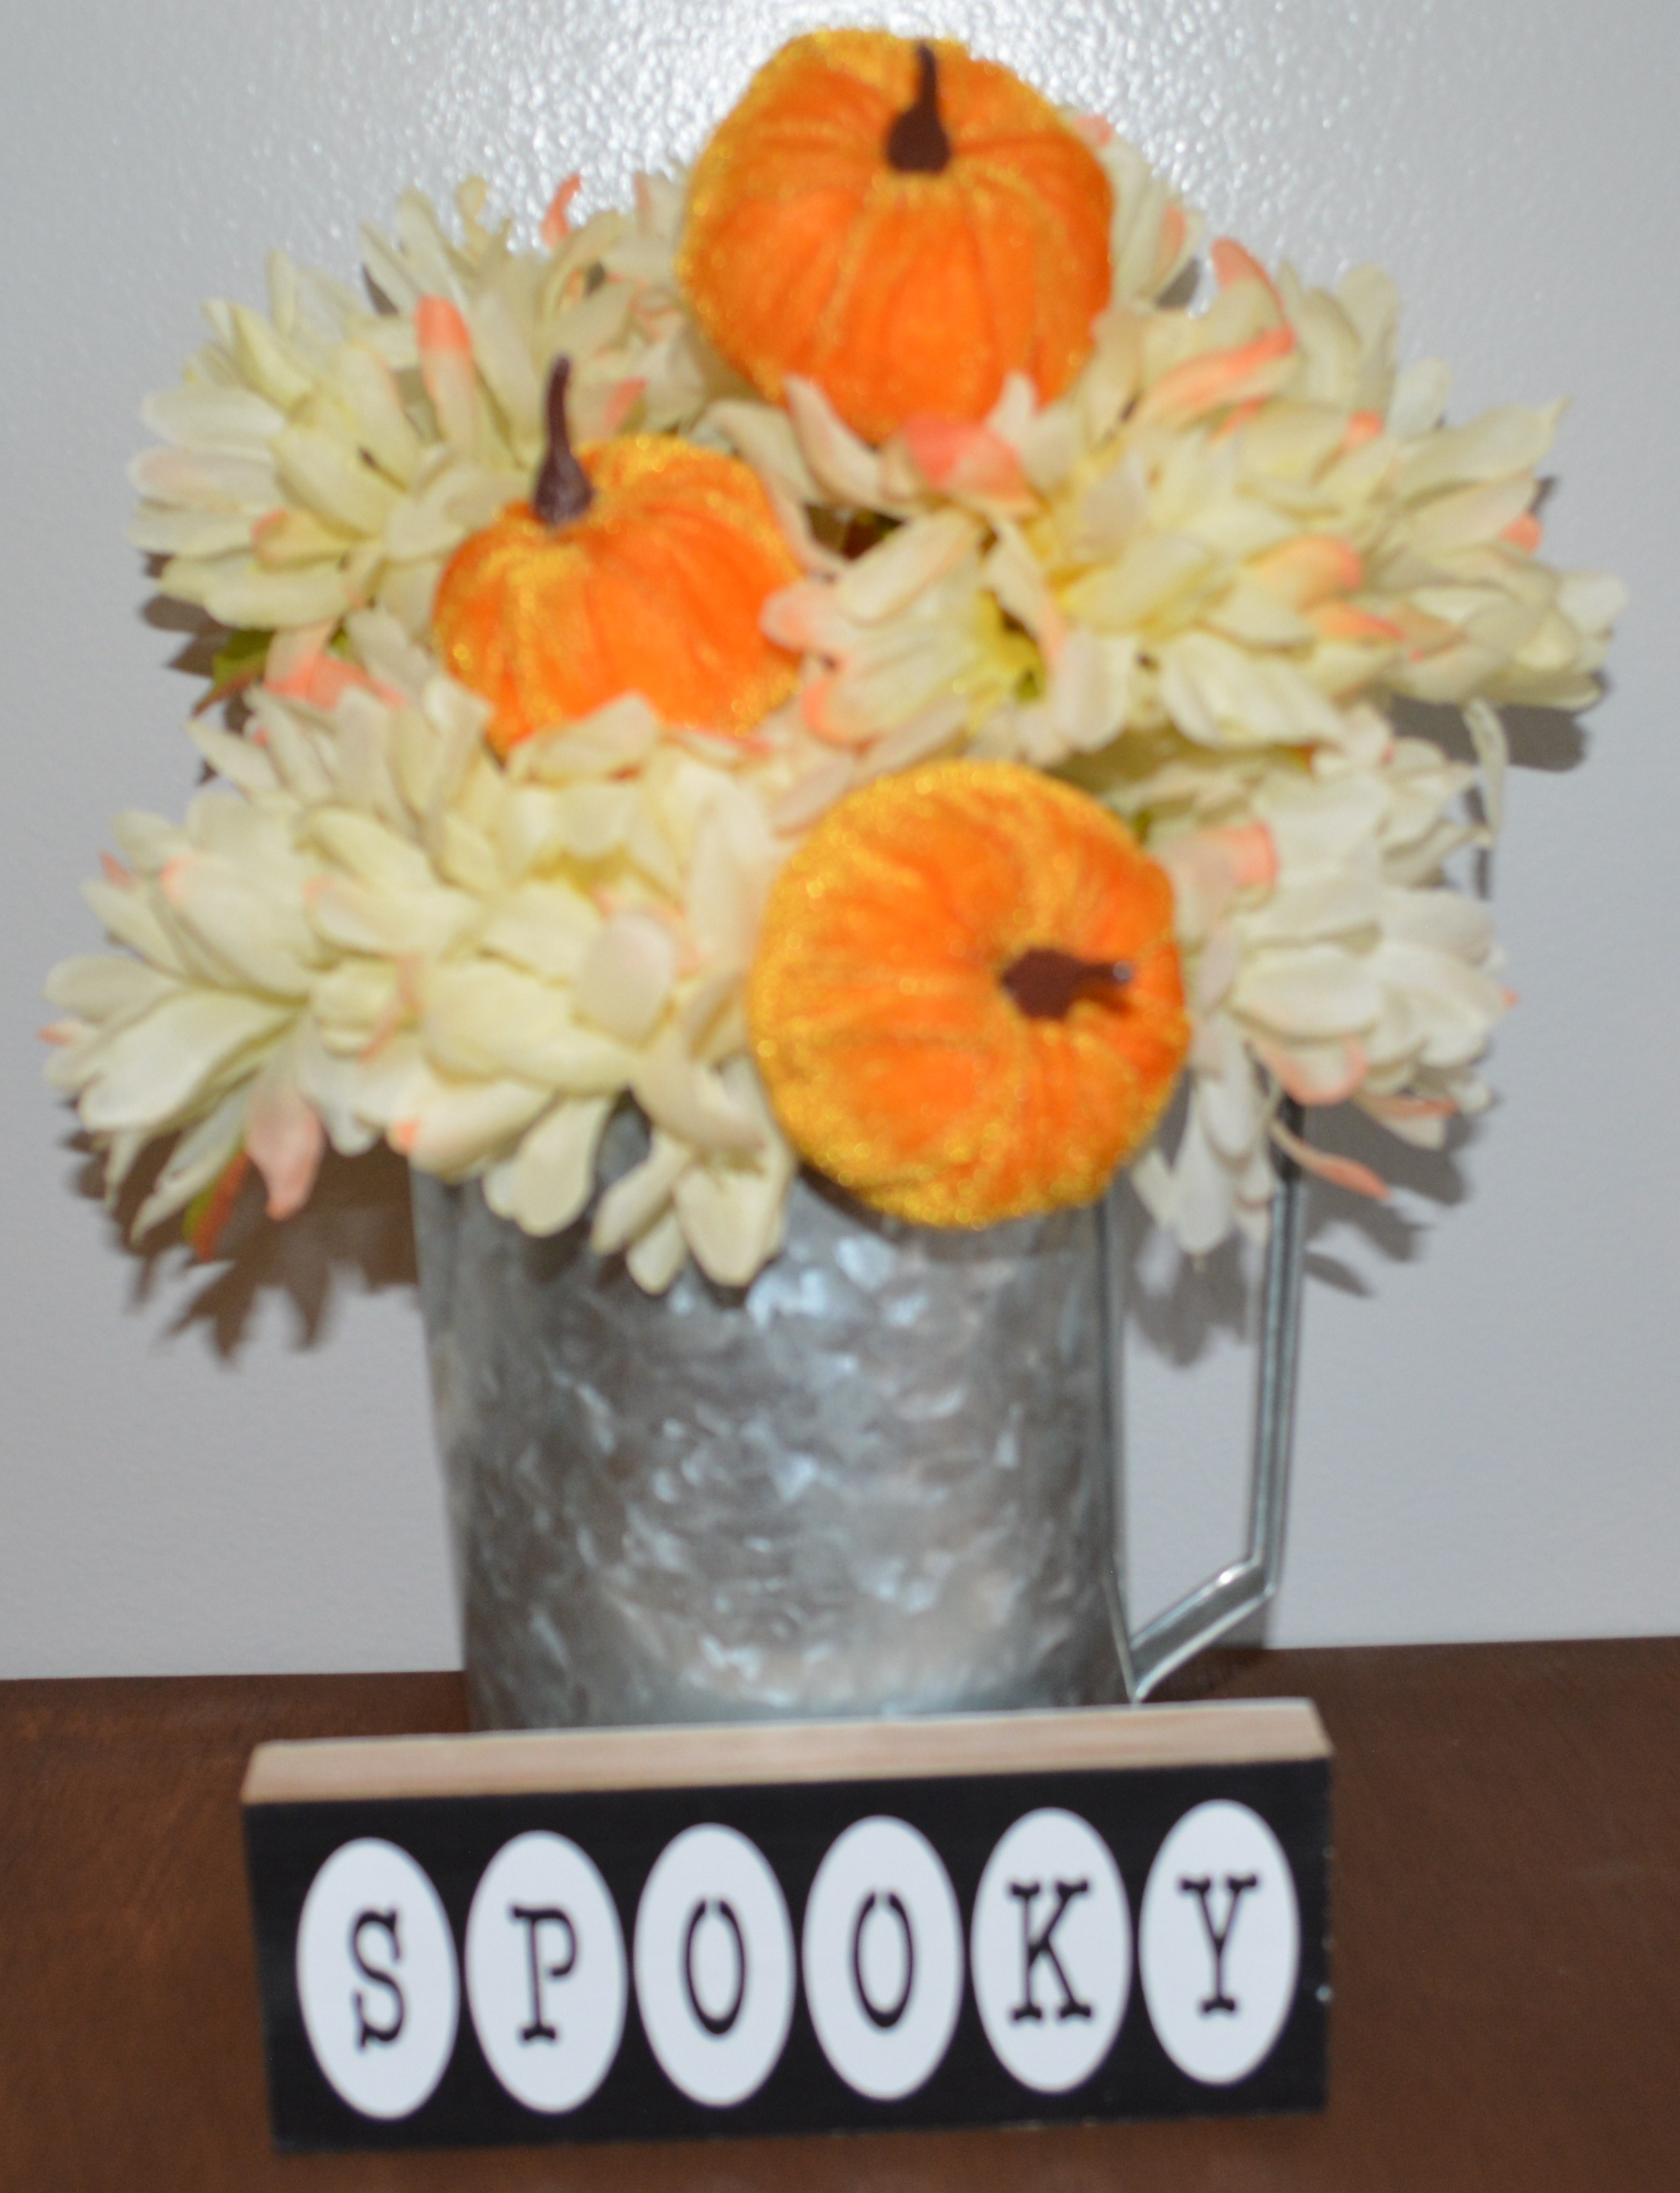
Project #2 is so simple. You will need any kind of vase or pitcher. These pitches I picked up at Target. Then get any kind of flowers that you love for fall. My favorite is sunflowers but these mums are beautiful and come in several different colors. The mums and sunflowers are from Dollar Tree. The pumpkin picks and the eucalyptus and and pumpkin pick came from Walmart.
If you wish to cut the flowers apart, you will need some wire cutters. I also used my Cricut again with some 651 vinyl.
I apologize for the blurry picture. We are going to start with the galvanized pitcher. I cut the mums off of the main stem with some wire cutters. Then I places the pumpkin pick in the center of the pitcher and added the mums around it until I was happy with how it looked. That was it!!
This next arrangement I did in a white pitcher. I cut the sunflowers off of the main stem with some wire cutters. From there I put the eucalyptus and pumpkins pick in the middle and added the sunflowers around it. It takes some playing around to get things to look the way I want. I move things until I am happy with how it looks. You could also add floral foam in the bottom of the pitchers if you want to help thing stay in place.
The final pitcher I added Pumpkin Farm to the bottom of with vinyl from my Cricut. I then did the same as I did with the other two. I cut the mums off of the main stem with wire cutters. After that I places the pumpkin pick in the center and added the mums around the pumpkins. It is that simple.
Here are the final projects. As you can see, you can combine the two to add some flare to the crafts. This is one that you can use from the start of fall all the way through Thanksgiving. You can add different blocks or just the leave the pitchers plain. There are so many options. It is a simple way to add some holiday decor to your home without a lot of fuss.
I hope you enjoyed these projects and that it gives you some quick ideas you can do even if you have a busy schedule.
Thank you for joining me! Please Like, Share, Comment, and Subscribe! Also find me on Instagram and Facebook under Yellow Butterfly Craft Designs.
Have a wonderful day!
Melissa McGuire
Supplies
Project #1
Blocks- Target, get any size you want from anywhere
Googly Eyes- Dollar Tree, any craft store
Waverly White Chalk Paint- Walmart
Paint Brush- Anywhere
Cricut and 651 Vinyl- Michaels Craft Store, or use stickers in place of this
Surebonder Hot Glue Gun and Hot Glue Sticks- Hobby Lobby
Welcome to day 2 of the 5 days of Halloween! I wanted to come up with some projects that were a outside of the box using items that are not normally thought of for Halloween crafting. There are three different projects that we are going to look at and three different outside of the box items I used to craft with.
Lets Get Started
Project #1
Supplies
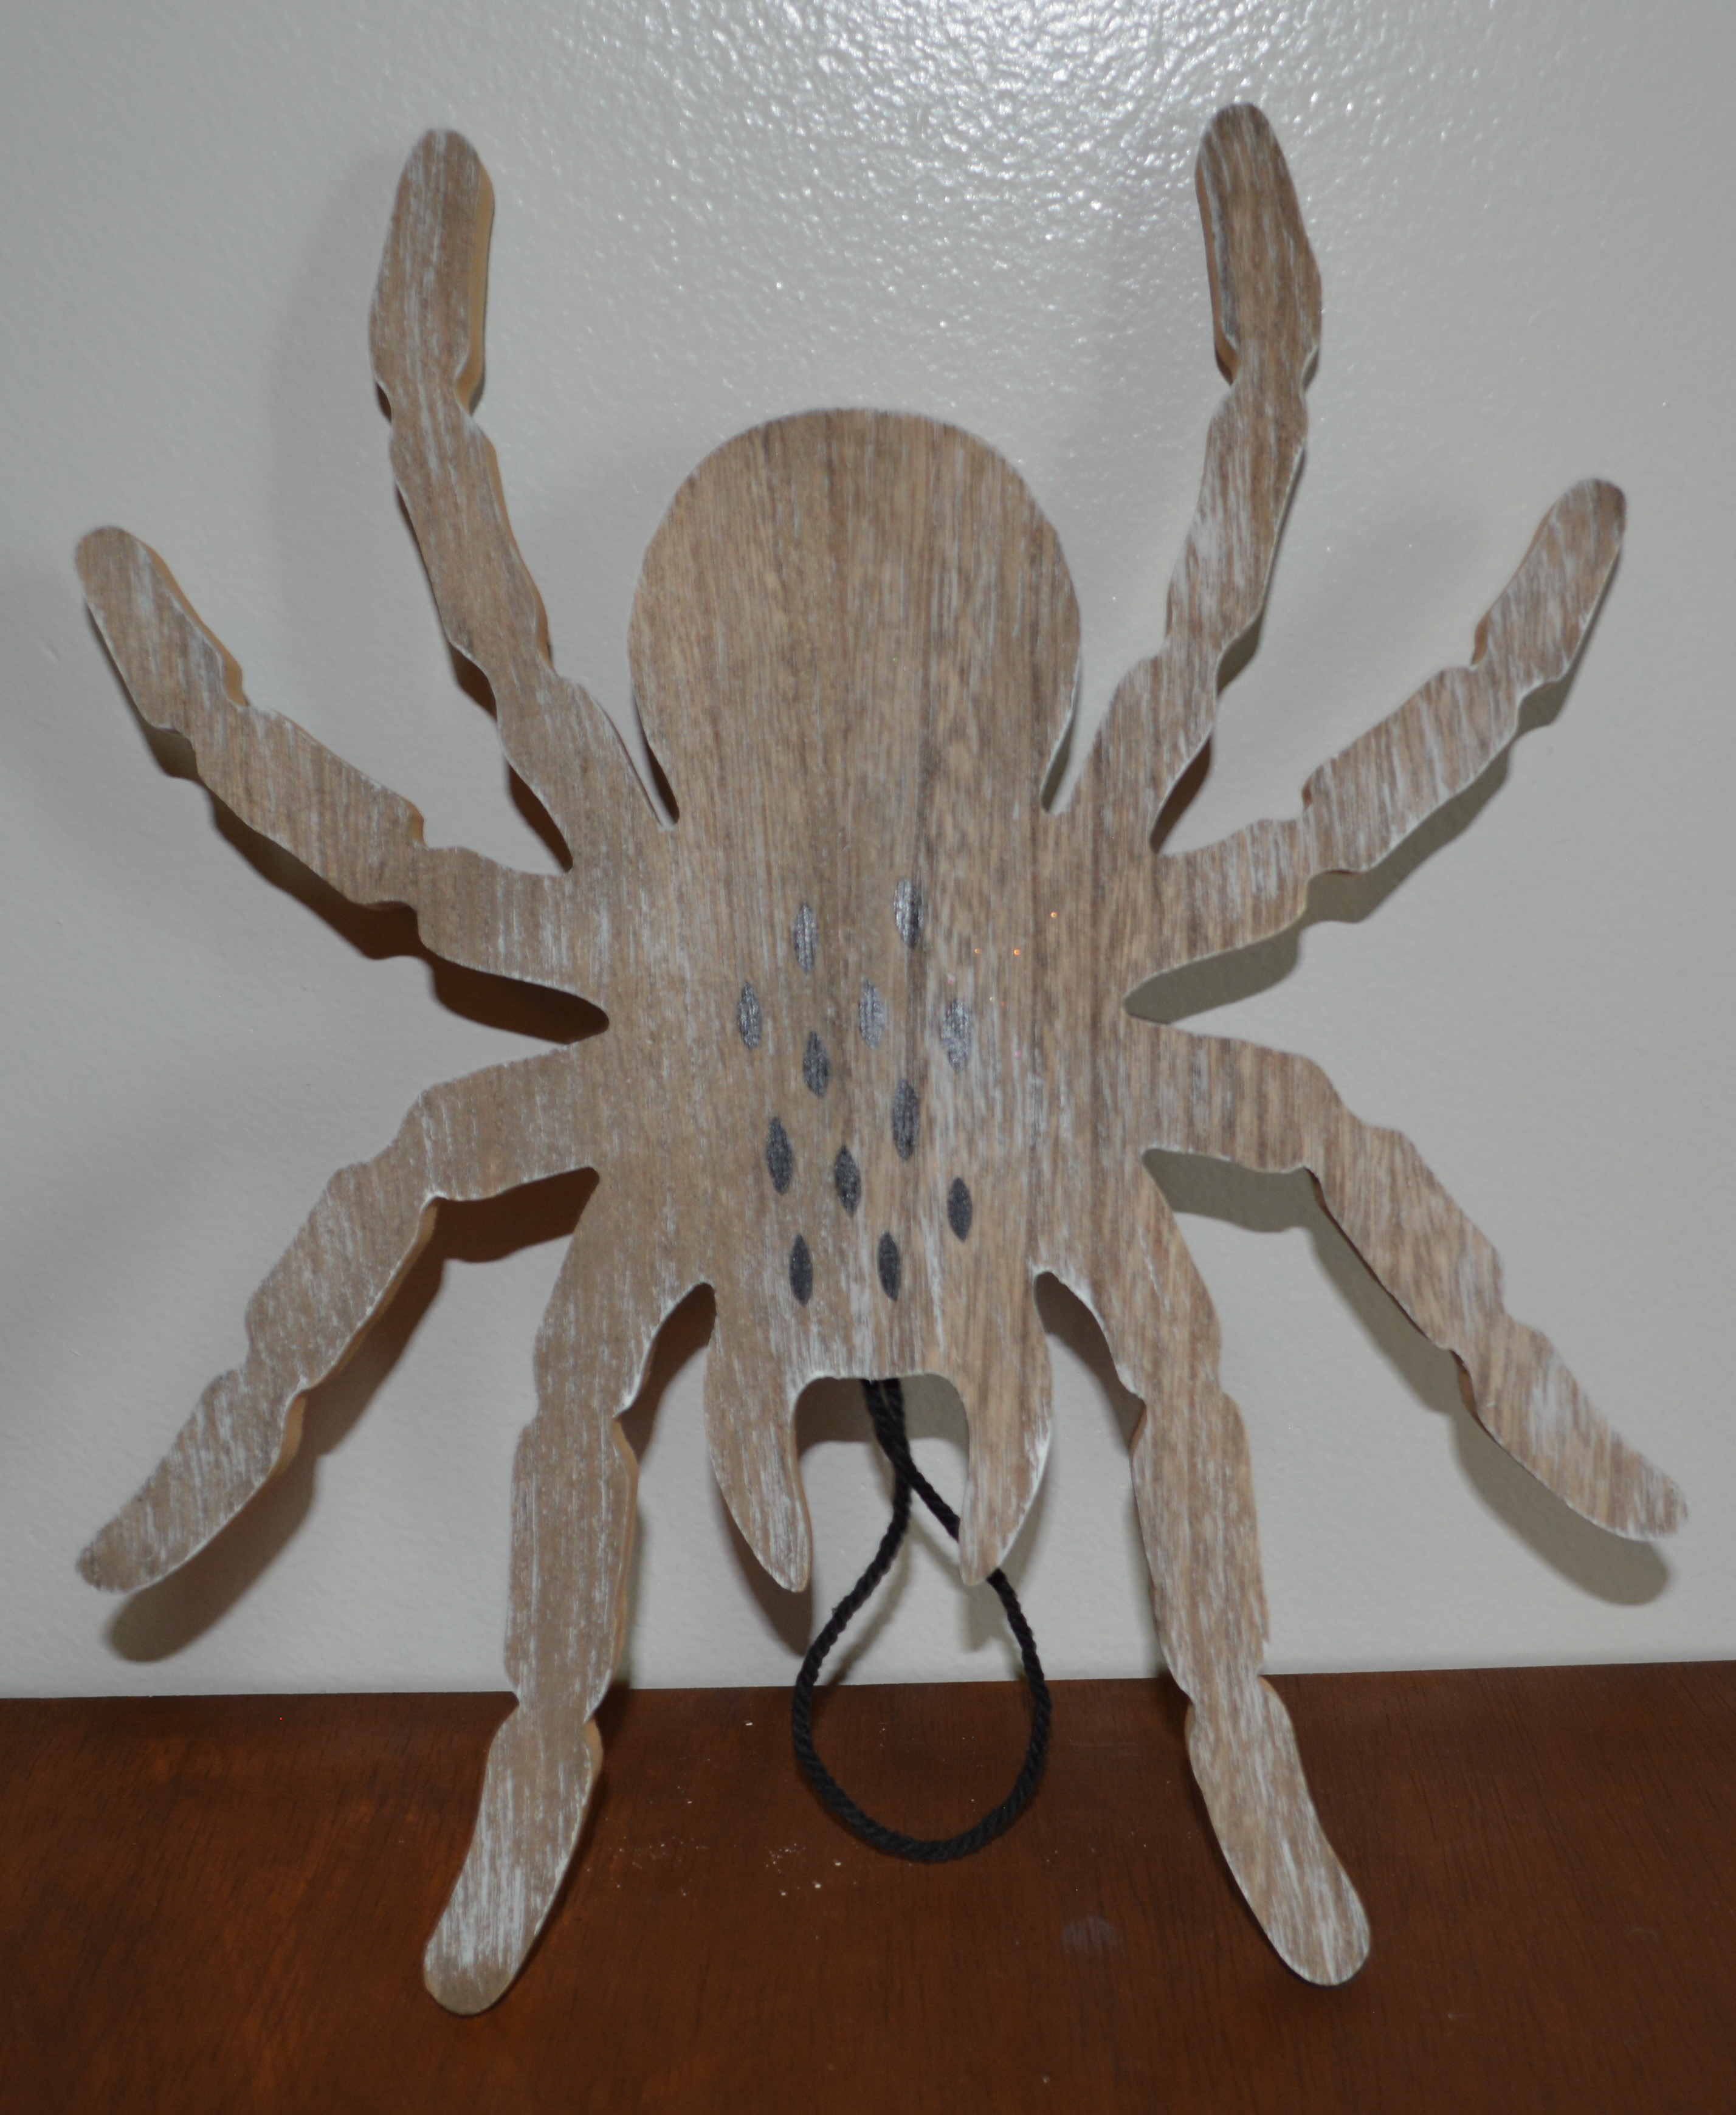
I found this wooden spider at Target. It is a heavy and solid piece but he was plain. I could have just stained him but I went a different direction. The paint I used was Waverly Chalk Paint in Ink. My outside of the box item for this spider is pompoms. I chose teal and black colored pompoms to add some texture to the spider.
A few other supplies I used was a paint brush, hot glue and googly eyes.
I started by painting the top of the spider with Waverly Chalk Paint in Ink. With this being such a thick piece and I wanted to keep the sides the natural color so I only painted the top. Then let it dry. It only needed one coat.
Next I went in with the pompoms. I suggest looking up some pictures to give you some ideas on what the back of spiders look like. My son found a spider outside of our house and it had babies all over the back of it. It was gross!! It was also my inspiration. I added the black pompoms first by laying them out on the spider to map out where I wanted to glue them. Once I was happy with how it looked I glued them down with hot glue. Now the black was pretty bland. It needed some serious color. Teal and white pompoms were the only two other colors I had on hand. I went with the teal and added them in a pattern on top of the black pompoms.
The last step was adding the googly eyes. I might have went a bit overboard with the eyes but at least he can see.
Here is the final project! He is a cute and spooky spider. I love the color pop of the teal on the black. The raw edge adds some personality to this spider too.
Project #2
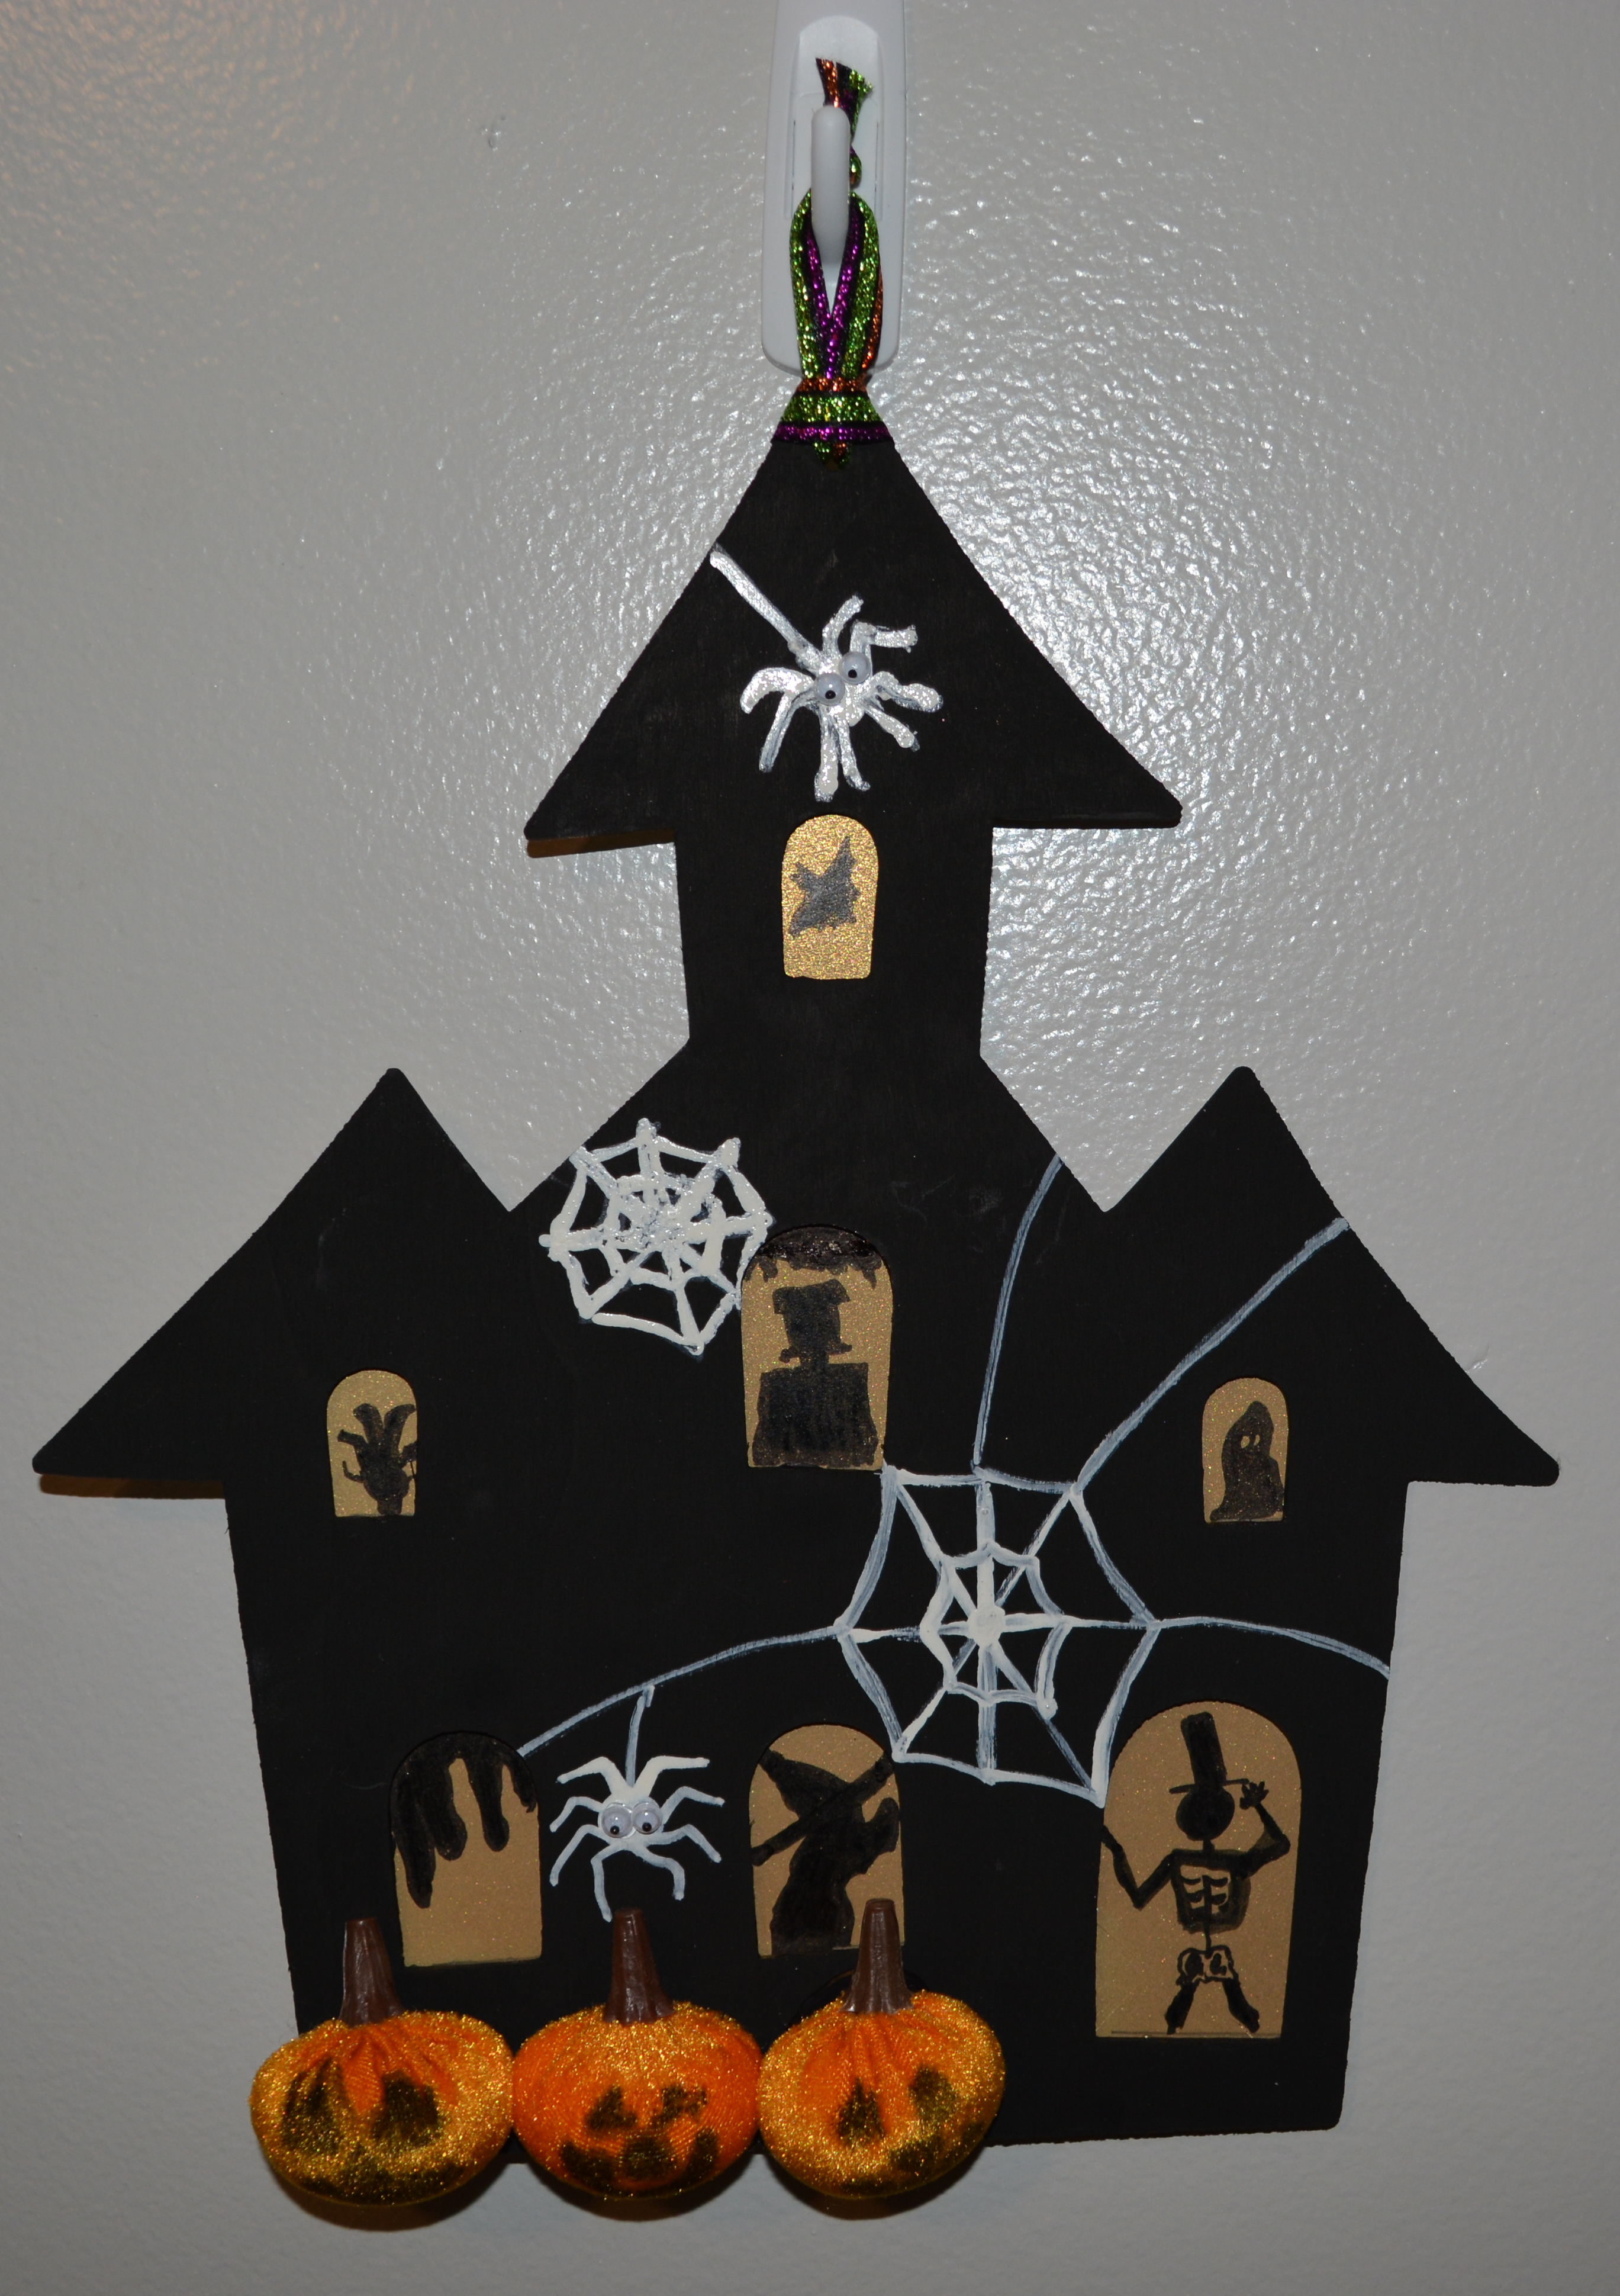
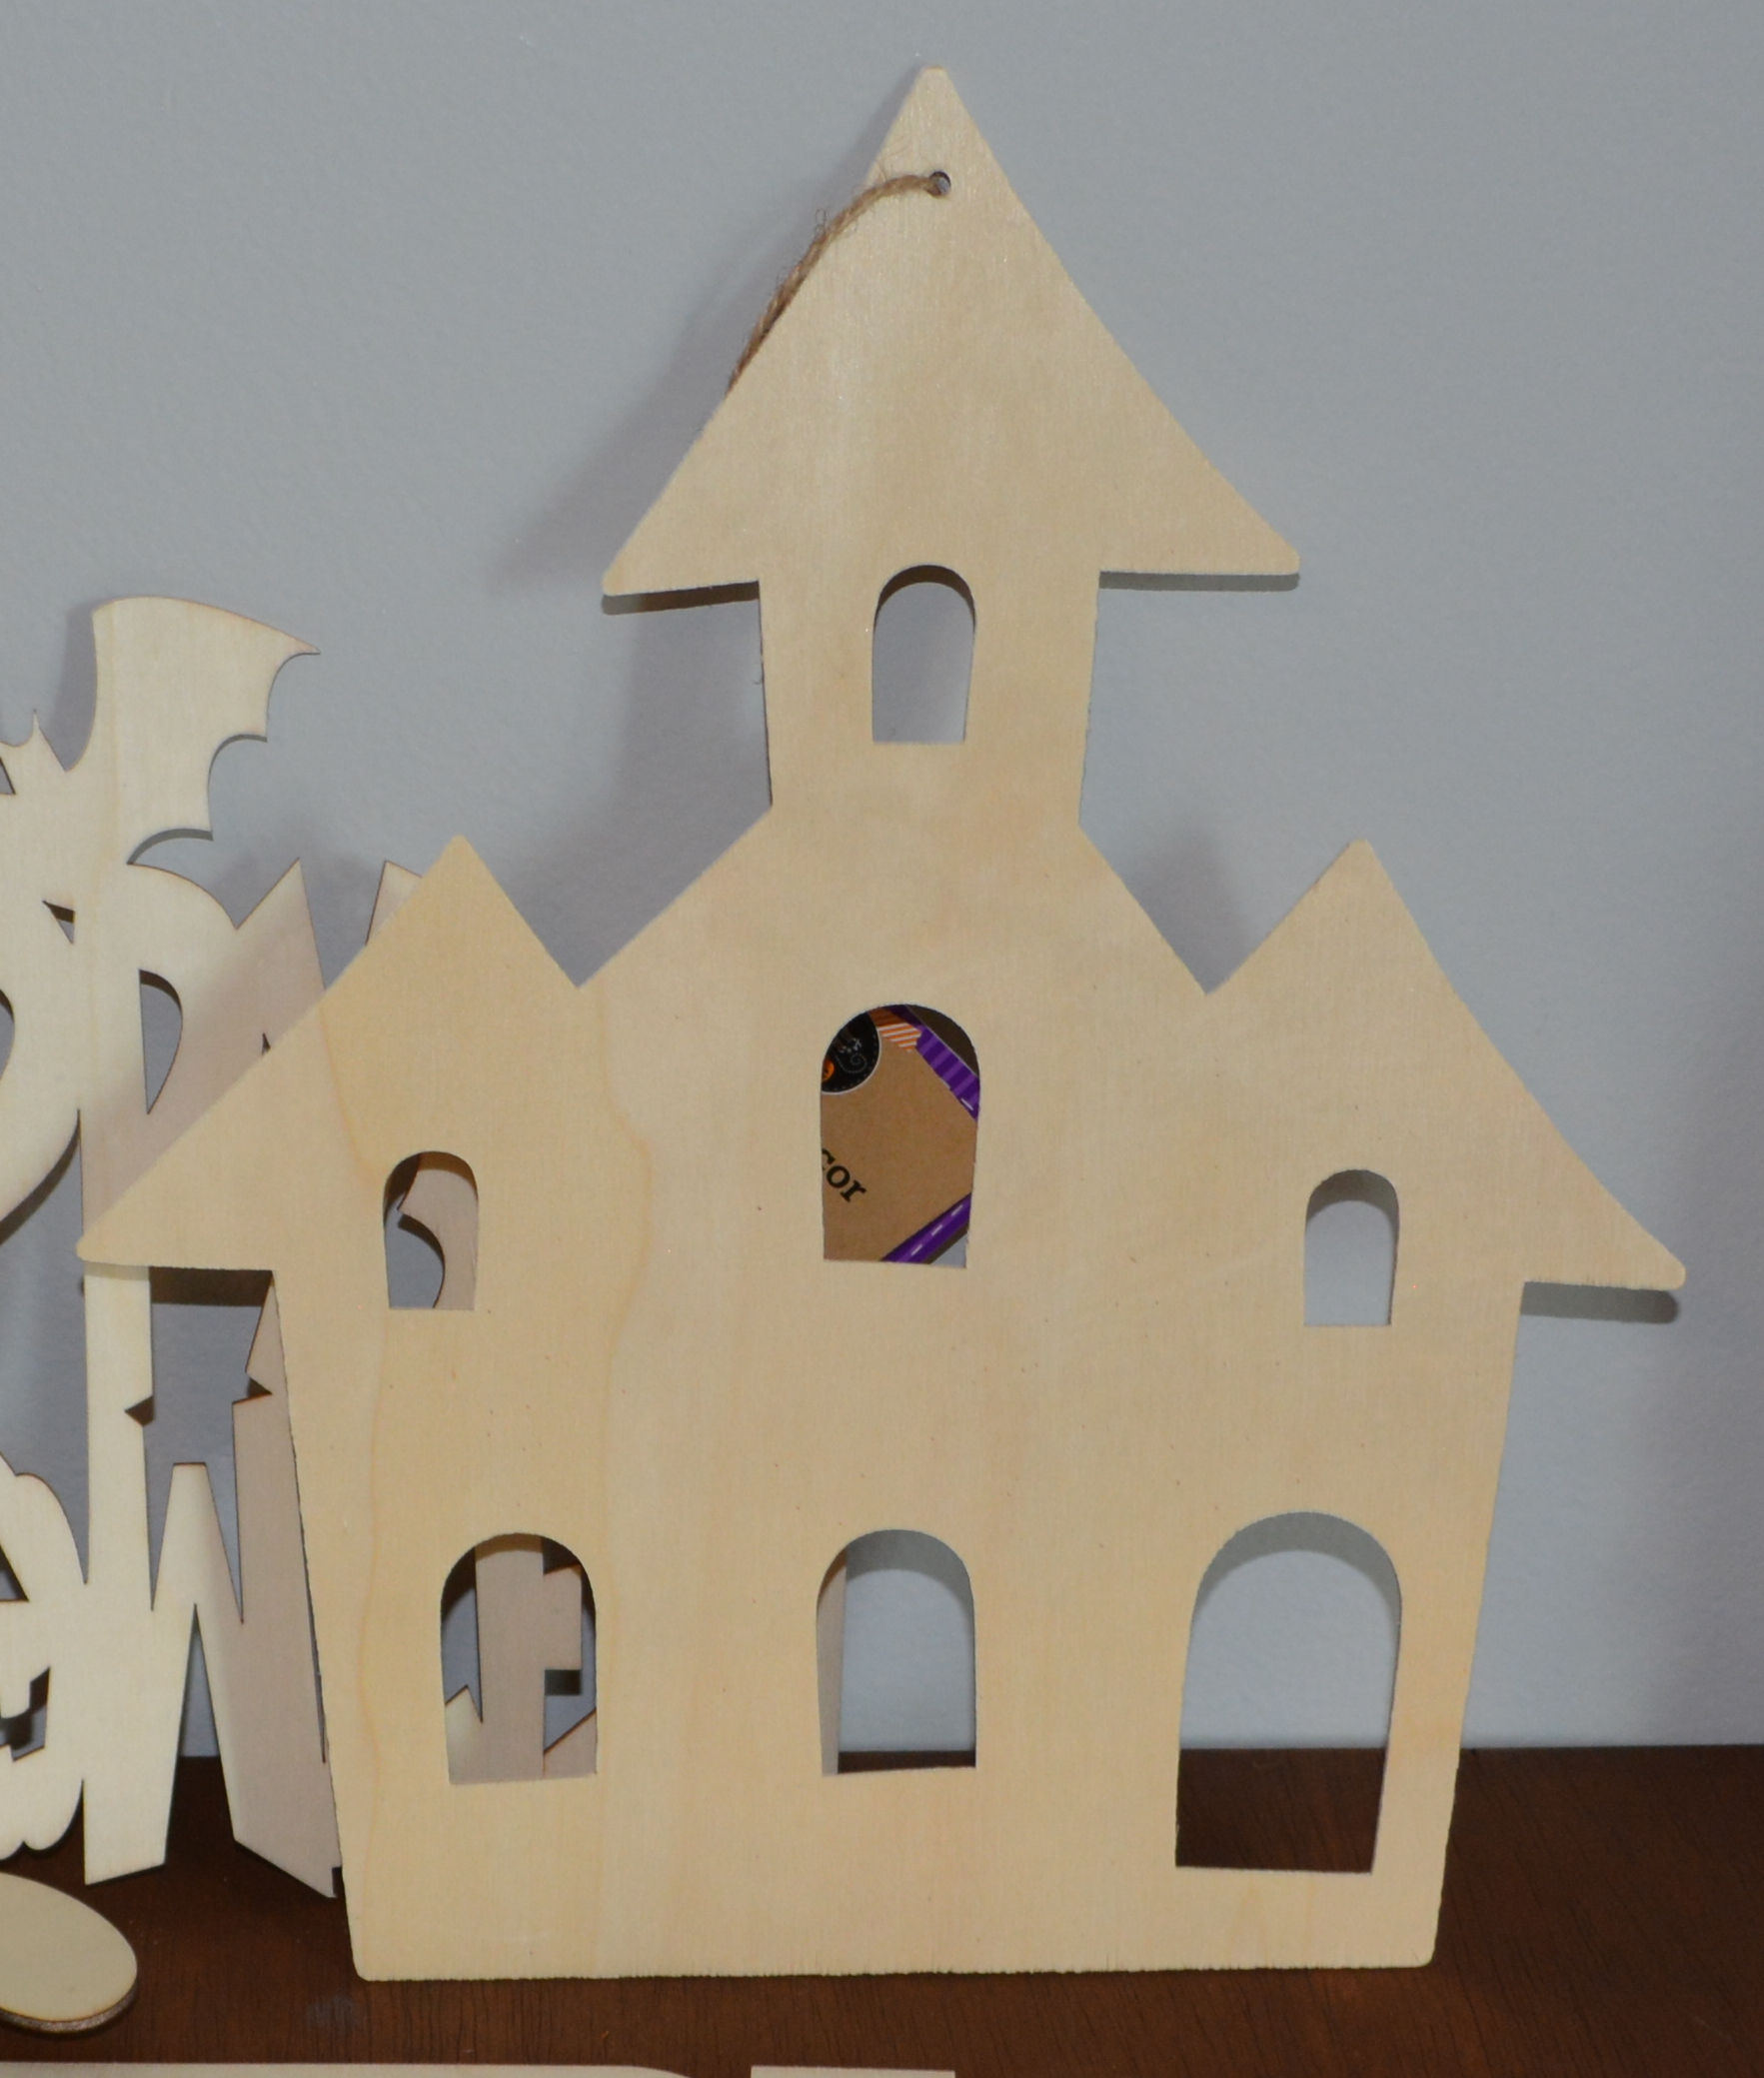
Supplies
The next project is a wooden haunted house from Dollar Tree. Scrapbook paper from Hobby Lobby and these little mini pumpkins are the outside of the box items. Not unusual but they did add some interest to this house. Other supplies I used were Waverly Chalk Paint in Ink, a white paint pen and a black sharpie marker. Also a hot glue gun and paint brush.
So I got a little carried away working on this project and forgot to take pictures as I was working. It happens. This is also not my best or Favorite project but I think it is important to show that I do things I love and things I am not so fond of.
The first thing I did was paint the house black with the Waverly Chalk Paint in Ink. Next I glued the goldish color scrapbook paper to the back of the house. The house needed something in the windows but a true yellow was just to bright. So I went with gold.
Once that was all glued down and dry, I knew the windows needed something in them. They are small windows and did not have a ton of room to add much. Now my drawing skills are not great at all but it seemed that was the only way to add stuff to the windows. I used a black Sharpie marker to add different figures into the windows like a witch that looked more like a dog and a skeleton. I had to go over them a few times till I could not see the sparkle of the paper any more.
The house was black and the figures in the windows were black. There needed to be some contrast colors on the house. What better way to spook up a haunted house than by adding cobwebs and spiders. I used a white paint pen to draw on the webs and spiders in several places around the house. Then I added googly eyes to the spiders.
The final step was to add these mini pumpkins. They are so cute but this is where I probably should have left them alone. Instead I took the Sharpie marker and drew faces on the pumpkins. The marker ink spread to far so their faces are bigger than I wanted. Once they were dry I glued them to the bottom of the haunted house bad faces and all.
Project #2 is finished. Like I said it is not my best work but I feel I should show not only the good ones but the ones that do not work out so well. Not everything I create comes out all the time. I do think this haunted house is cute though and I will add it to my decor!
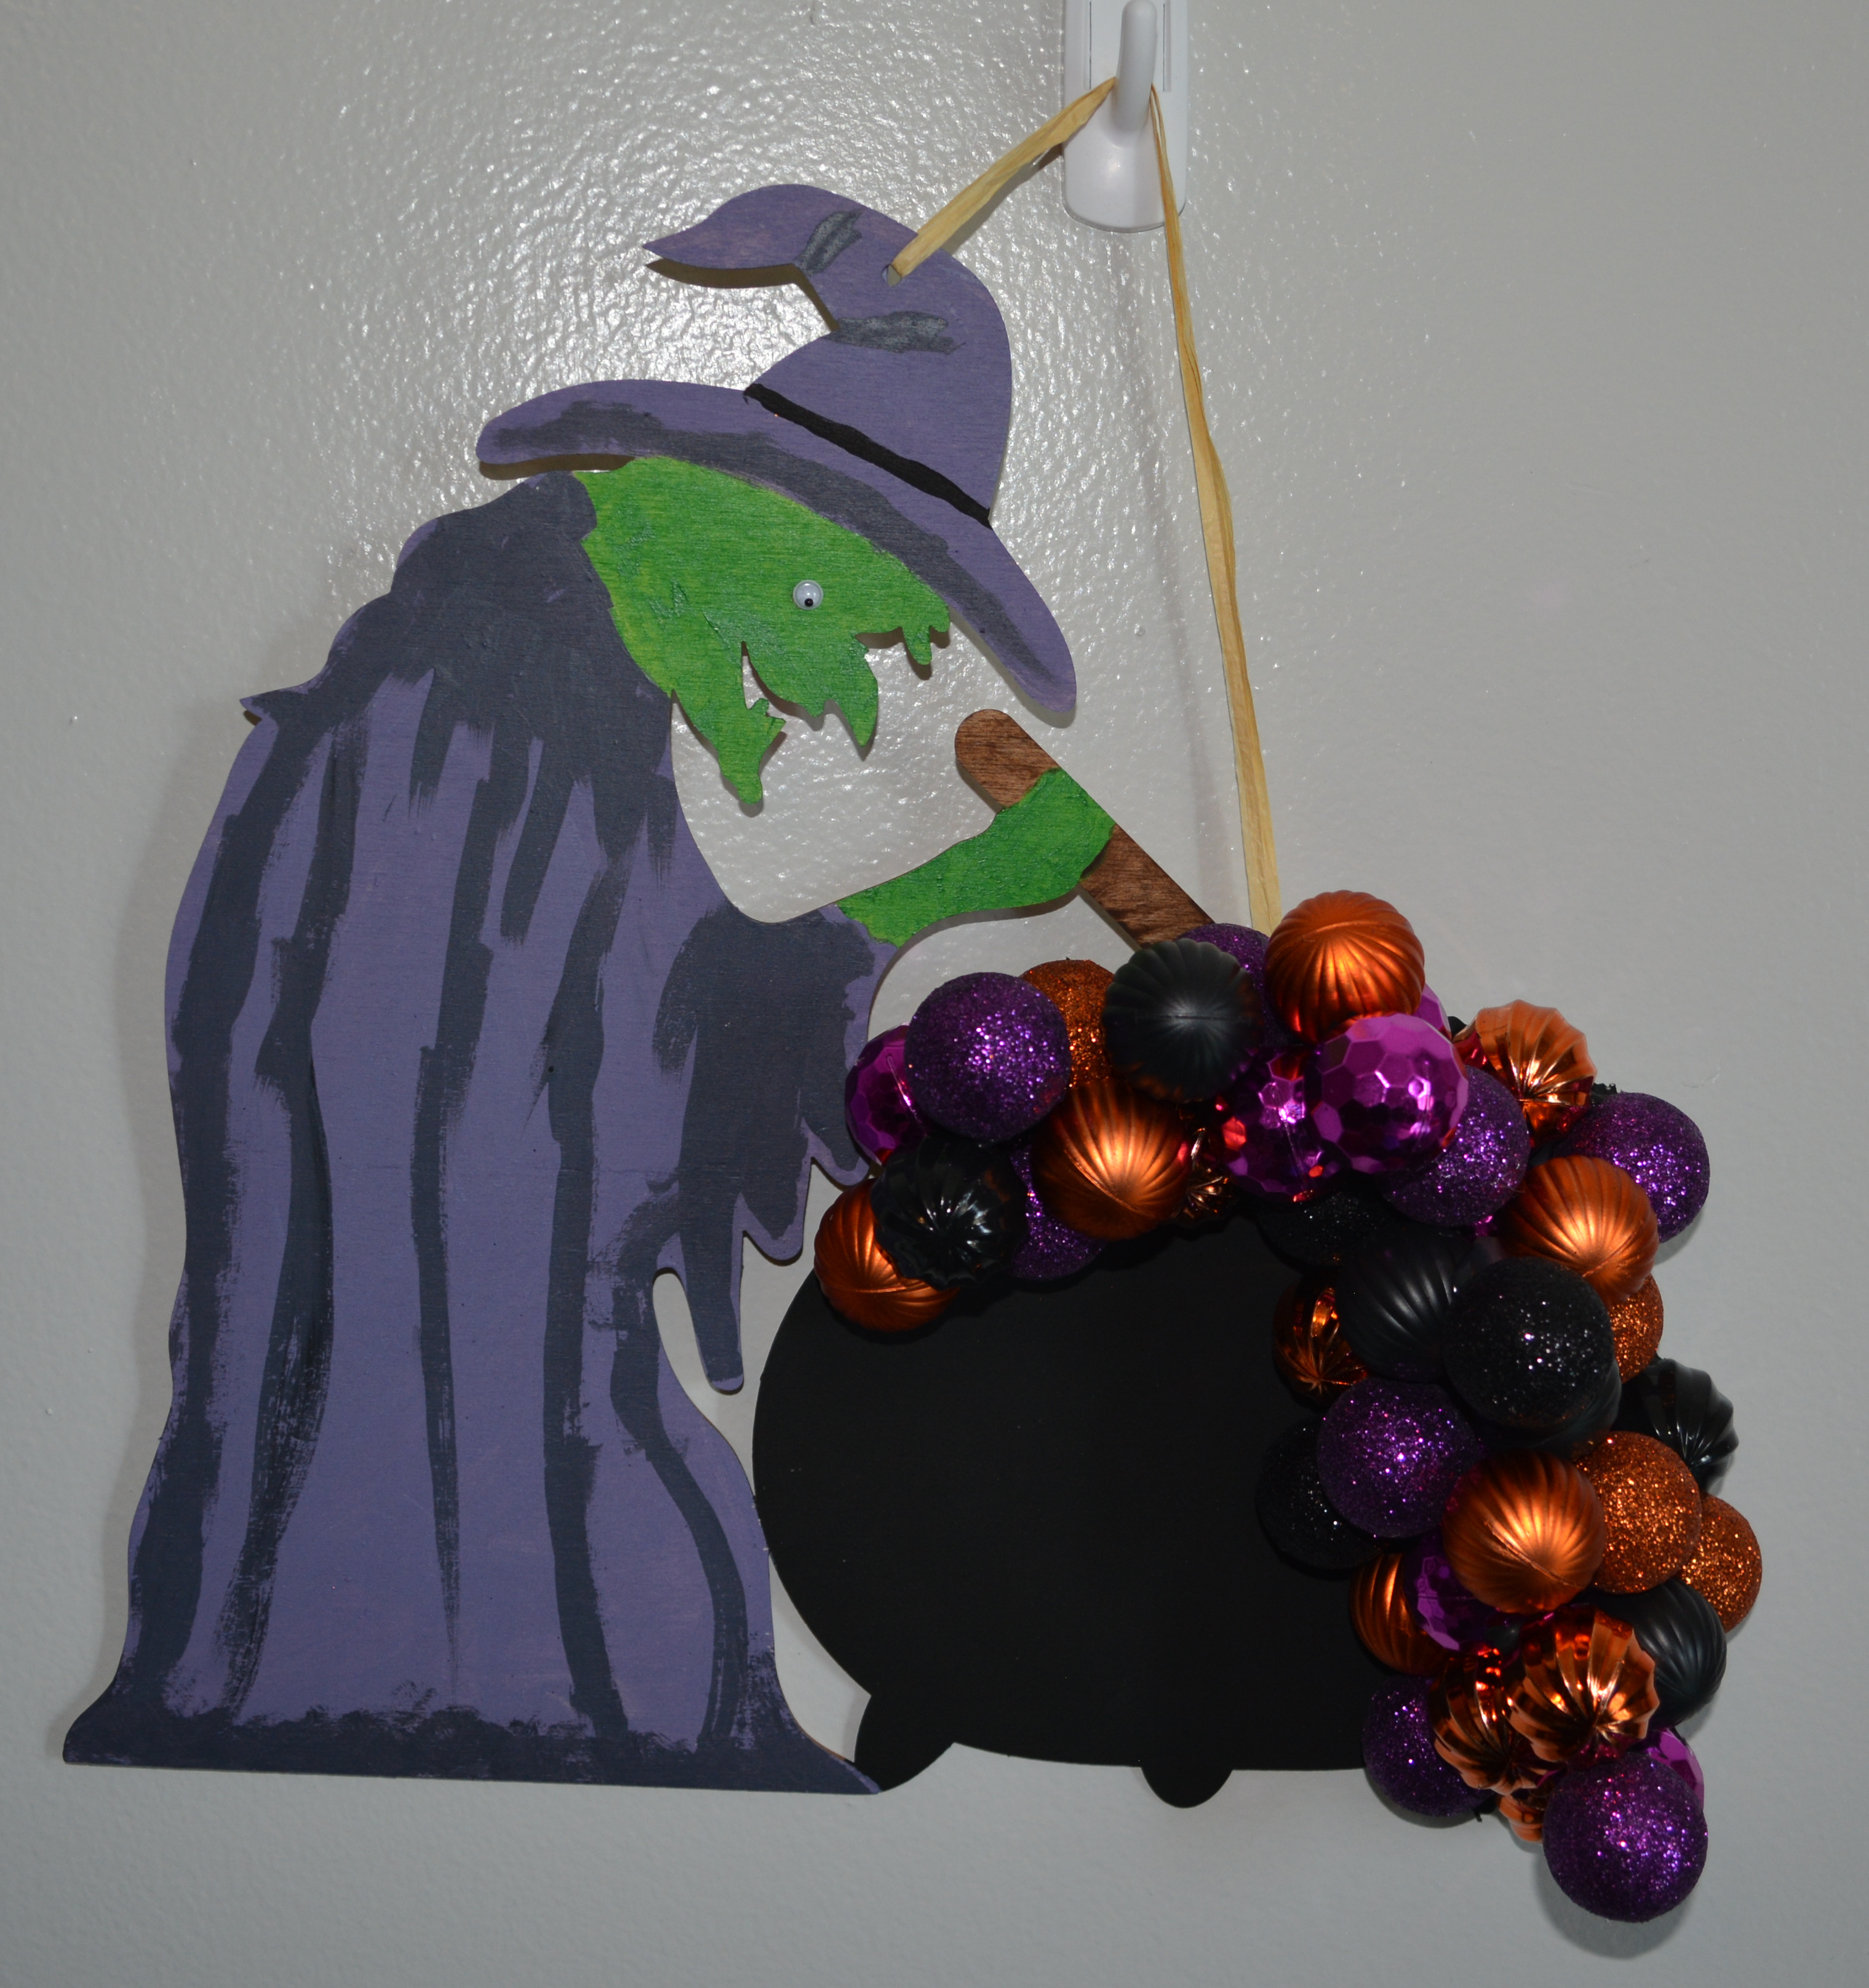
Project #3
Supplies
For this third and final project you will need this witch from Dollar Tree and a few different colors of mini ornaments. I got the ornaments at Dollar Tree too and they are my outside of the box item for this craft. As far as paint, I used colors I had on hand. Along with paint brushes and hot glue.
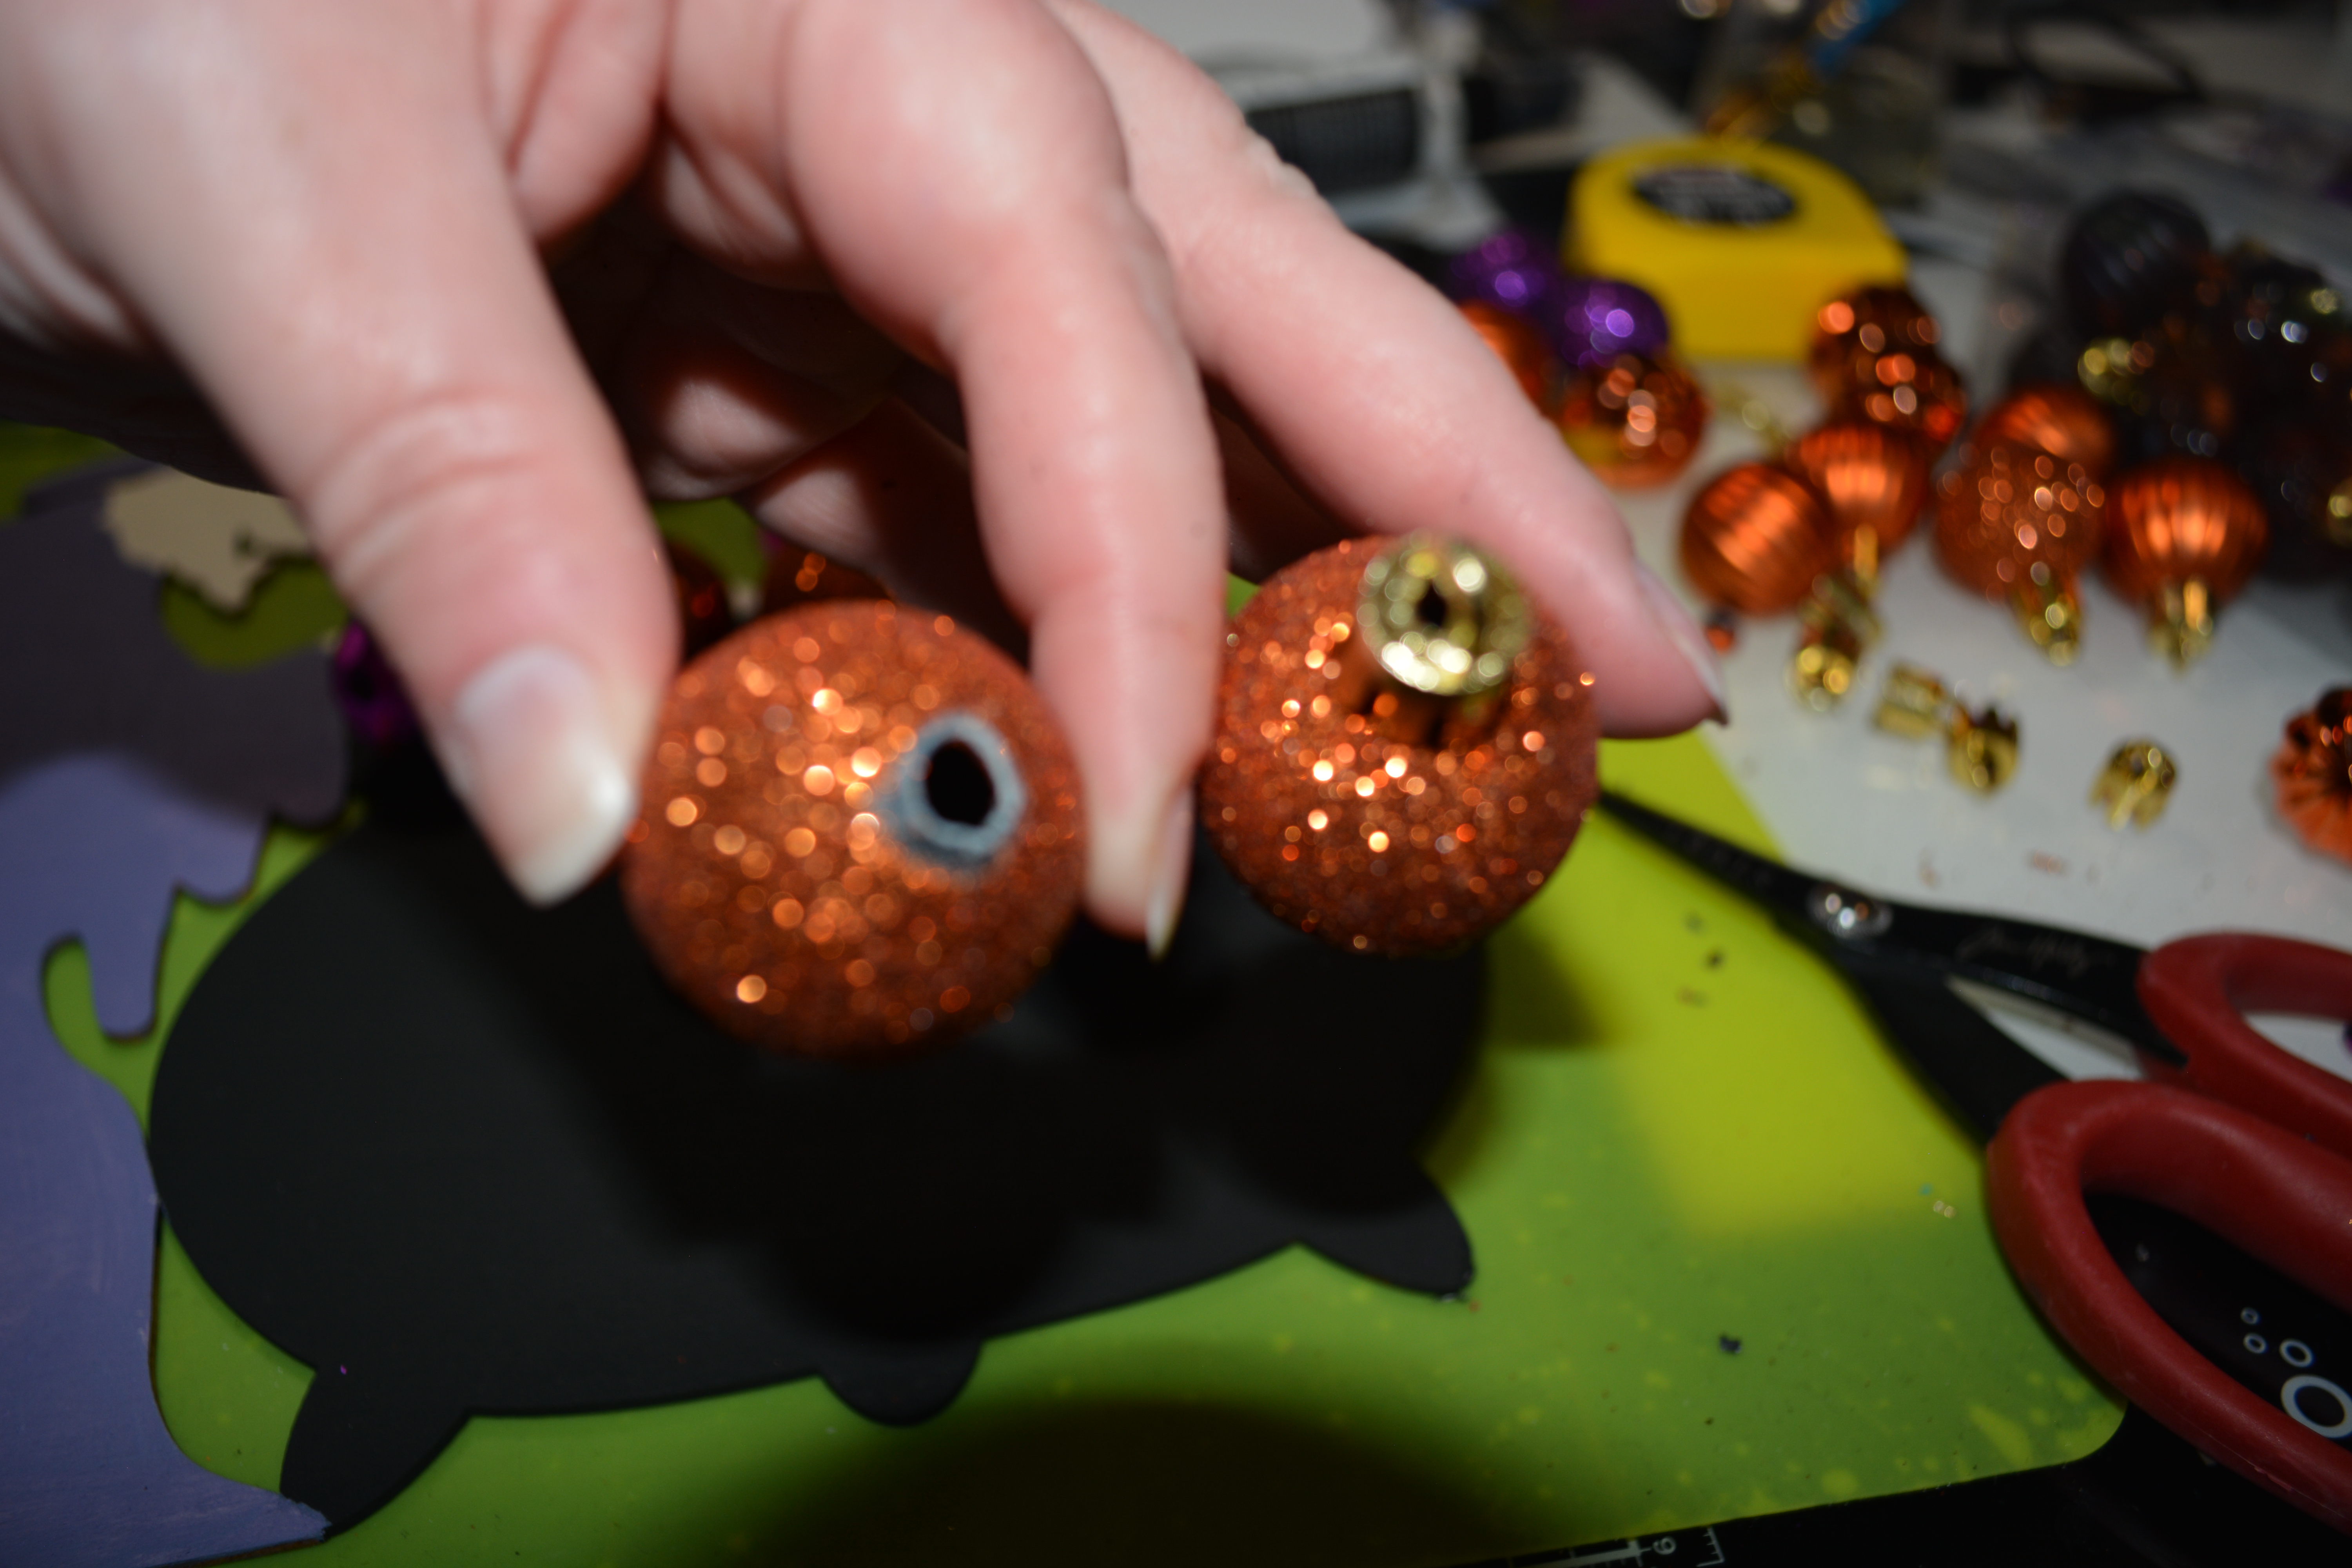
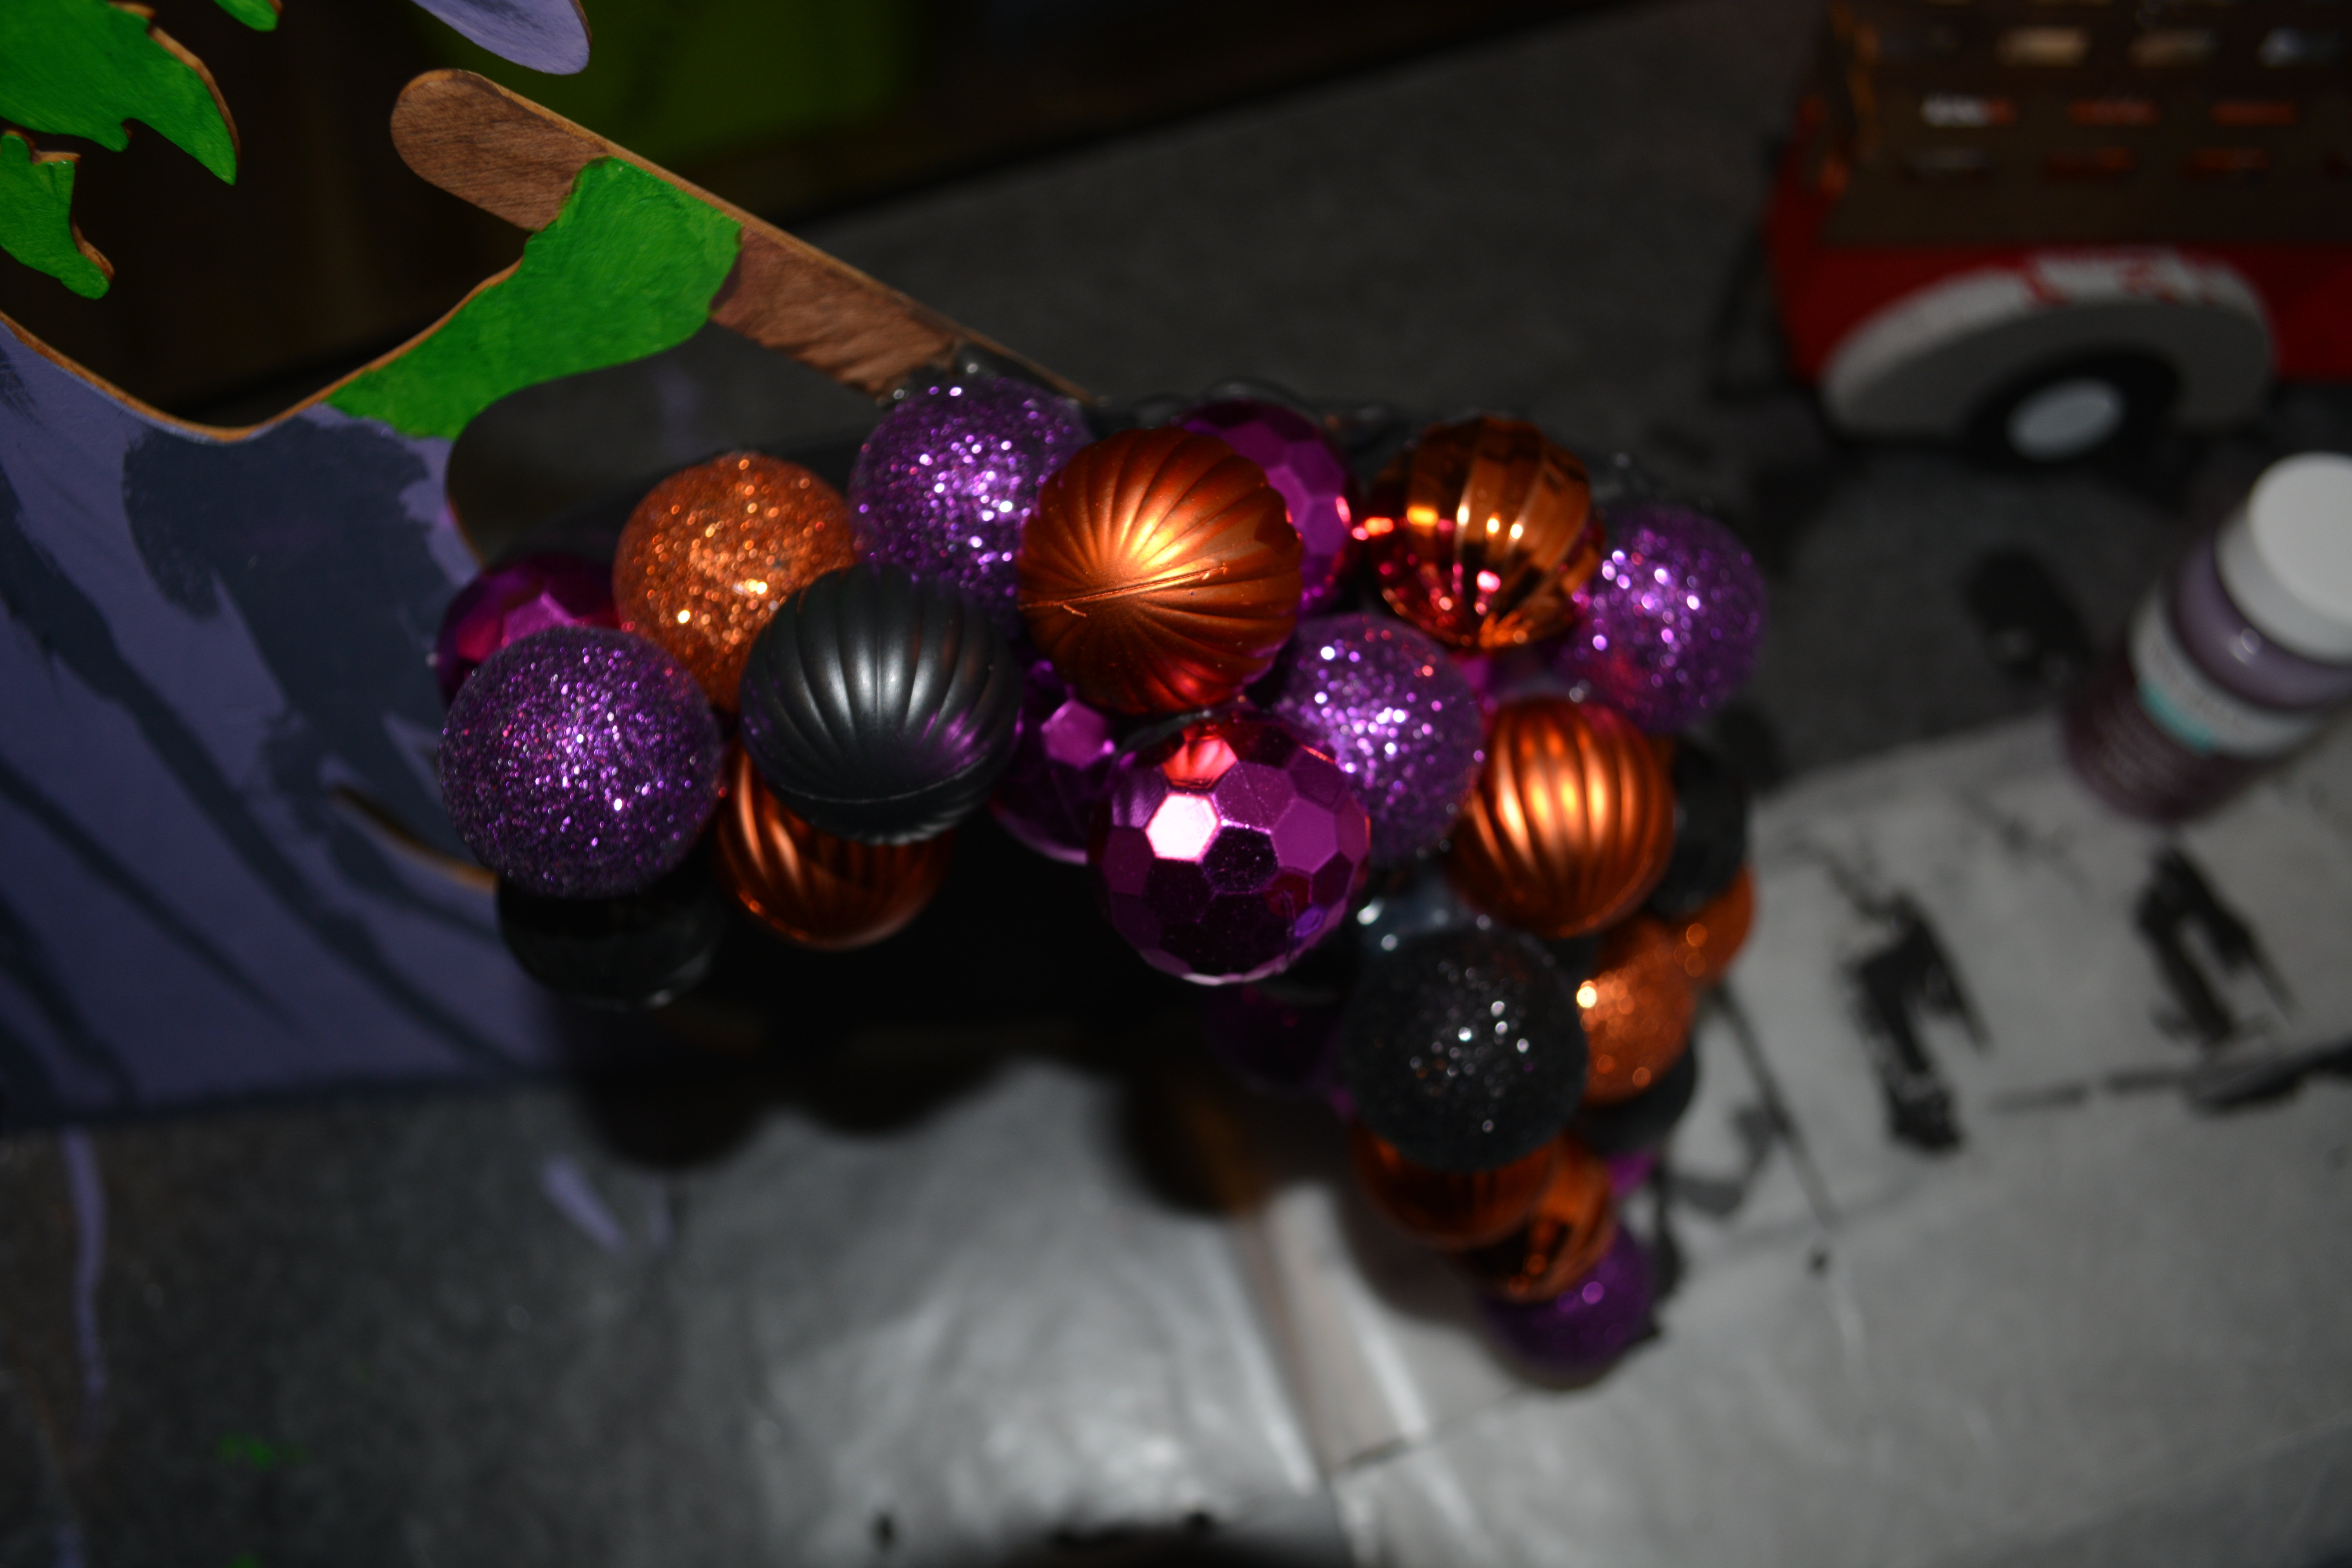
This is yet another project that I did not take pictures of while I was creating. So what I did not show you was me painting the cauldron black with Waverly Chalk Paint in Ink. I did not have a dark purple on hand so I mixed some black paint with a lavender purple color and painted the witch’s hat and dress with it. Her face had to be green and the spoon handle got painted brown. Now lets get the the outside of the box item!
For the ornaments, I cut off the top part of the ornaments with some heavy duty scissors. From there I started hot gluing the ornaments around the top and down the right side of the cauldron. This is suppose to look like the witch’s brew is overflowing out of the cauldron and down onto the floor. Once you get the first layer of ornaments done start with the next layer on top of that. I glued three layers of ornaments and made them scattered and uneven to make them flow like liquid. If you can see the hot glue after you are done, take some black paint and paint over it. You will not be able to see it once it dried.
She is a spooky witch making a big mess. I added some details to her dress and hat. Also a little spooky eye. The bubbles are the star of the show though. They sparkle and shine!
I hope you enjoyed these three outside of the box projects. They were fun to do and use supplies in different ways than they were intended.
Thank you for joining me! Please Like, Share, Comment, and Subscribe!
Also join me on Facebook and Instagram
Stay safe and healthy!
Melissa McGuire
Supply List
Project #1
Wooden Spider- Target
Waverly Chalk Paint in Ink- Walmart
Pompoms- Hobby Lobby
Surebonder Hot Glue Gun and Hot Glue Sticks- Hobby Lobby
Paint Brushes- Anywhere
Googly Eyes- Any craft store
Project #2
Wooden Haunted House- Dollar Tree
Mini Pumpkins- Dollar Tree
Scrapbook Paper in Gold- Hobby Lobby
Sharpie- anywhere
Paint Pen- Walmart
Googly Eyes- Anywhere
Surebonder Hot Glue Gun and Hot Glue Sticks- Hobby Lobby
Project #3
Wooden Witch- Dollar Tree
Variety of Paint- Anywhere
Mini Ornaments in Different Colors- Dollar Tree
Paint Brushes- Anywhere
Googly Eyes- Anywhere
Surebonder Hot Glue Gun and Hot Glue Sticks- Hobby Lobby
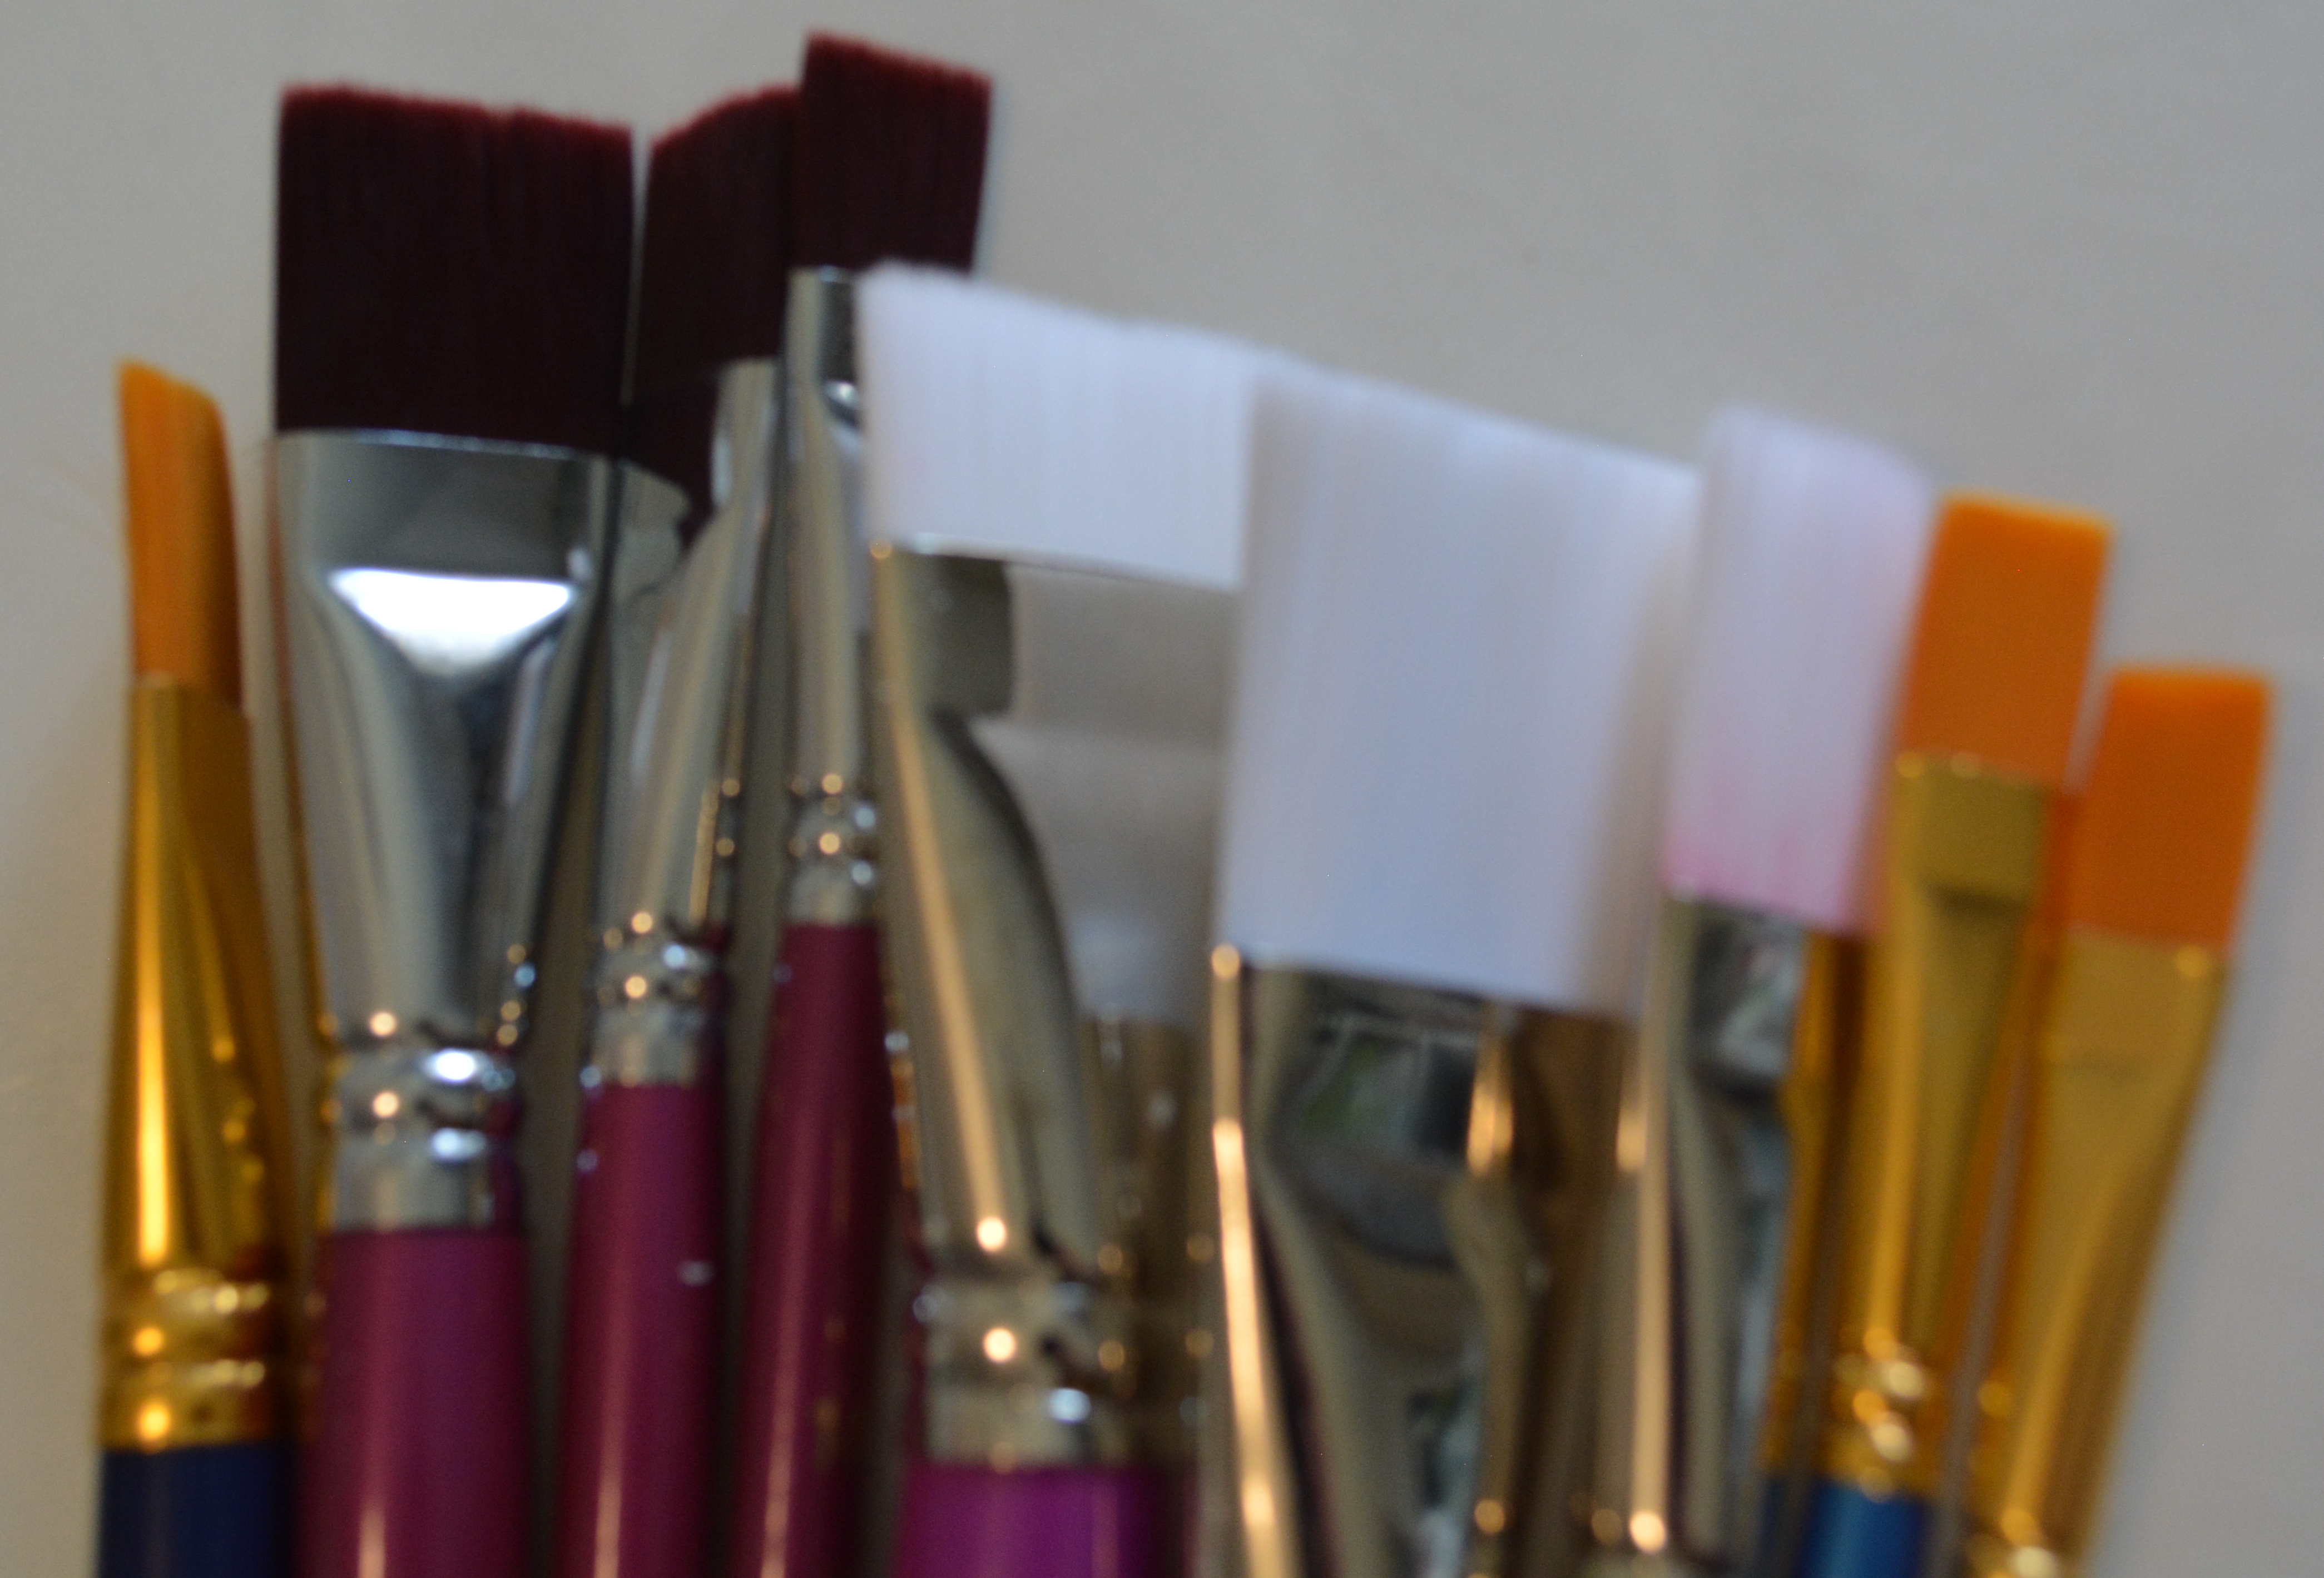
This Tool Tuesday is all about paint brushes. Not this is a very basic look at paint brushes. I am not an expert at all. I use what I like for the different things that I paint. Honestly I did not really use most of my brushes for the mediums it says to use them for.
There other thing I will say is that I have gotten brushes from all over the place. Of course Hobby Lobby and other craft stores have all kinds of paint brushes but I also get them from Dollar Tree and Amazon. So lets take a look!
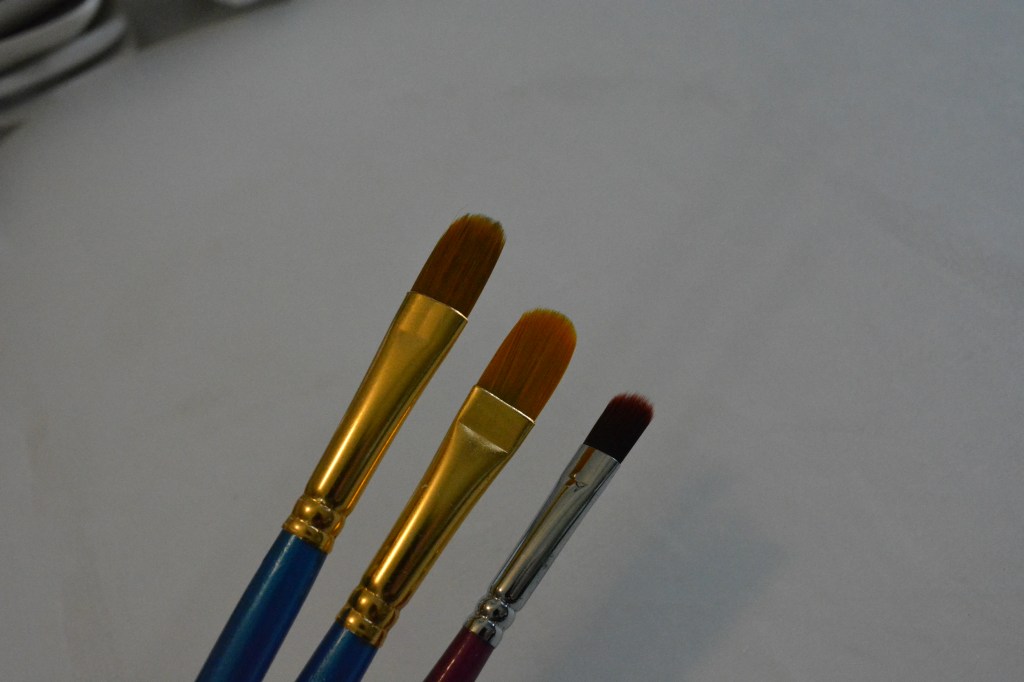
These brushes are flat and pretty short bristles. I use these for big paint projects. They cover a lot of surface area. These big brushes are also good for doing a big wash of color or getting water color paper wet.
These are smaller versions of the being ones we just looked at. They are small, square tipped brushes. Brushes like this are great for making stripes with paint. They are also great for getting close to lines.
Dome shaped brushes are next. This is a universal brush. They can be used for almost any kind of painting.
Chalk paint is the paint I use the most, and these are chalk paint brushes. They put a thick coat of paint on and do not leave a bunch of brush strokes behind. Chalk paint brushes are great for large areas.
The final brush we will look at are the most cost effective and can be used for just about any kind of painting. They are foam brushes. You can get lots in a pack and they come in several different sizes. I do not clean them, I just throw them away when I am done.
Here is a good paint brush trick for you. If you are applying more than one coat of paint, put you brush in a plastic bag and wrap the bristles up in it. This will keep moisture in the brush that way you do not have to wash it or throw it out and start with a new one when you are ready to put on the next coat of paint.
These brushes can be bought almost anywhere. I normally get mine at the craft stores and Amazon. Buy them at a price point you are comfortable with.
Thank you so much for joining me today. I hope you found this information helpful. Please Like, Comment, Share, and Subscribe!
Welcome to 5 days of Halloween crafts. Most of the crafts this week will be fast and cheap. We are going to start with these two signs.
Supplies
Dollar Tree for the win on this one. I bought both of these signs at Dollar Tree. They have several styles of DIY signs right now for Halloween. I also used Waverly Chalk Paint in the color Ink and White. For the red paint, I used to red acrylic paint I had on hand that I am trying to use up.
Once I had everything painted I though the signs needed something more so I used Dollar Tree Halloween Stickers. Other supplies are paint brushes and glue for the stickers.
Let’s Get Started
To start these wall hangers I painted the BOO with Ink Waverly Chalk Paint and EEK with red acrylic paint. Both only took one coat. Each have a different texture to them since I used different kinds of paint. Please use what ever color and type of paint you want to or have on hand. Purple and orange would also be great colors to use.
Next I took a fan brush and brushed the edges of each word with White Waverly Chalk Paint. To do this, lightly load up the brush with paint and tap of the brush on a scrap sheet of paper to get some of the paint off of it. This will keep it from clumping up the paint when you touch it to the words. Swipe the brush over the words to add some interest to them.
Once painted and dry, I thought they still looked bare. I dug though my Halloween stash and found these felt Dollar Tree Halloween Stickers. I spread them out across both words until I was happy with how they looked.
Here is a closer look at the wall hangers. I love projects like this that are fast and each cost about $3.00 each. That is very affordable.
I hope you enjoyed day 1 of 5 days of Halloween. Please let me know what you think!
Happy Monday and have a great week. Join me tomorrow for two blog posts. Tool Tuesday will take a look at paint brushes and also another Halloween craft will be posted.
Thank you for joining me! Please Like, Comment, Share, and Subscribe!
Have a great day!
Melissa McGuire
Supplies
EEK and BOO Word Hangers- Dollar Tree
Waverly Chalk Paint in Ink- Walmart
Waverly Chalk Paint in White- Walmart
Red Acrylic Paint- Tuesday Morning (any craft store or Walmart)