I love to do crafts with the plastic Easter eggs every year. This year I did not have any ideas so I went to Pintrest to look for inspiration and like usual it did not disappoint. There were eggs covered in so many different things like lace and fabric, but the ones I liked the most were the eggs covered in twine. I do not have a shortage of twine that’s for sure which meant I had the supplies on hand. I must say though I do not advise you go out shopping. Please stay at home and be safe and healthy and shop your crafty stash.
Supplies
")
")
For this project you will need plastic Easter eggs, Mod Podge, and of course twine. I will be using a crate and moss because I wanted something to put my eggs in once they were done but you do not need to do this step. If you use a crate of some sort then you might need paint if you want to paint it. It would be handy to have a paint brush or a paint sponge if you have them. I also used a craft knife and scotch tape but those are optional too.
Lets Get To It
")
")
")
Now this is not a fast project. It does take some time and some patience. I started by threading the twine up though one of the holes on the inside of the plastic eggs and putting some scotch tape on the inside of the egg to hold it in place. I did change things up some after my first egg though. I did not like that the hole was not in the cent of the top of the egg so I used a craft knife to make a hole in the top and bottom of the egg to string the twine though.
Once the twine is secure take your brush and load it up with Mod Podge. Paint it onto the top of the egg so that it is covered. Then start twisting the twine on the top of the egg in a circular motion to make a spiral. I used a skewer and a small silicone spatula to help press the twine onto the egg because my finger kept sticking to the twine and pulling it back off the egg. Continue the process of adding some Mod Podge all around the egg and then wrapping the twine around it.
")
")
Do the egg in two parts. First wrap the top part of the egg in twine and then cut the twine leaving about 3 inches to tuck inside the egg. Then start the bottom part of the egg by doing the same steps as you did to start the top. Once you have secured the twint inside the egg, place the left over piece from the top of the egg inside and close it up. When I got to the middle of the egg with the second piece of twine, I made sure the egg was covered well with the twine and then cut the twine and pushed it down well against the egg trying to get it in between the twine that I have wrapped around. Then I covered the ending with Mod Podge. I also covered the whole twined egg with Mod Podge to make sure it was all secure and let it dry on parchment paper.
You can use any kind or color of twine for this project. If you have neutral decor, you could use just the regular brown twine. This project is very customizable to the decor and colors in your home.
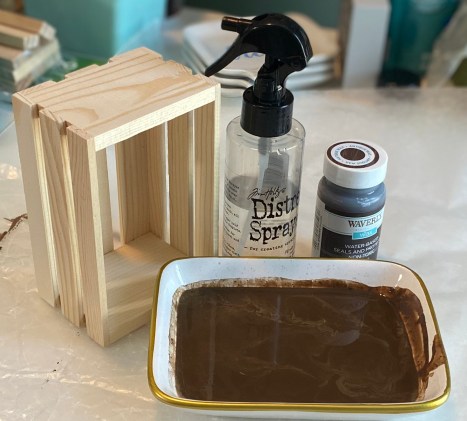
Now lets work on the crate. I only want to stain the crate. I did not want an opaque look to the paint. So I took Antique Wax paint and added a lot of water to it and mixed it together. You can turn almost any kind of paint into a stain by adding a lot of water to it. The more water you add, the less color you will get when you paint your project.

The final step is to add moss to the bottom of you crate and add the eggs to it. This has been a great little addition to my Easter decor. I love the eggs and they were fun to make. I hope you love this project too. It is a perfect one to do while watching TV.
Thank you for joining me and please stay safe and healthy.
Melissa McGuire
Supplies
Plastic Easter Eggs- Dollar Tree, Walmart, Target
Twine- Any craft store or place like Walmart
Mod Podge- Dollar Tree, Walmart, craft stores
Foam Brush- Dollar Tree, Craft Stores
Wooden Crate- Michael’s Craft Store
Antique Wax Waverly Paint- Walmart
Paint Brush- Walmart, Craft Stores
Moss- Dollar Tree
Craft Knife- Craft Stores
