Christmas is a week away!! YAY!!! It is coming up fast!
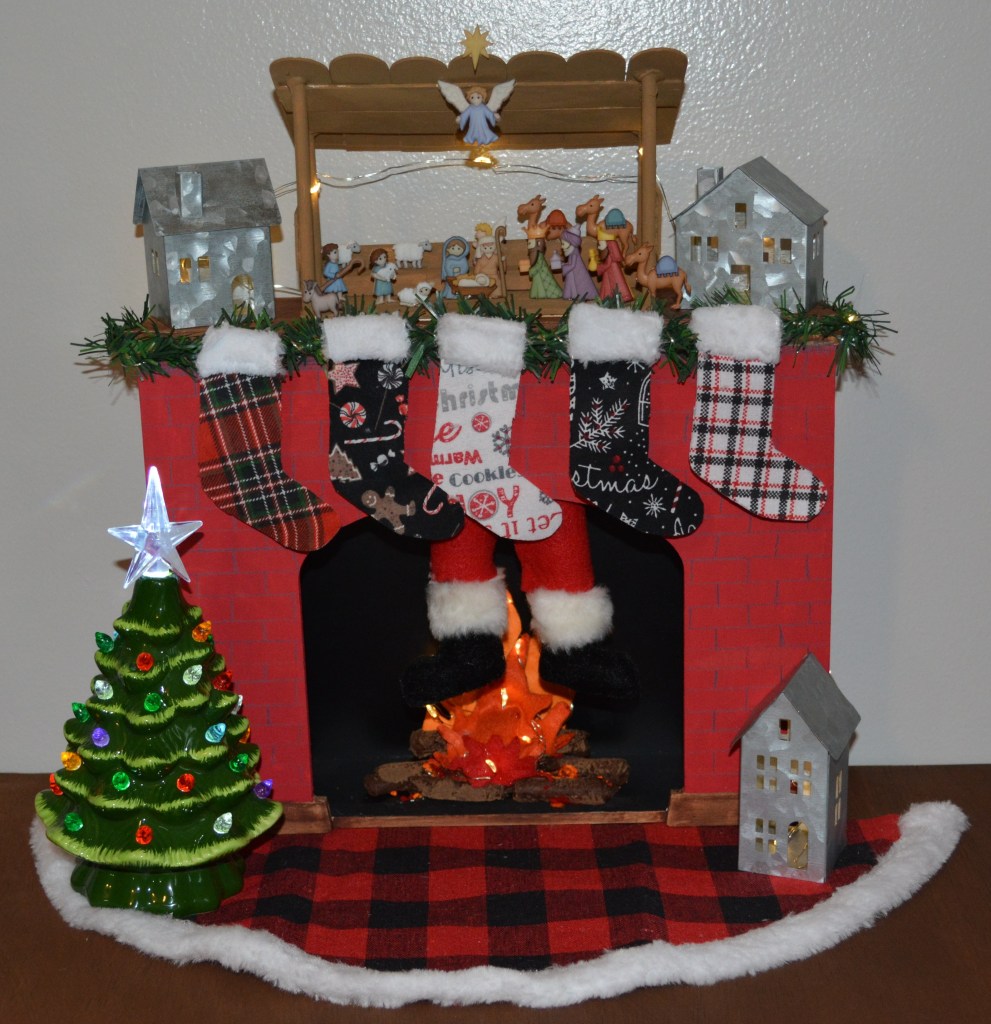
So I have worked for over two weeks on this fireplace. The Fireplace itself is from Target. It was a Halloween decoration that had something to do with potions but as soon as I first laid eyes on it, I knew exactly what I was going to do with it. It was going to be transformed into a beautiful fireplace with Santa coming down the chimney. I even built a manger out of popsicle sticks to put on the mantle. This project really challenged me to think outside of the box to make each piece of this. Please come along as I tell you how I created this cute fireplace scene.
Lets Get Started
Supplies

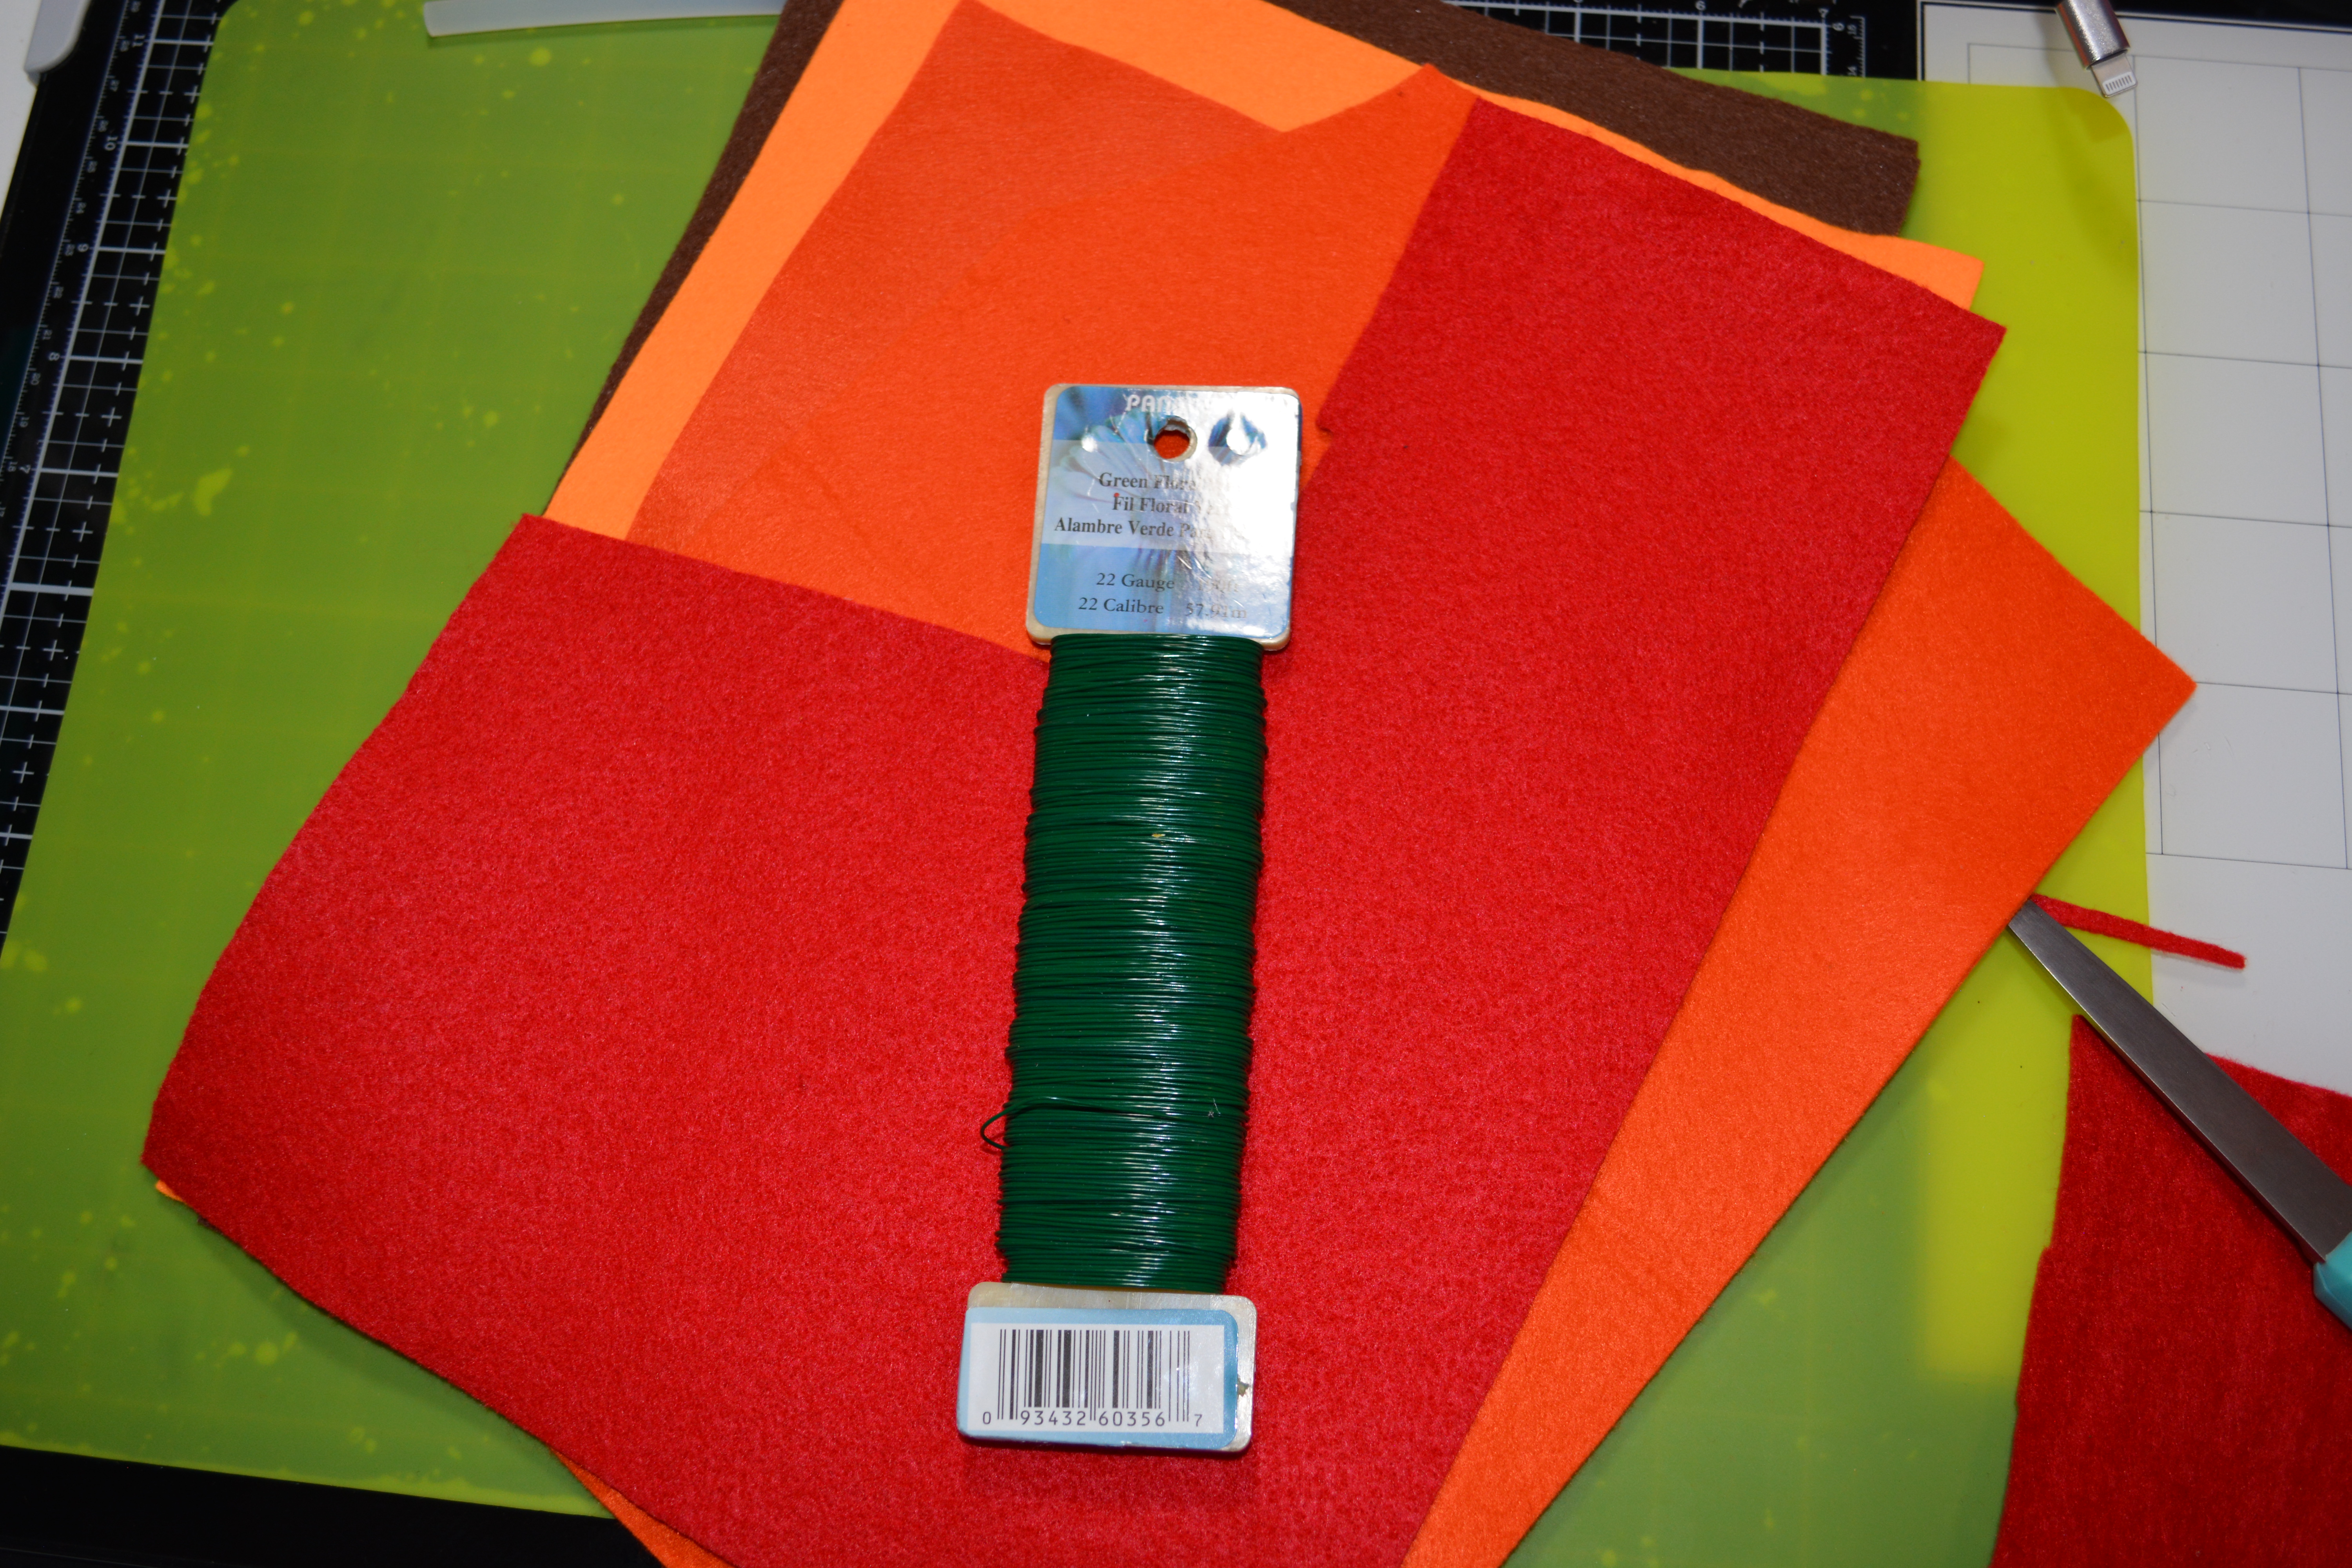

I am not going to lie, this project has a lot of pieces. To start, I got the Potions Halloween decoration at Target. You could make one of these out of foam core board from Dollar Tree. I used elf legs from Walmart. Some of the little stuff I used was felt, floral wire, fairy lights, houses, popsicle sticks, dowel rods, buttons, garland ties, fabric and a ceramic tree. The tools I used were wire cutters, hot glue, tape, and paint.

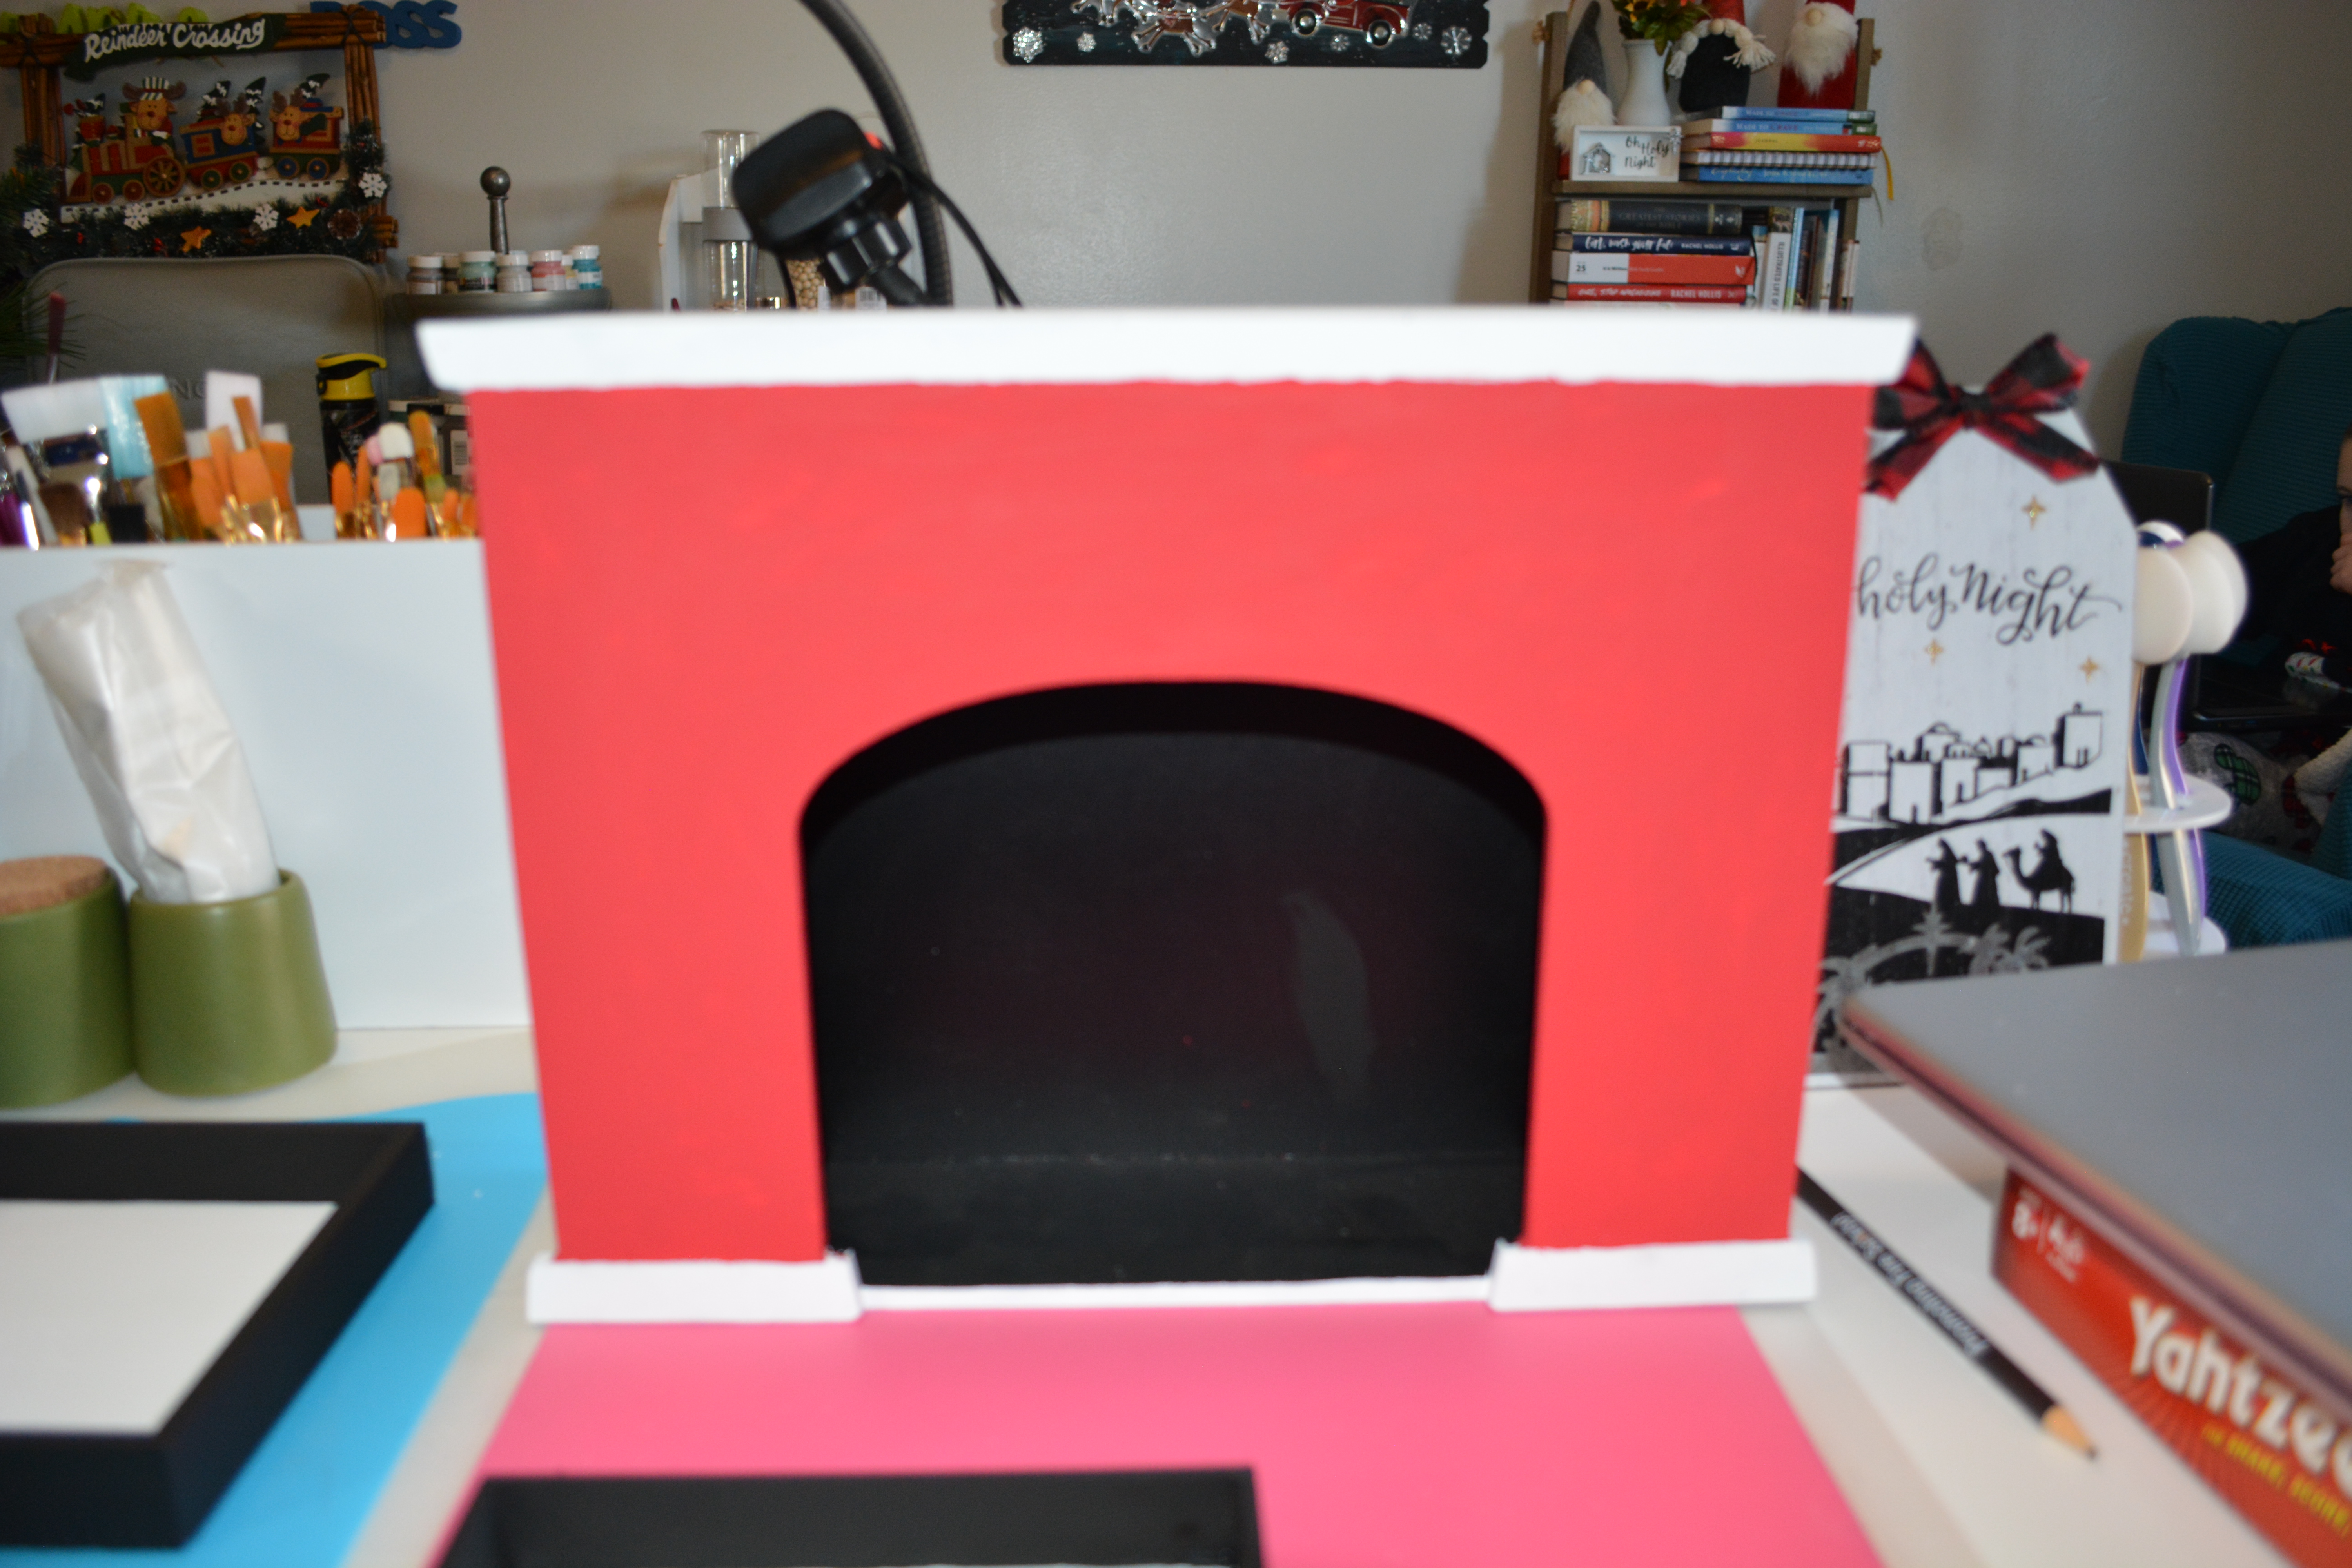
The first step for this fireplace is to prime it. I used Waverly White Chalk Paint to do that and I only did one coat. Next I painted the main part of the fireplace with red chalk paint. I left the bottom edge and the top mantle white for now. This took to coats.
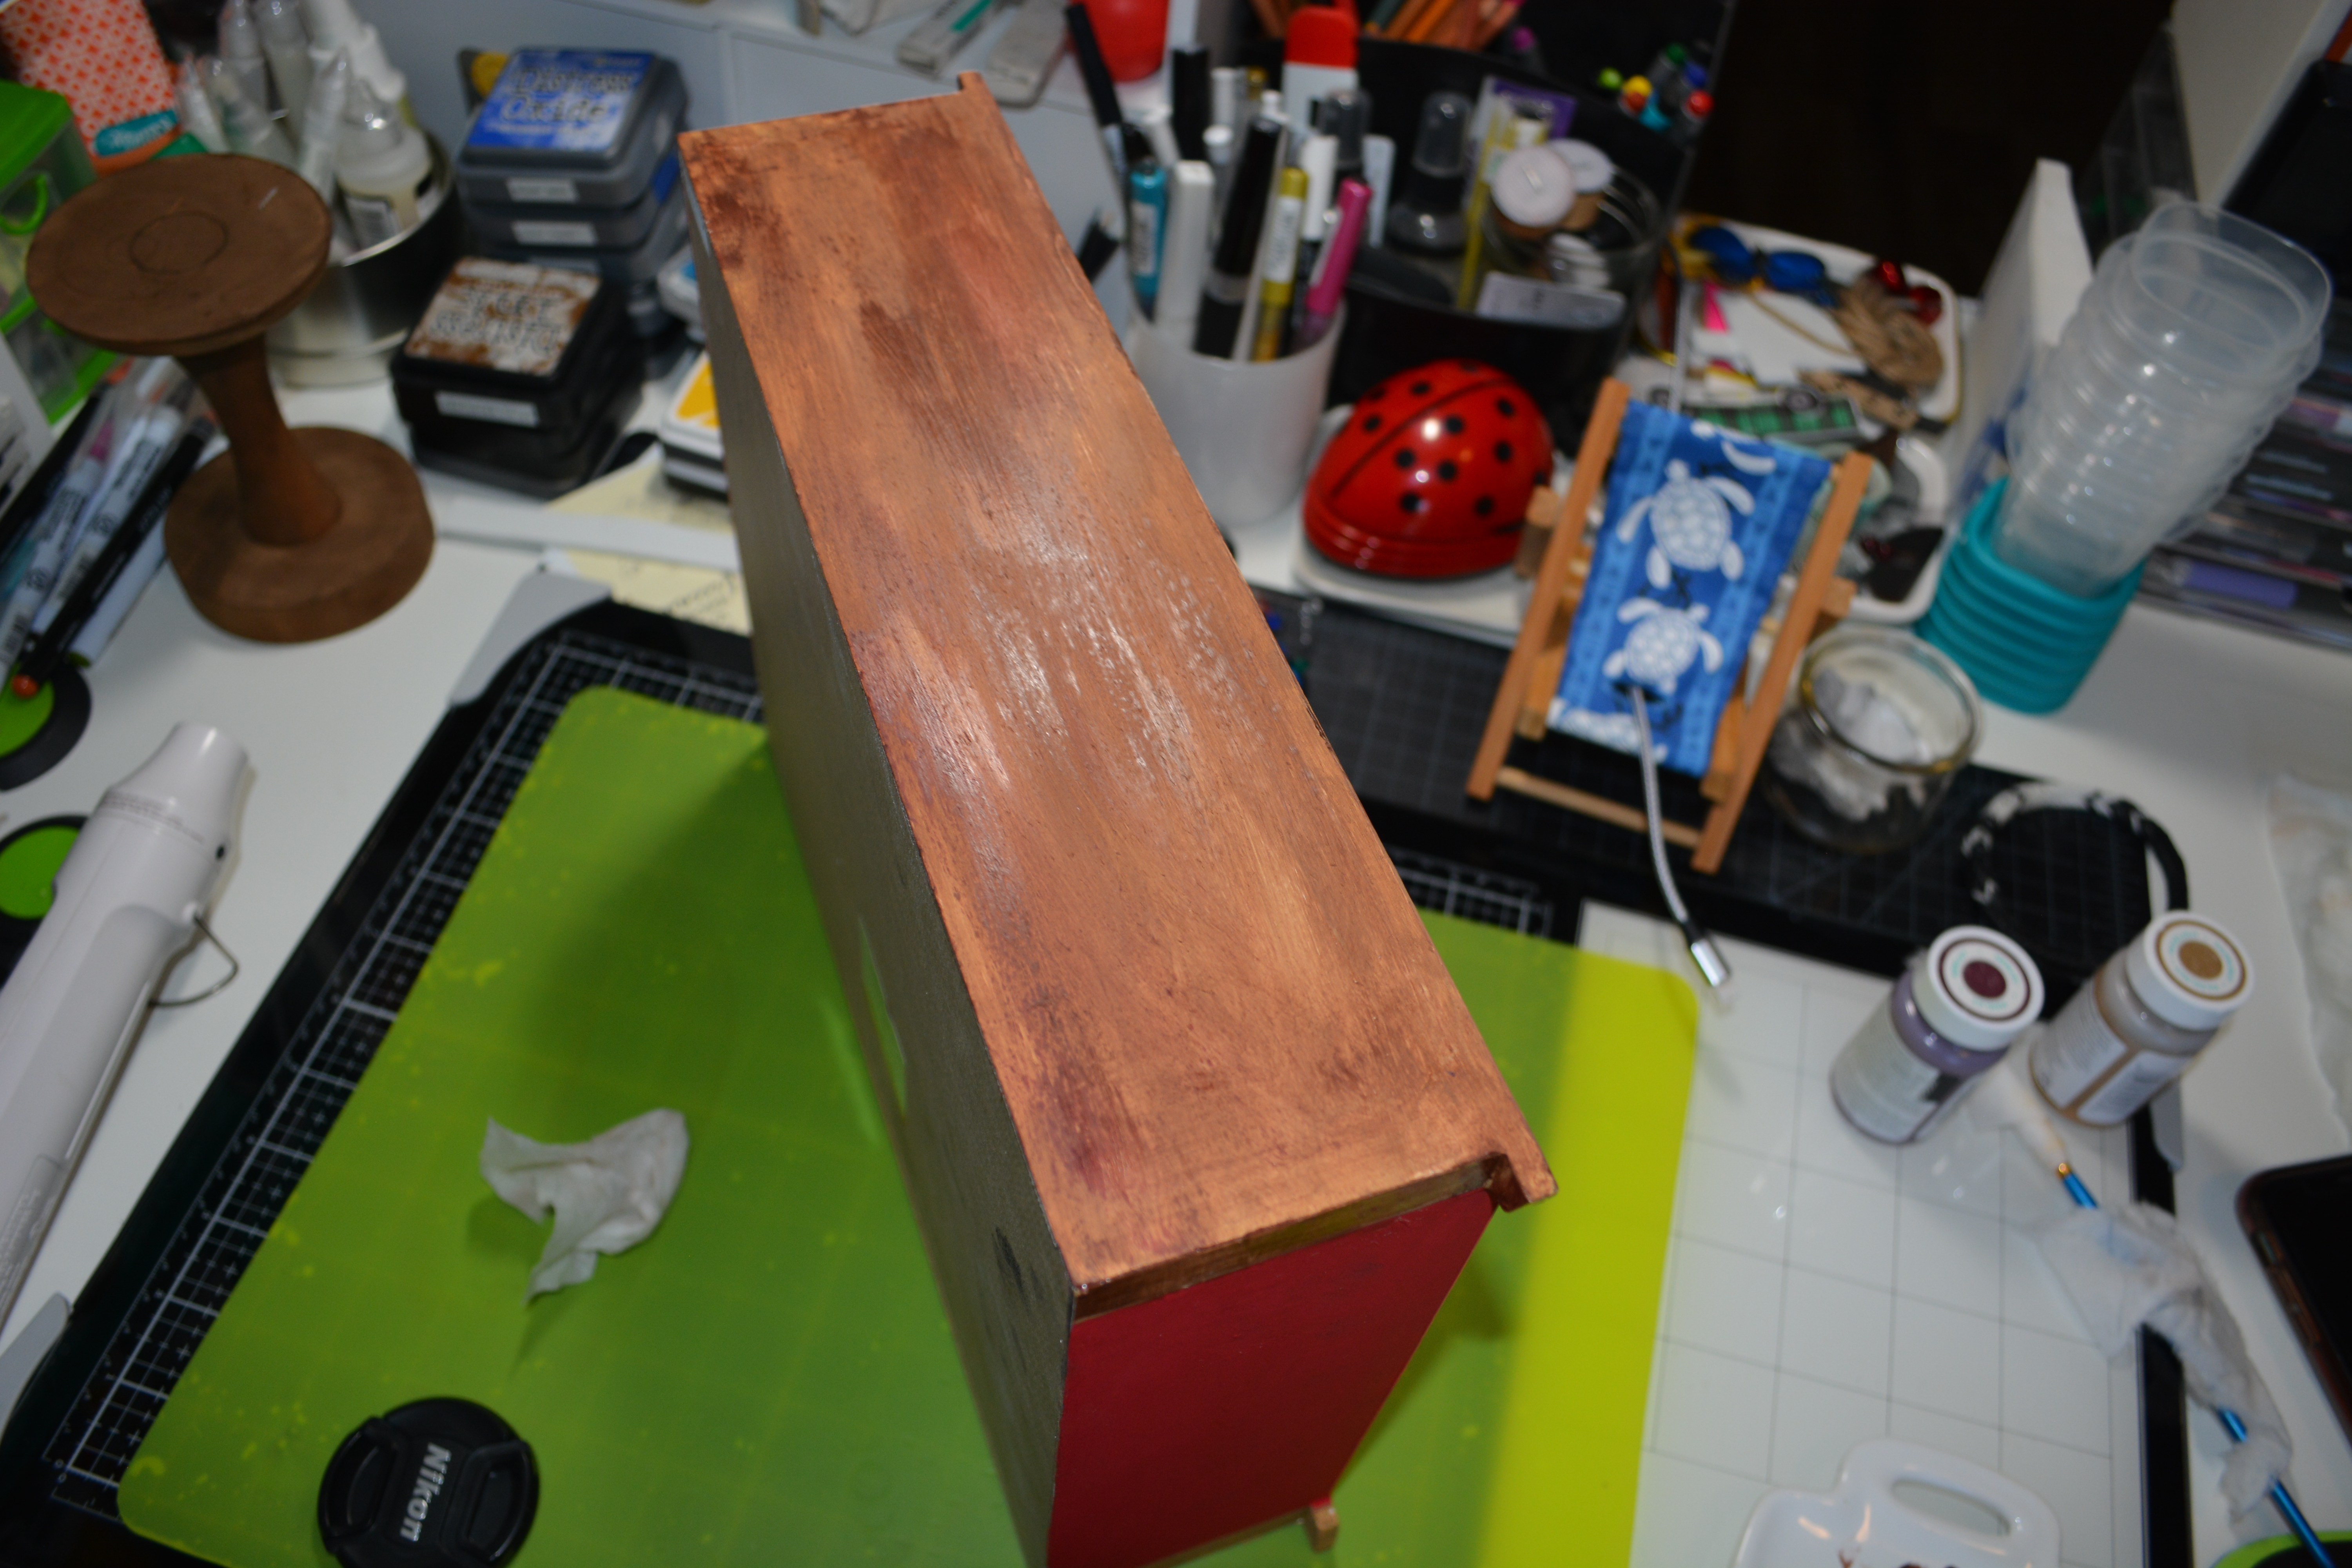
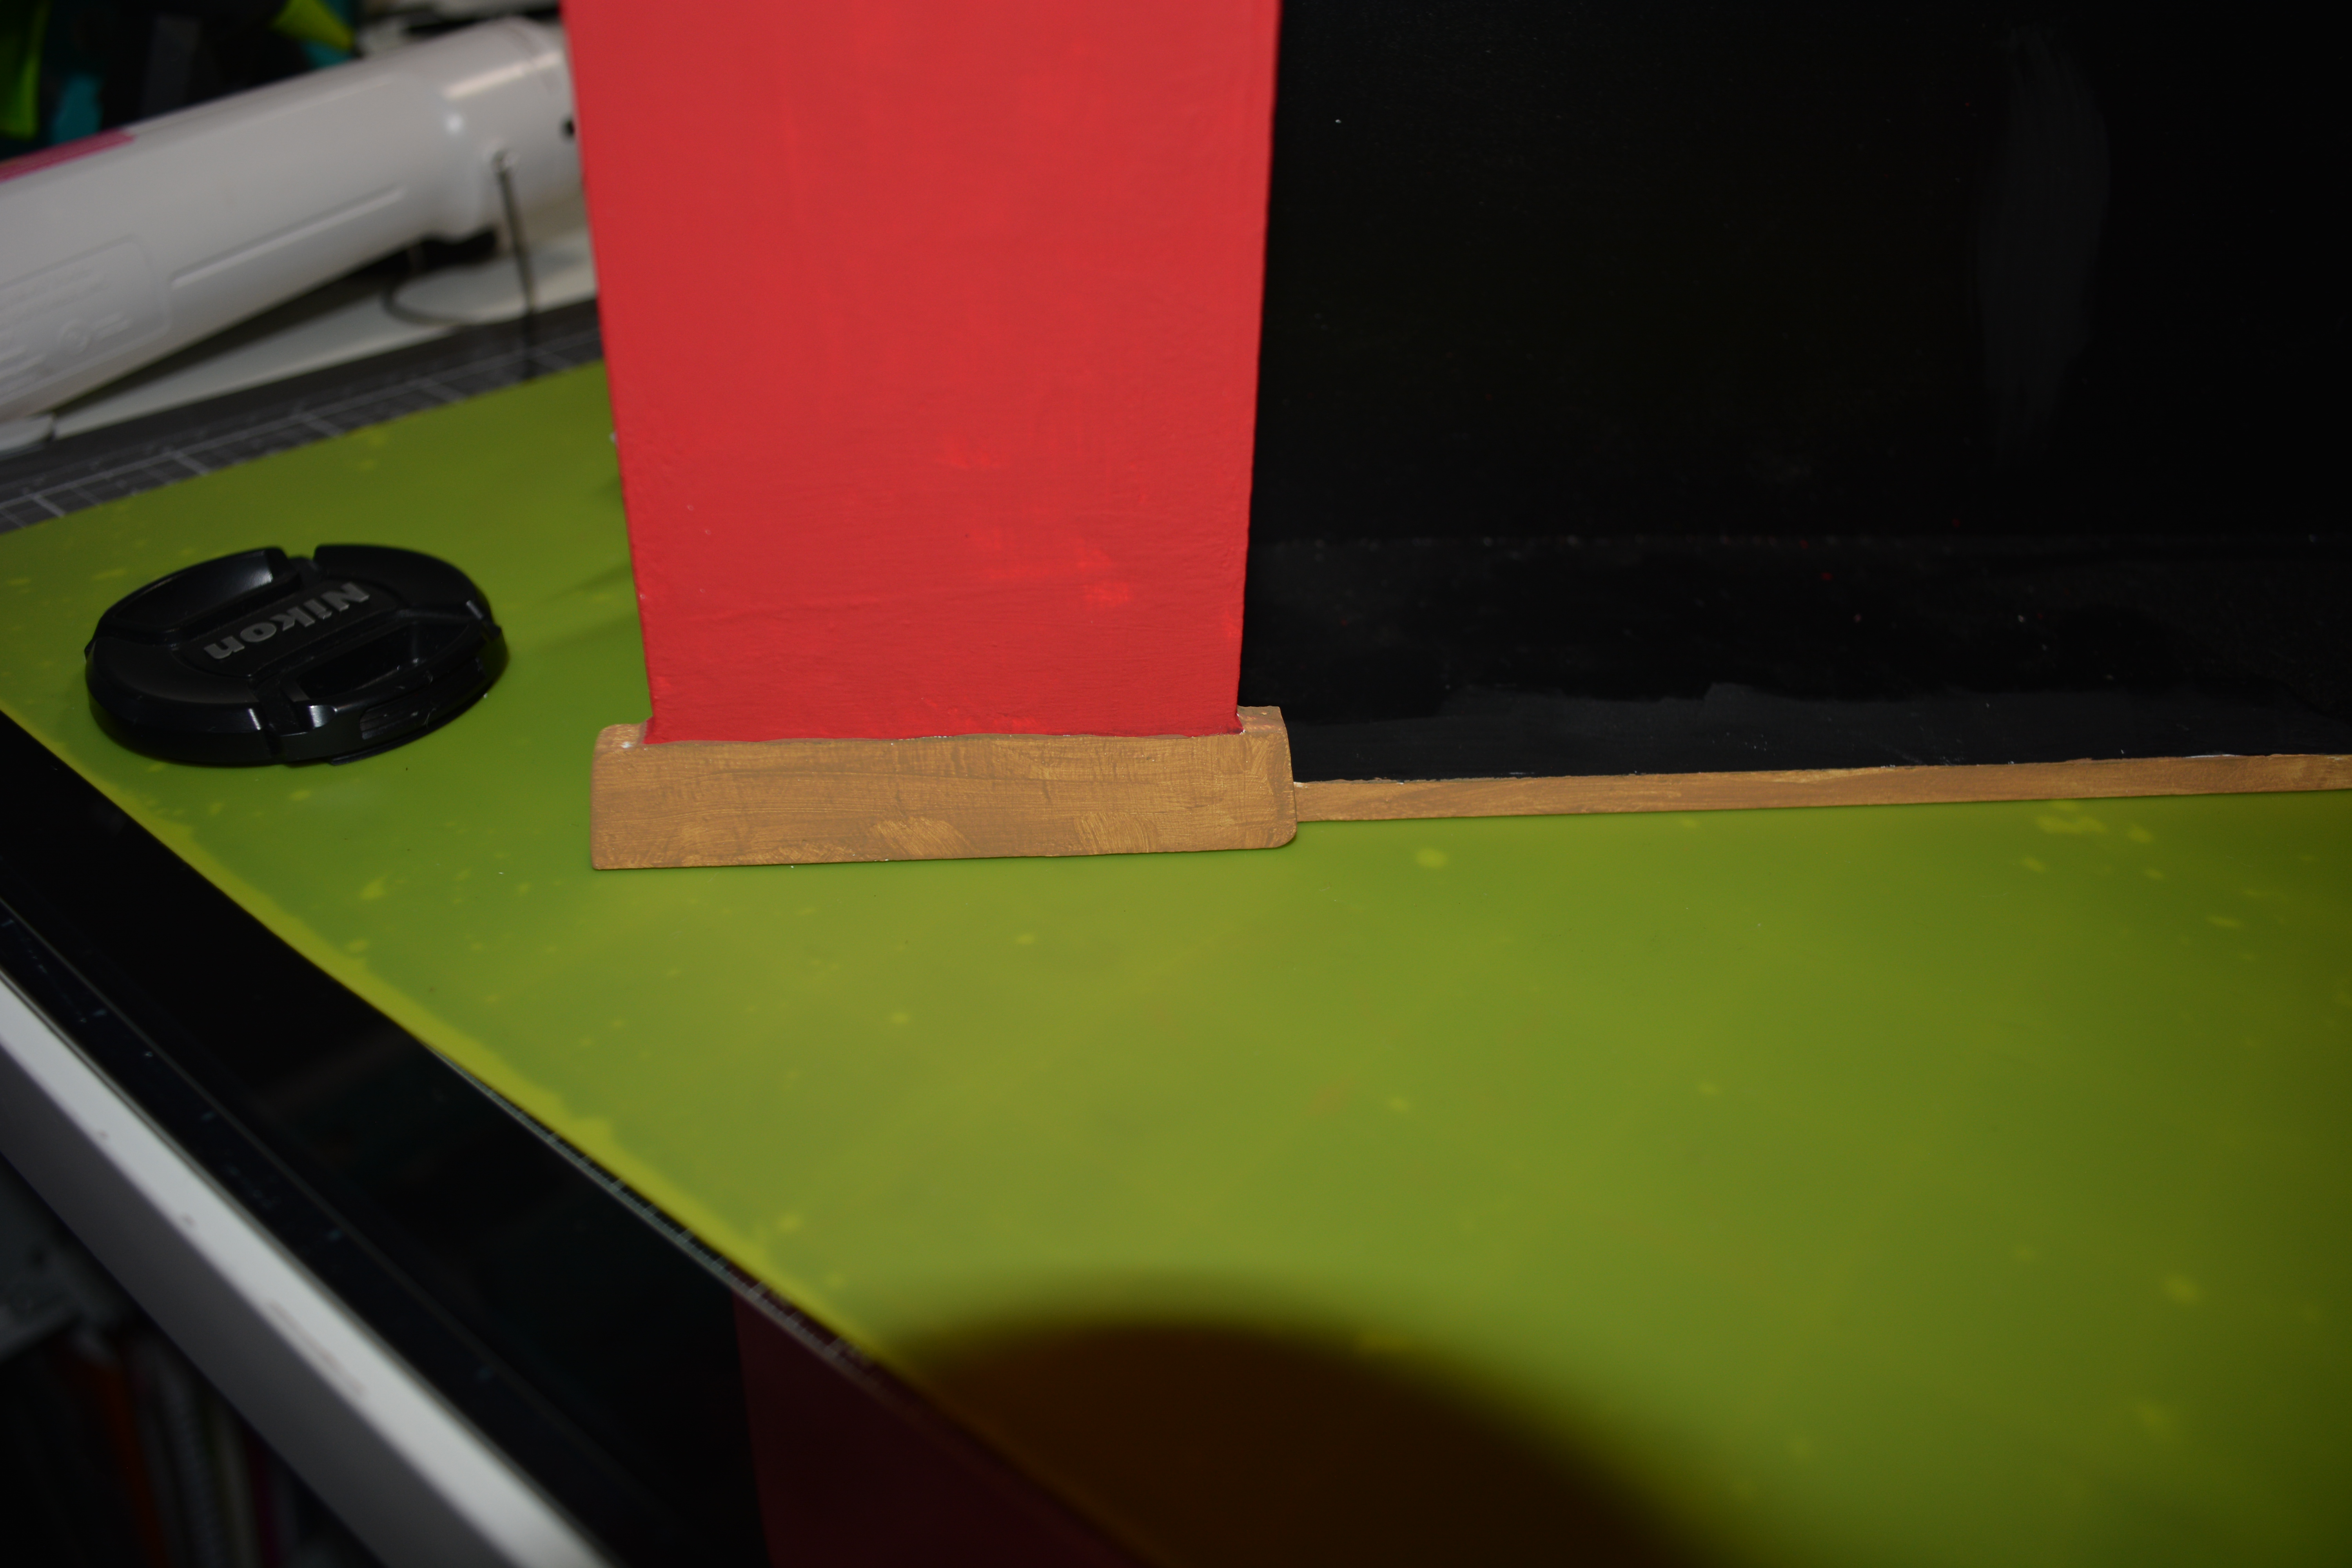
After the red chalk paint is dry, I took Waverly Chalk Paint in Hazelnut and painted the bottom and the top mantle with it. I let that dry just a bit and then dry brushed Waverly Antique Wax. This made the mantle and the bottom edge look like wood. I left the inside of the fire place black.

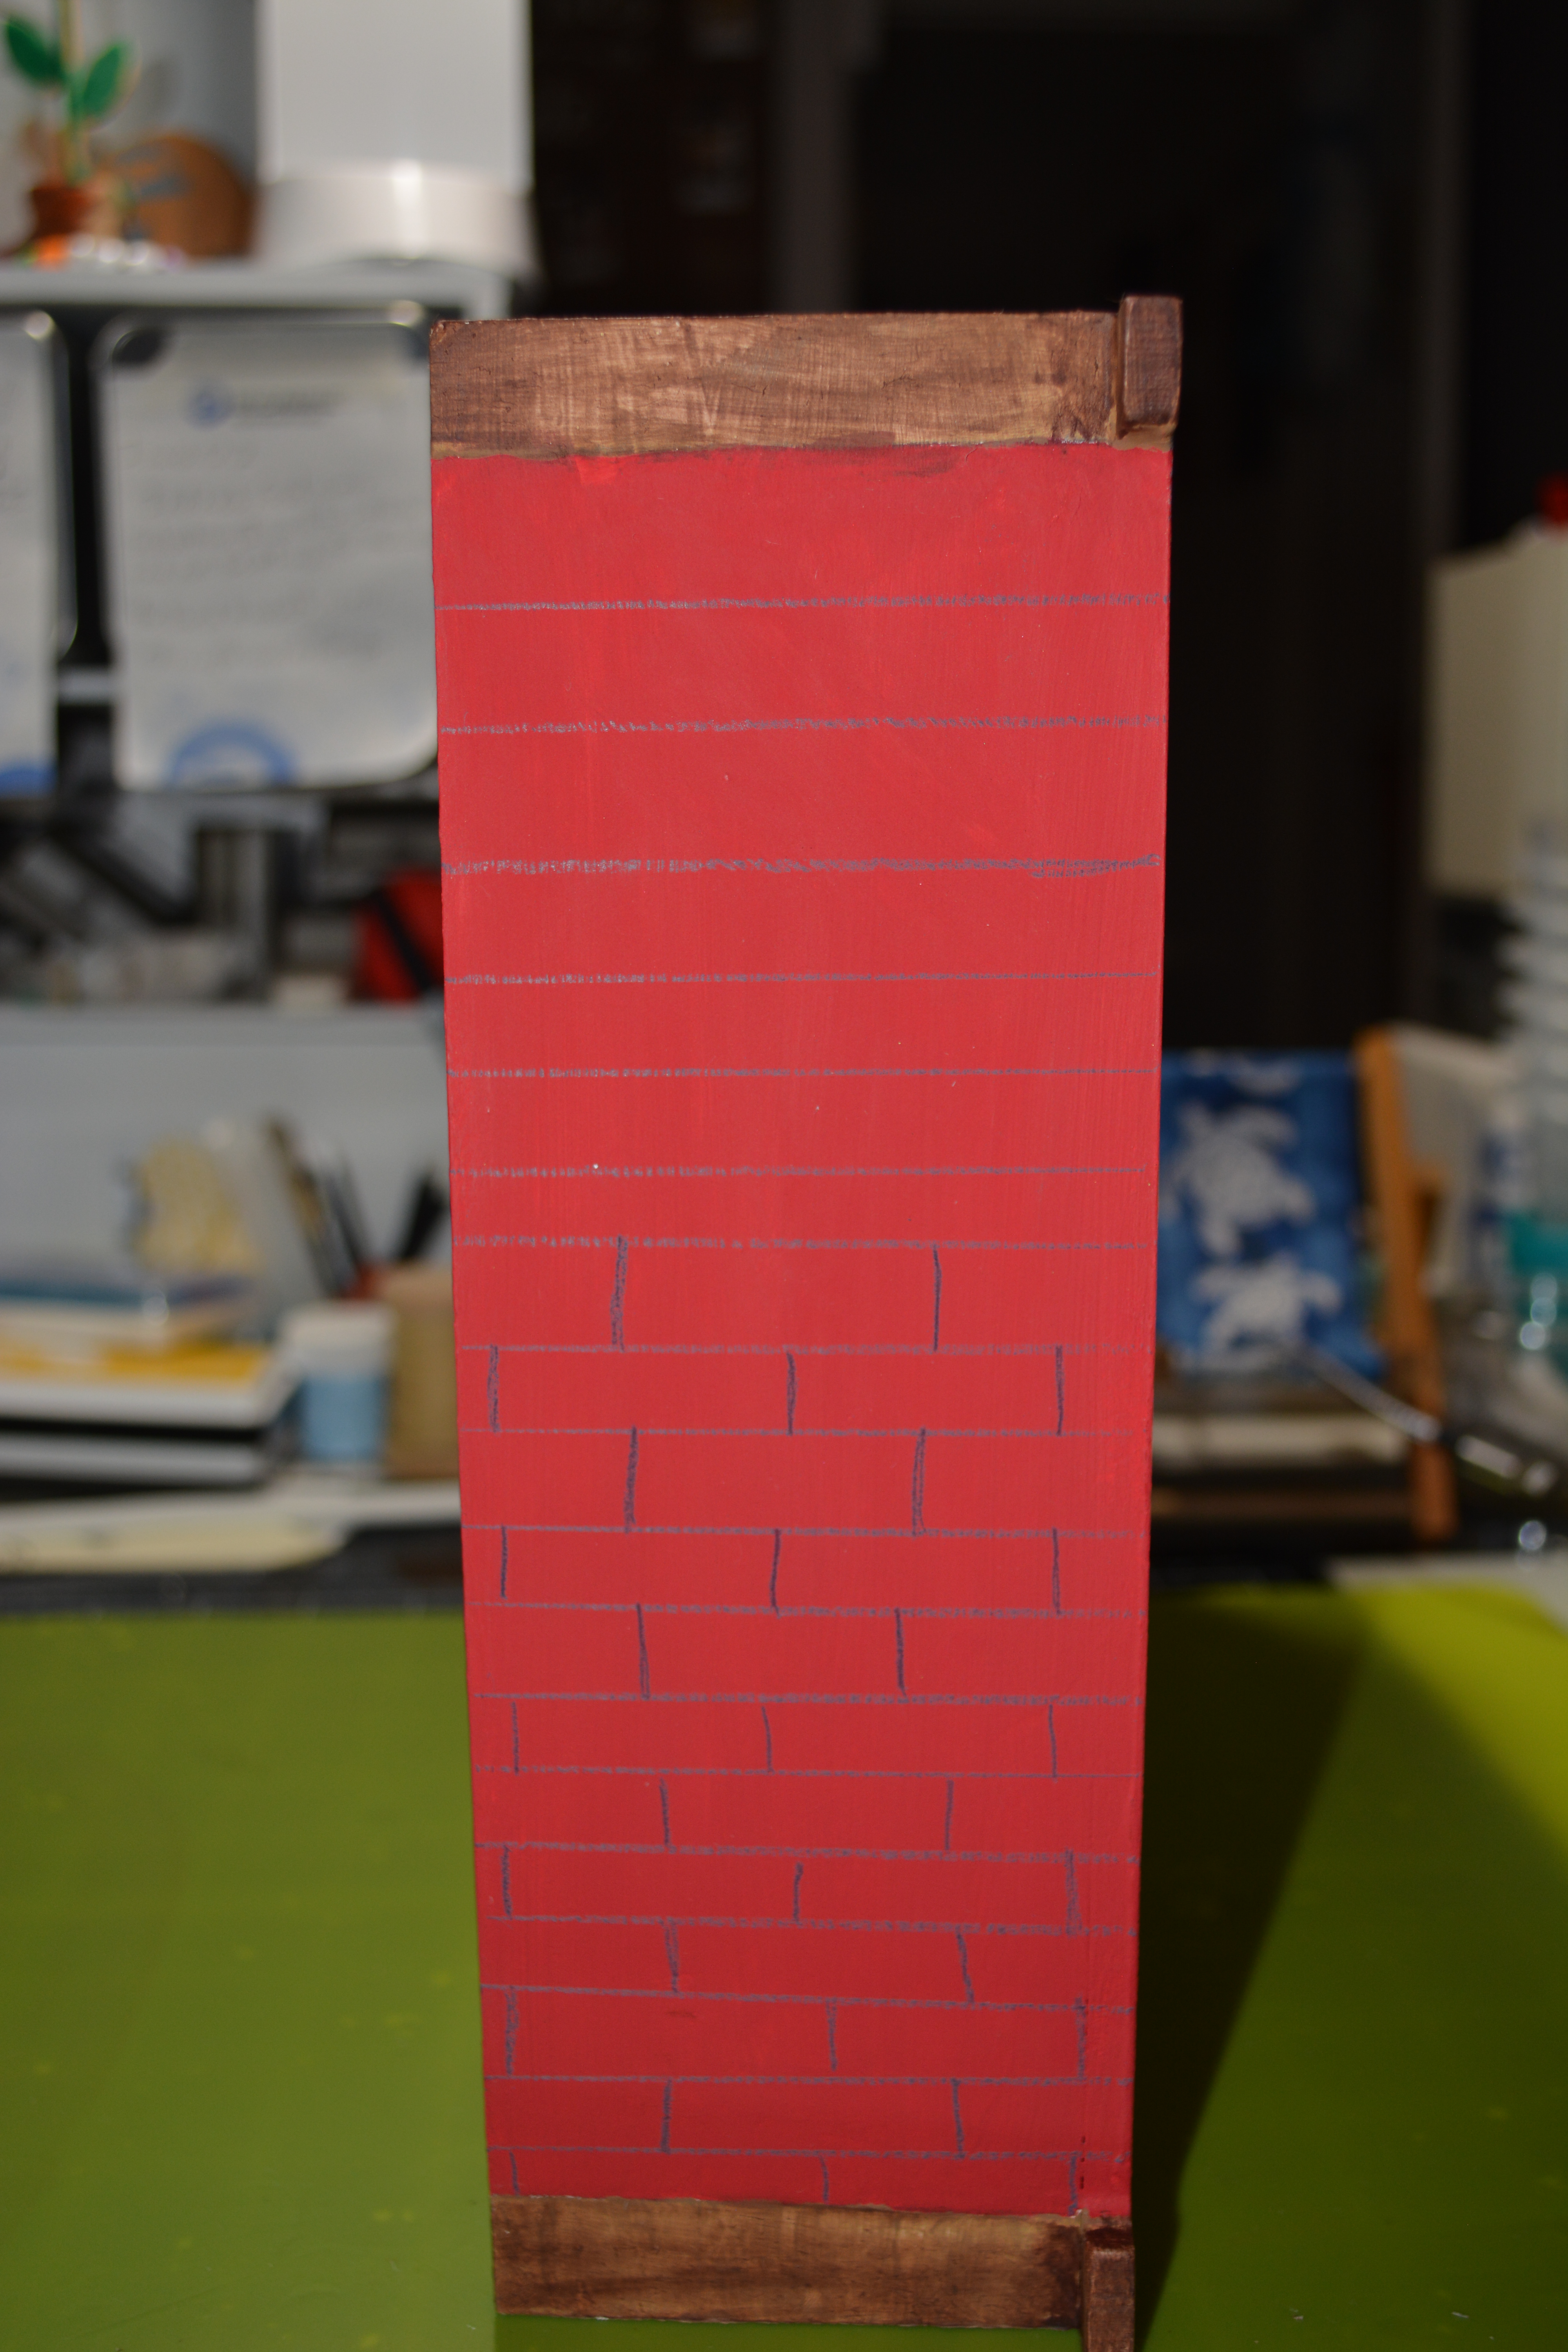

This next part is a bit tedious but the affect it gives is so great! I good a T-square and drew lines with a gray colored pencil to make the fireplace look like it was made out of brick. This took a bit and I started at the bottom of the fireplace and worked my way up.
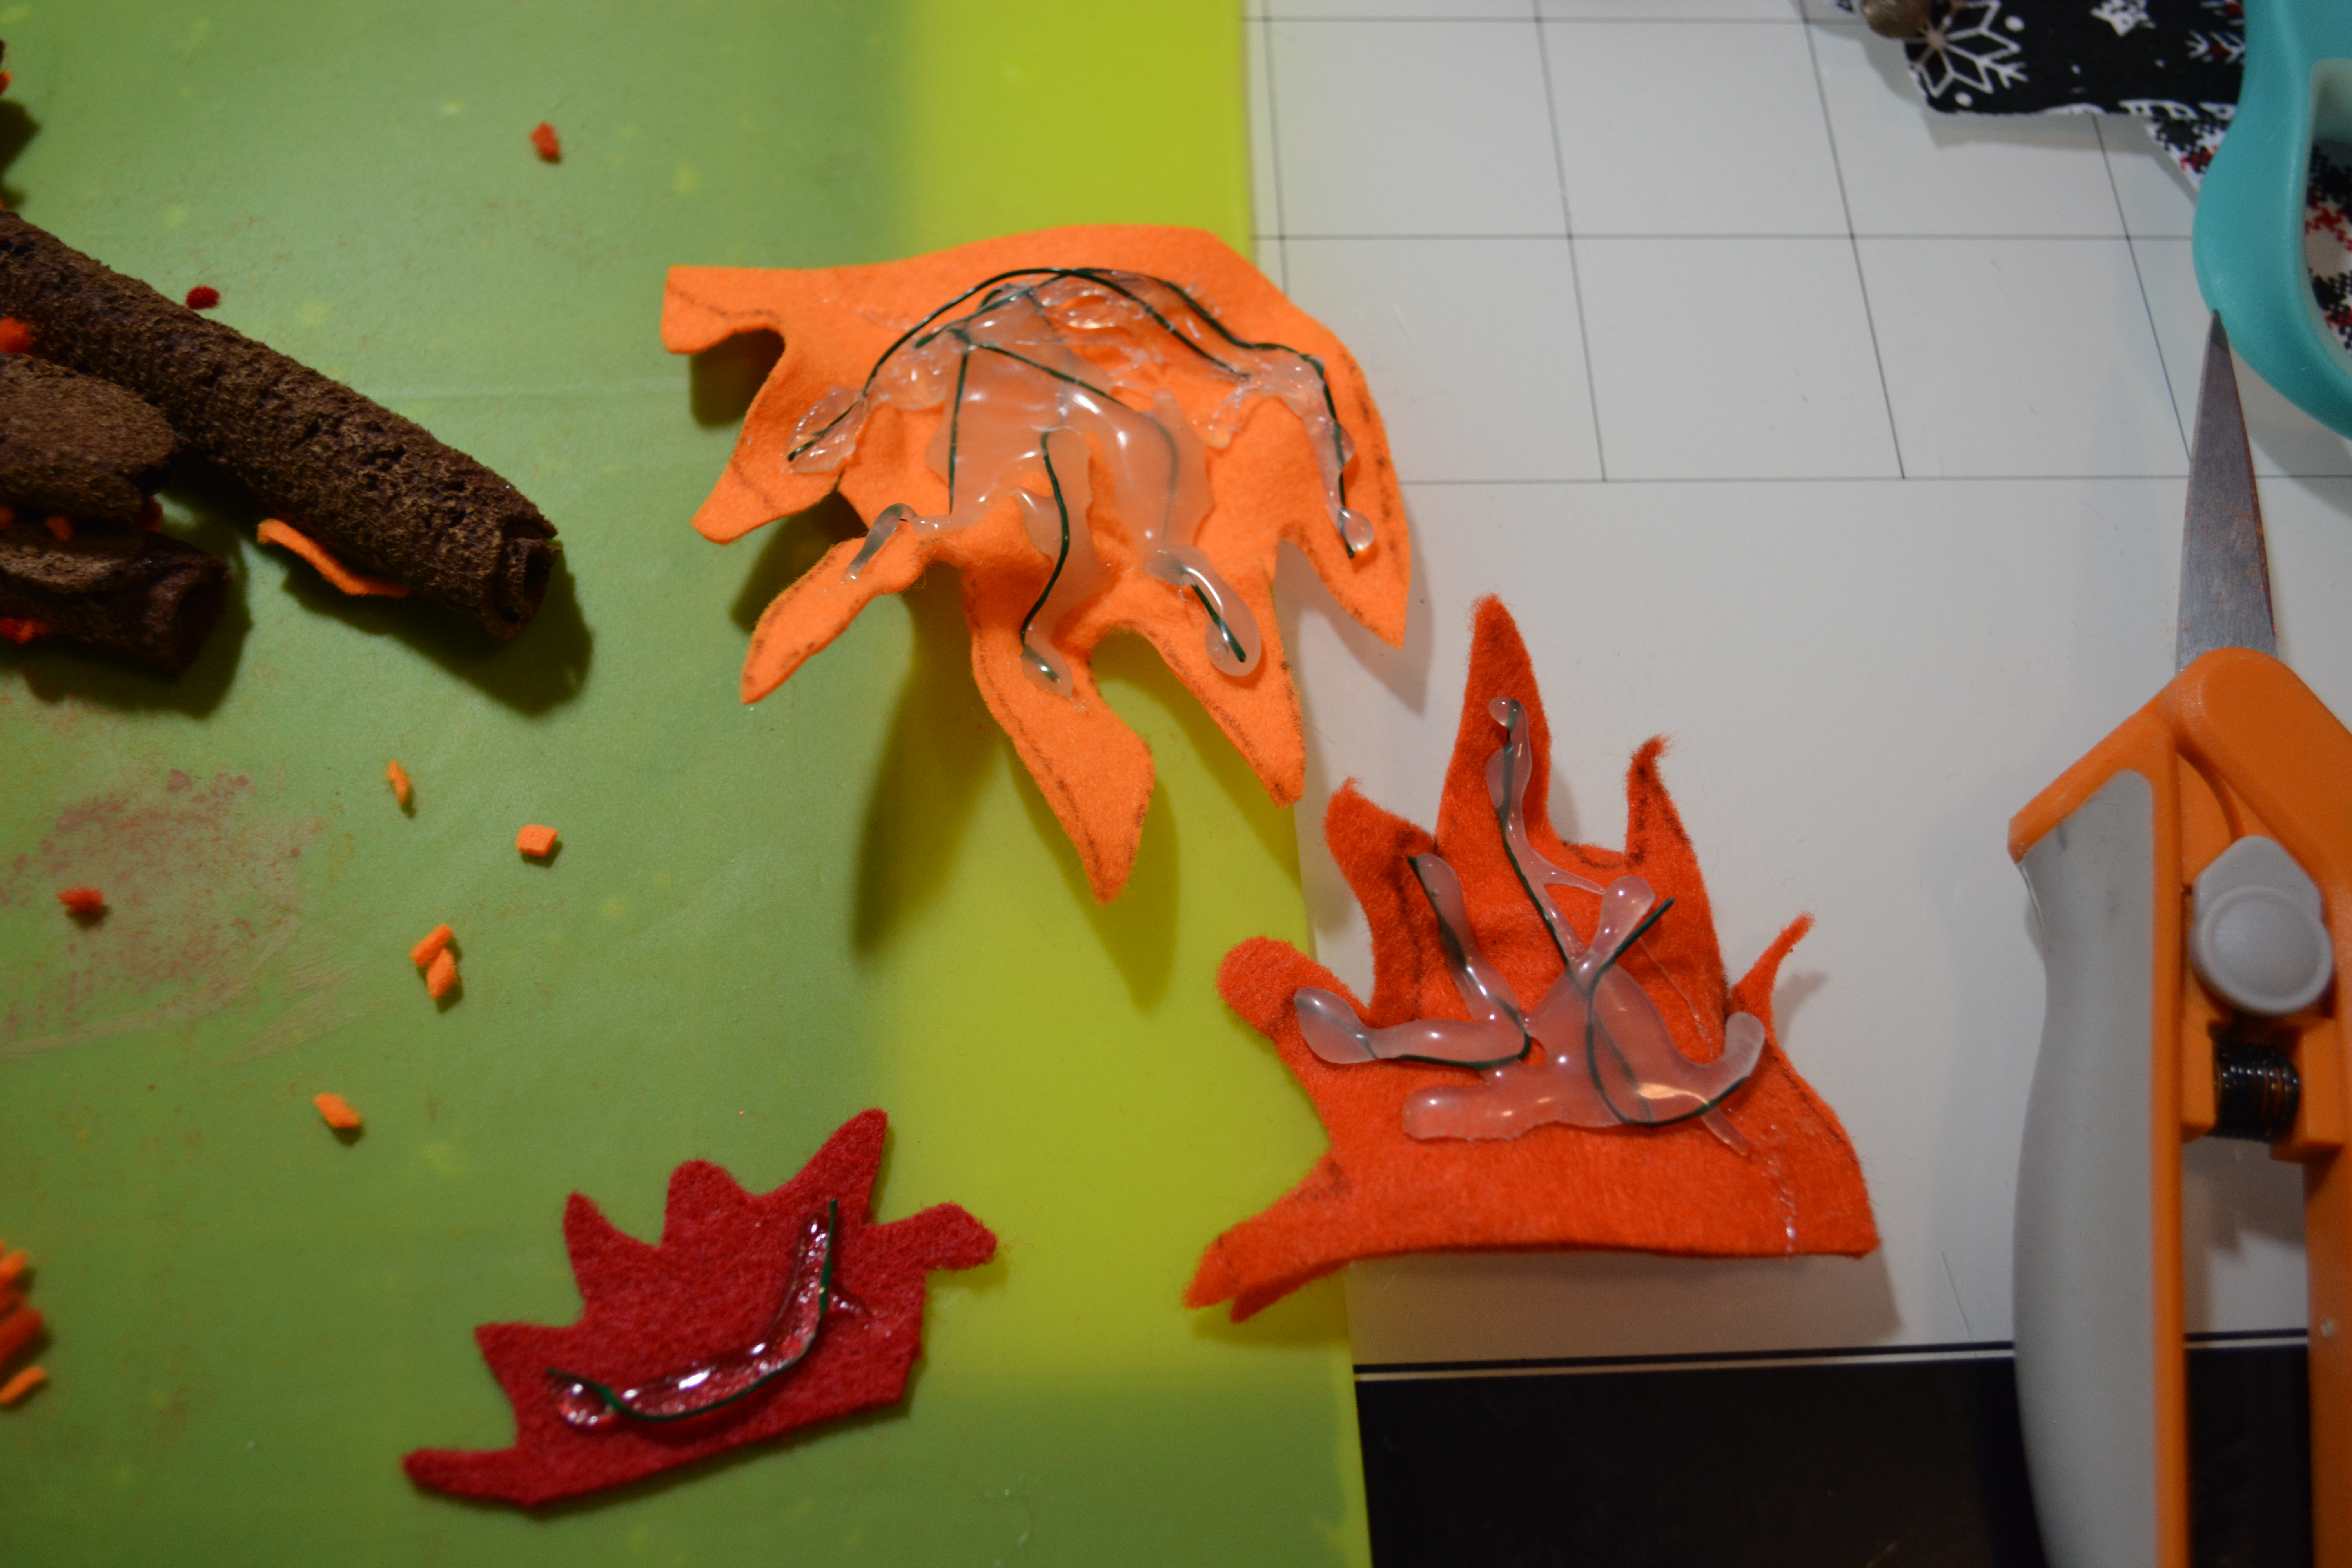

Now lets work on the fire for the fireplace. I took orange and red felt and cut out things that looked like flames. You can add yellow felt too, but I did not have any on hand. Each color is a shorter flame than the one before it. On the back of the flames I hot glued floral wire to them so that I could bend them to look more realistic. Then I sprayed the front of the felt with glimmer spray. You could skip this because it does not glitter like I thought it would.
For the firewood, I cut rectangles out of dark brown felt and rolled them up and hot glued the edges. Then I brushed Waverly Chalk Paint in Hazelnut over them. I was having a hard time trying to make these pieces look like wood. Then I remembered that if you took a crafting heat gun to felt, it melts!! so that is what I did. I melted all the pieces and they looked a lot more like wood when I got done. You could use brown paper for this.
From there I cut very tiny pieces of the orange and red felt to add with the wood to make it look like it is burning,
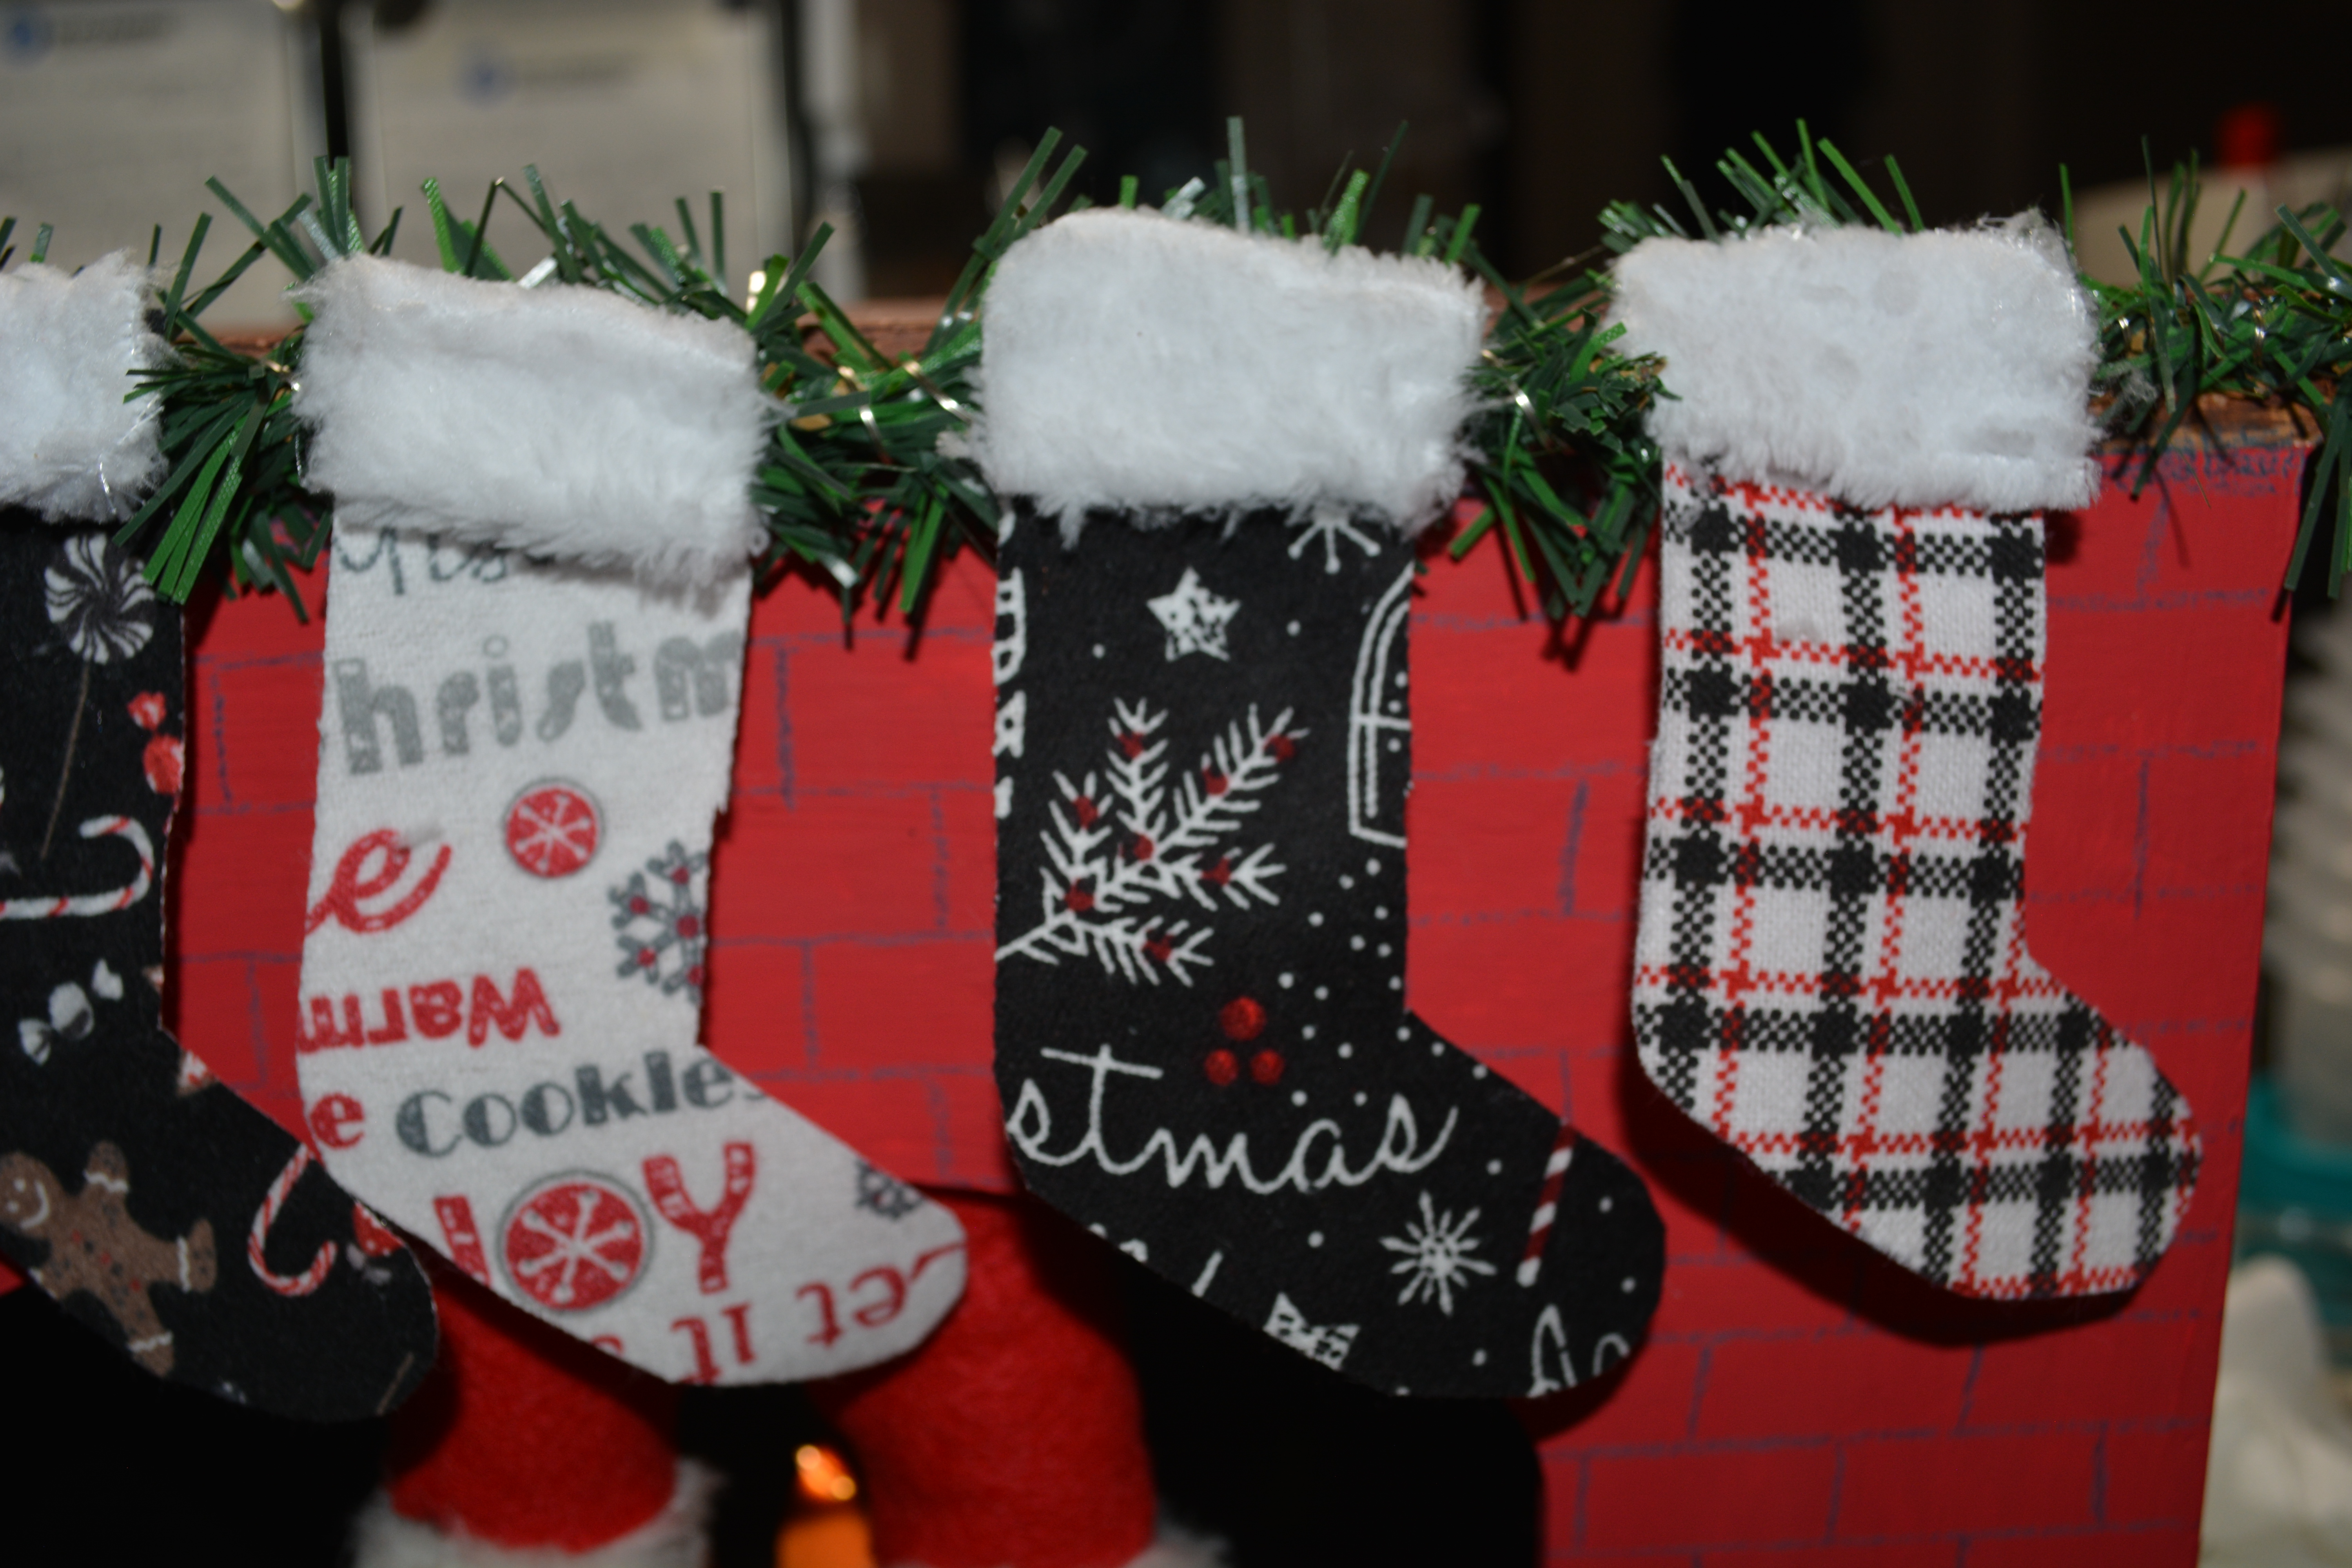

Now lets look at the stockings. I drew a stocking shape on fabric from Walmart. Lets be honest here I cut out a stocking 4 or 5 different times until I liked the shape and size of one. Then I used that one and cute out 4 more stockings. That gave me 5 all together and they were all different patterns. For the fluffy white trim, I used a white cloth from Dollar Tree. I cut it to size and rounded the corners. Then hot glued it onto the top part of the stocking.
It’s time to add Santa! Santa need some help though. I could not find Santa legs but Walmart had these elf legs that you clip under the branches of a tree. It took some thought to turn them into Santa legs. I covered the legs with red felt and hot glued it down. Then I bent the toes of the elf backwards and hot glued them backwards. This made Santa boots instead of pointy elf shoes. It is time to add Santa’s legs! I hot glued them in place making sure his legs were seen but did not completely cover the the fire.
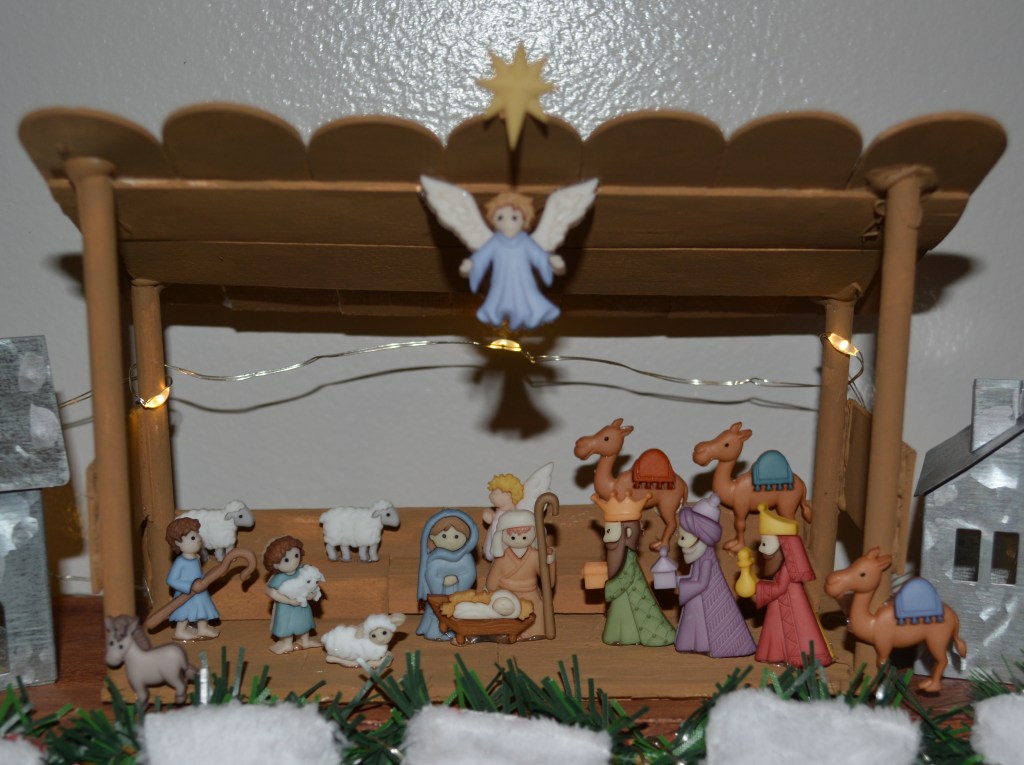
The final thing I created for this scene is a manger. I build it out of jumbo popsicle sticks and small dowel rods from Dollar Tree. The people themselves are buttons from Hobby Lobby. If you want to a manger scene you could just put a small one on the mantle. You do not have to build one. I just loved these buttons of all the Christmas story people and wanted to use them. I hot glued them in place. Yes it is a bit big for the mantle but I had to have the space for all the people and animals and a manger scene was a must have for me personally.

It is time to assemble everything. I started with the inside of the fireplace. I knew I wanted fairy lights inside the fireplace so I drilled a hole in the bottom back of it and fed some of the fairy lights through. Next I glued the wood and tiny pieces of felt down. After that I molded the flames the way I wanted them and hot glued them in place. I did not glue them on top of each other. I left some space between them. Finally, I moved the fairy lights around the flames and hot glued them down where they needed it. I did this will the fairy lights on so that I could see where the light would shine.
Around the top of the mantle, I hot glued 2 garland ties that I twisted together. From there I glued the stocking to it.
I had an extra tree skirt for a mini tree, so I cut it and made it a rug around the fireplace. On the rug I placed a ceramic tree on one side and a small metal house on the other side. I took some of those fairy lights and stuffed them inside the house. I placed 2 more small houses on top of the mantle and stuffed lights in them too.
The last step was to add the manger scene. I wrapped some lights around it too. Any fairy lights that were in the back of the fireplace I taped them to the back so they could not slide around. It took 2 strands of fairy lights to light up everything in and on the fireplace.
Yes this project took two weeks. Yes it was COMPLETELY worth it. I love this so much. It is Christmas all wrapped up in one scene. This is great for someone with a small apartment or if you do not want to put up a ton of decor but want a bit of Christmas. This fireplace can be decorated however you want. Lots of bottle brush trees on the top would be pretty or making lots of mini Christmas carts to line up across it. The possibilities are endless.
Thank you so much for reading to the end of this blog. I know it is a long one. Please Like, Share, Comment, and Subscribe. Also please find me on Facebook and Instagram all under Yellow Butterfly Craft Designs!
Have a wonderful weekend and I may have one more project next week!!
Melissa McGuire
Isaiah 9:6-7
6. For to us a child is born, to us a son is given, and the government will be on his shoulders. And he will be called Wonderful Counselor, Mighty God, Everlasting Father, Prince of Peace. 7. Of the greatness of his government and peace there will be no end. He will reign on David’s throne and over his kingdom, establishing and upholding it with justice and righteousness from that time on and forever. The zeal of the LORD Almighty will accomplish this.
Supplies
Fireplace- Target
Elf Legs- Walmart
Felt in Orange, Red, Brown, and Yellow= Hobby Lobby
Garland Ties- Dollar Tree
Fairy lights- Amazon
Mini Houses- Target
Small Ceramic Tree- Hobby Lobby
Material- Walmart
White Car Cloth- Dollar Tree
Floral Wire- Dollar Tree
Colored Pencil- Anywhere
Waverly Chalk Paint in White and Hazelnut- Walmart
Red Chalk Paint- Walmart
Waverly Antique Wax- Walmart
Mini Tree Skirt- Walmart
Surebonder Hot Glue Gun and Hot Glue Sticks- Hobby Lobby

A lot of thanks for sharing Article !
Merry Christmas & Happy New Year
LikeLike
Thank you for reading it! Merry Christmas and Happy New Year to you too!!
LikeLike