Red and Black Valentine Check!

My craft mojo had been gone. I mean completely gone. Just what you want to hear from a craft blogger right! I had no idea what I was going to make for the blog this week. Do you ever feel that way? Do you have craft days where your brain is completely blank and you can not come up with anything to make? That is where I have been the last few weeks. I guess Christmas crafting did me in. With that said it has been hard to come up with things to make lately.

With this project I literally just started painting. I knew I wanted something that was not big bright colors for Valentine’s day and I am trying to use up the products I have on hand. Sometimes things that have no plan at all turn out to be awesome!! That is the case with this project. What started with no direction, took on a life of its own and I love the final project.

Lets Get Started

Supplies

I did not use a ton of things to get this project done. I used this little LOVE sign from Dollar Tree and a long Dollar Tree sign. I also used some hot glue, strong scissors, paint, and ribbon. That is it!

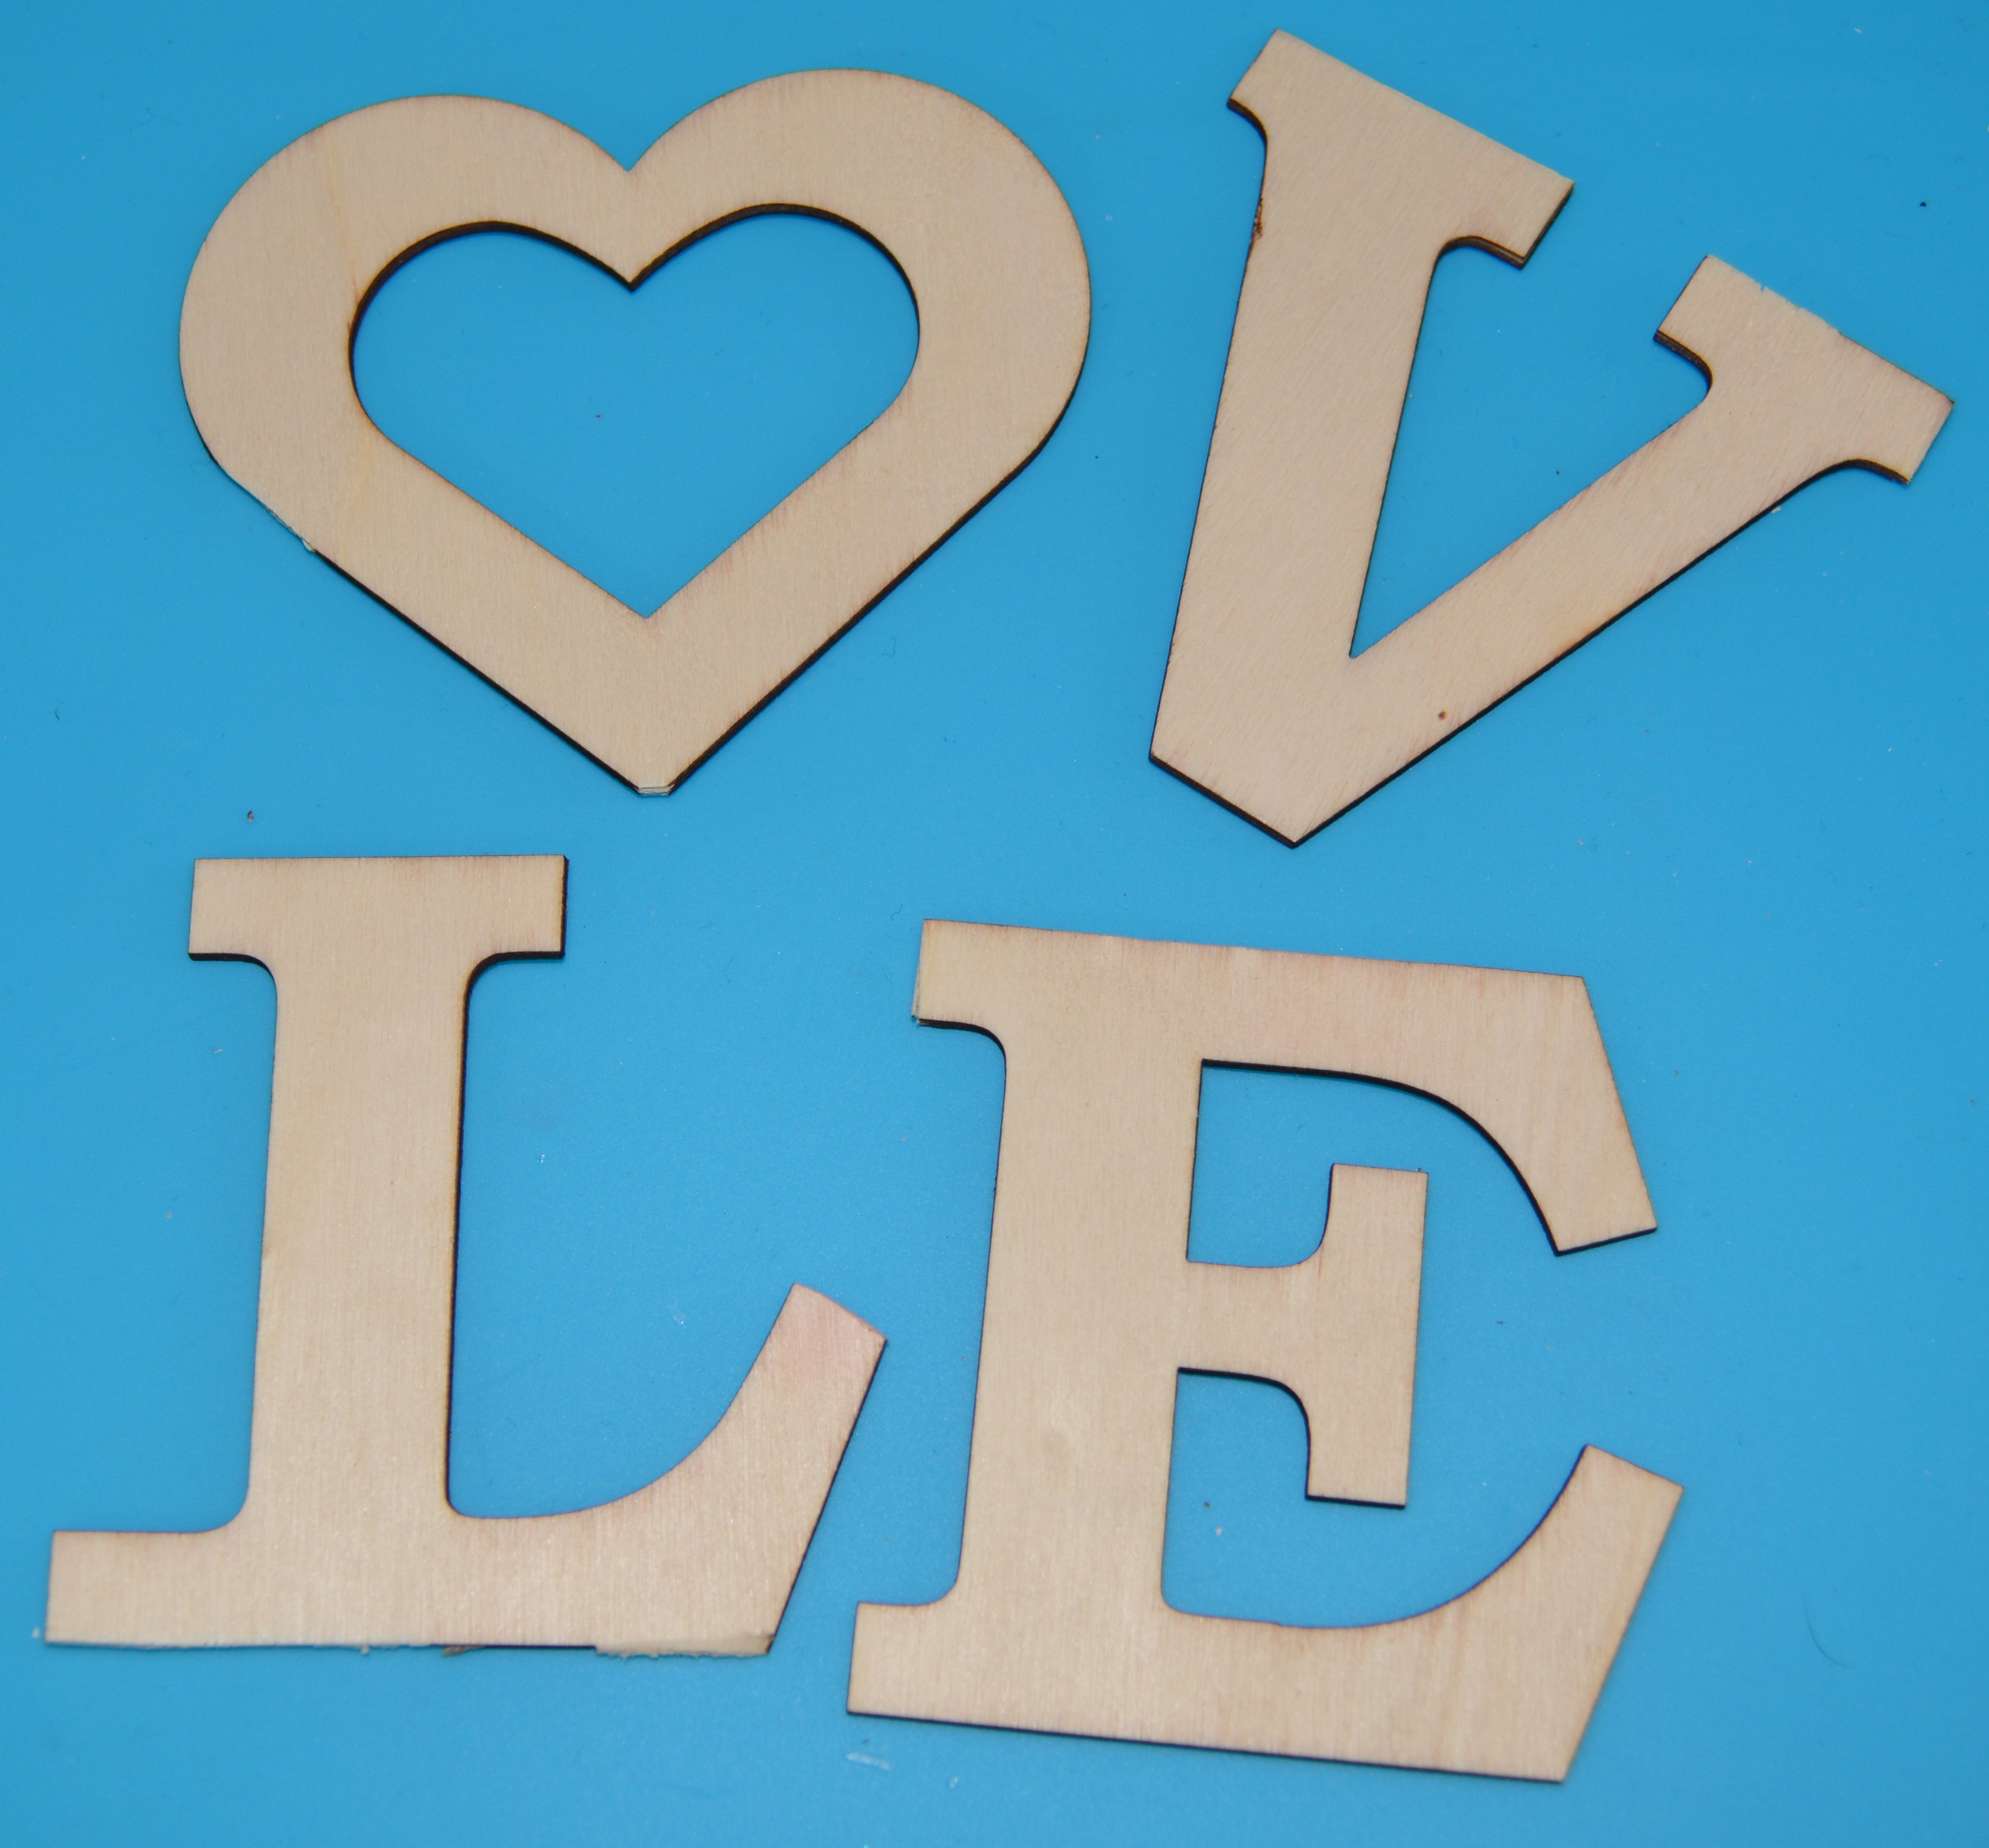
To start off, you are going to use some really strong scissors, a craft knife, or a box cutter to cut the LOVE sign apart. Take your time with this because you can break the letters. Next, pull the galvanized heart off of the sign. If you can not pull it right off then use a paint scraper to get under it. After you get it off you might have to sand it down.

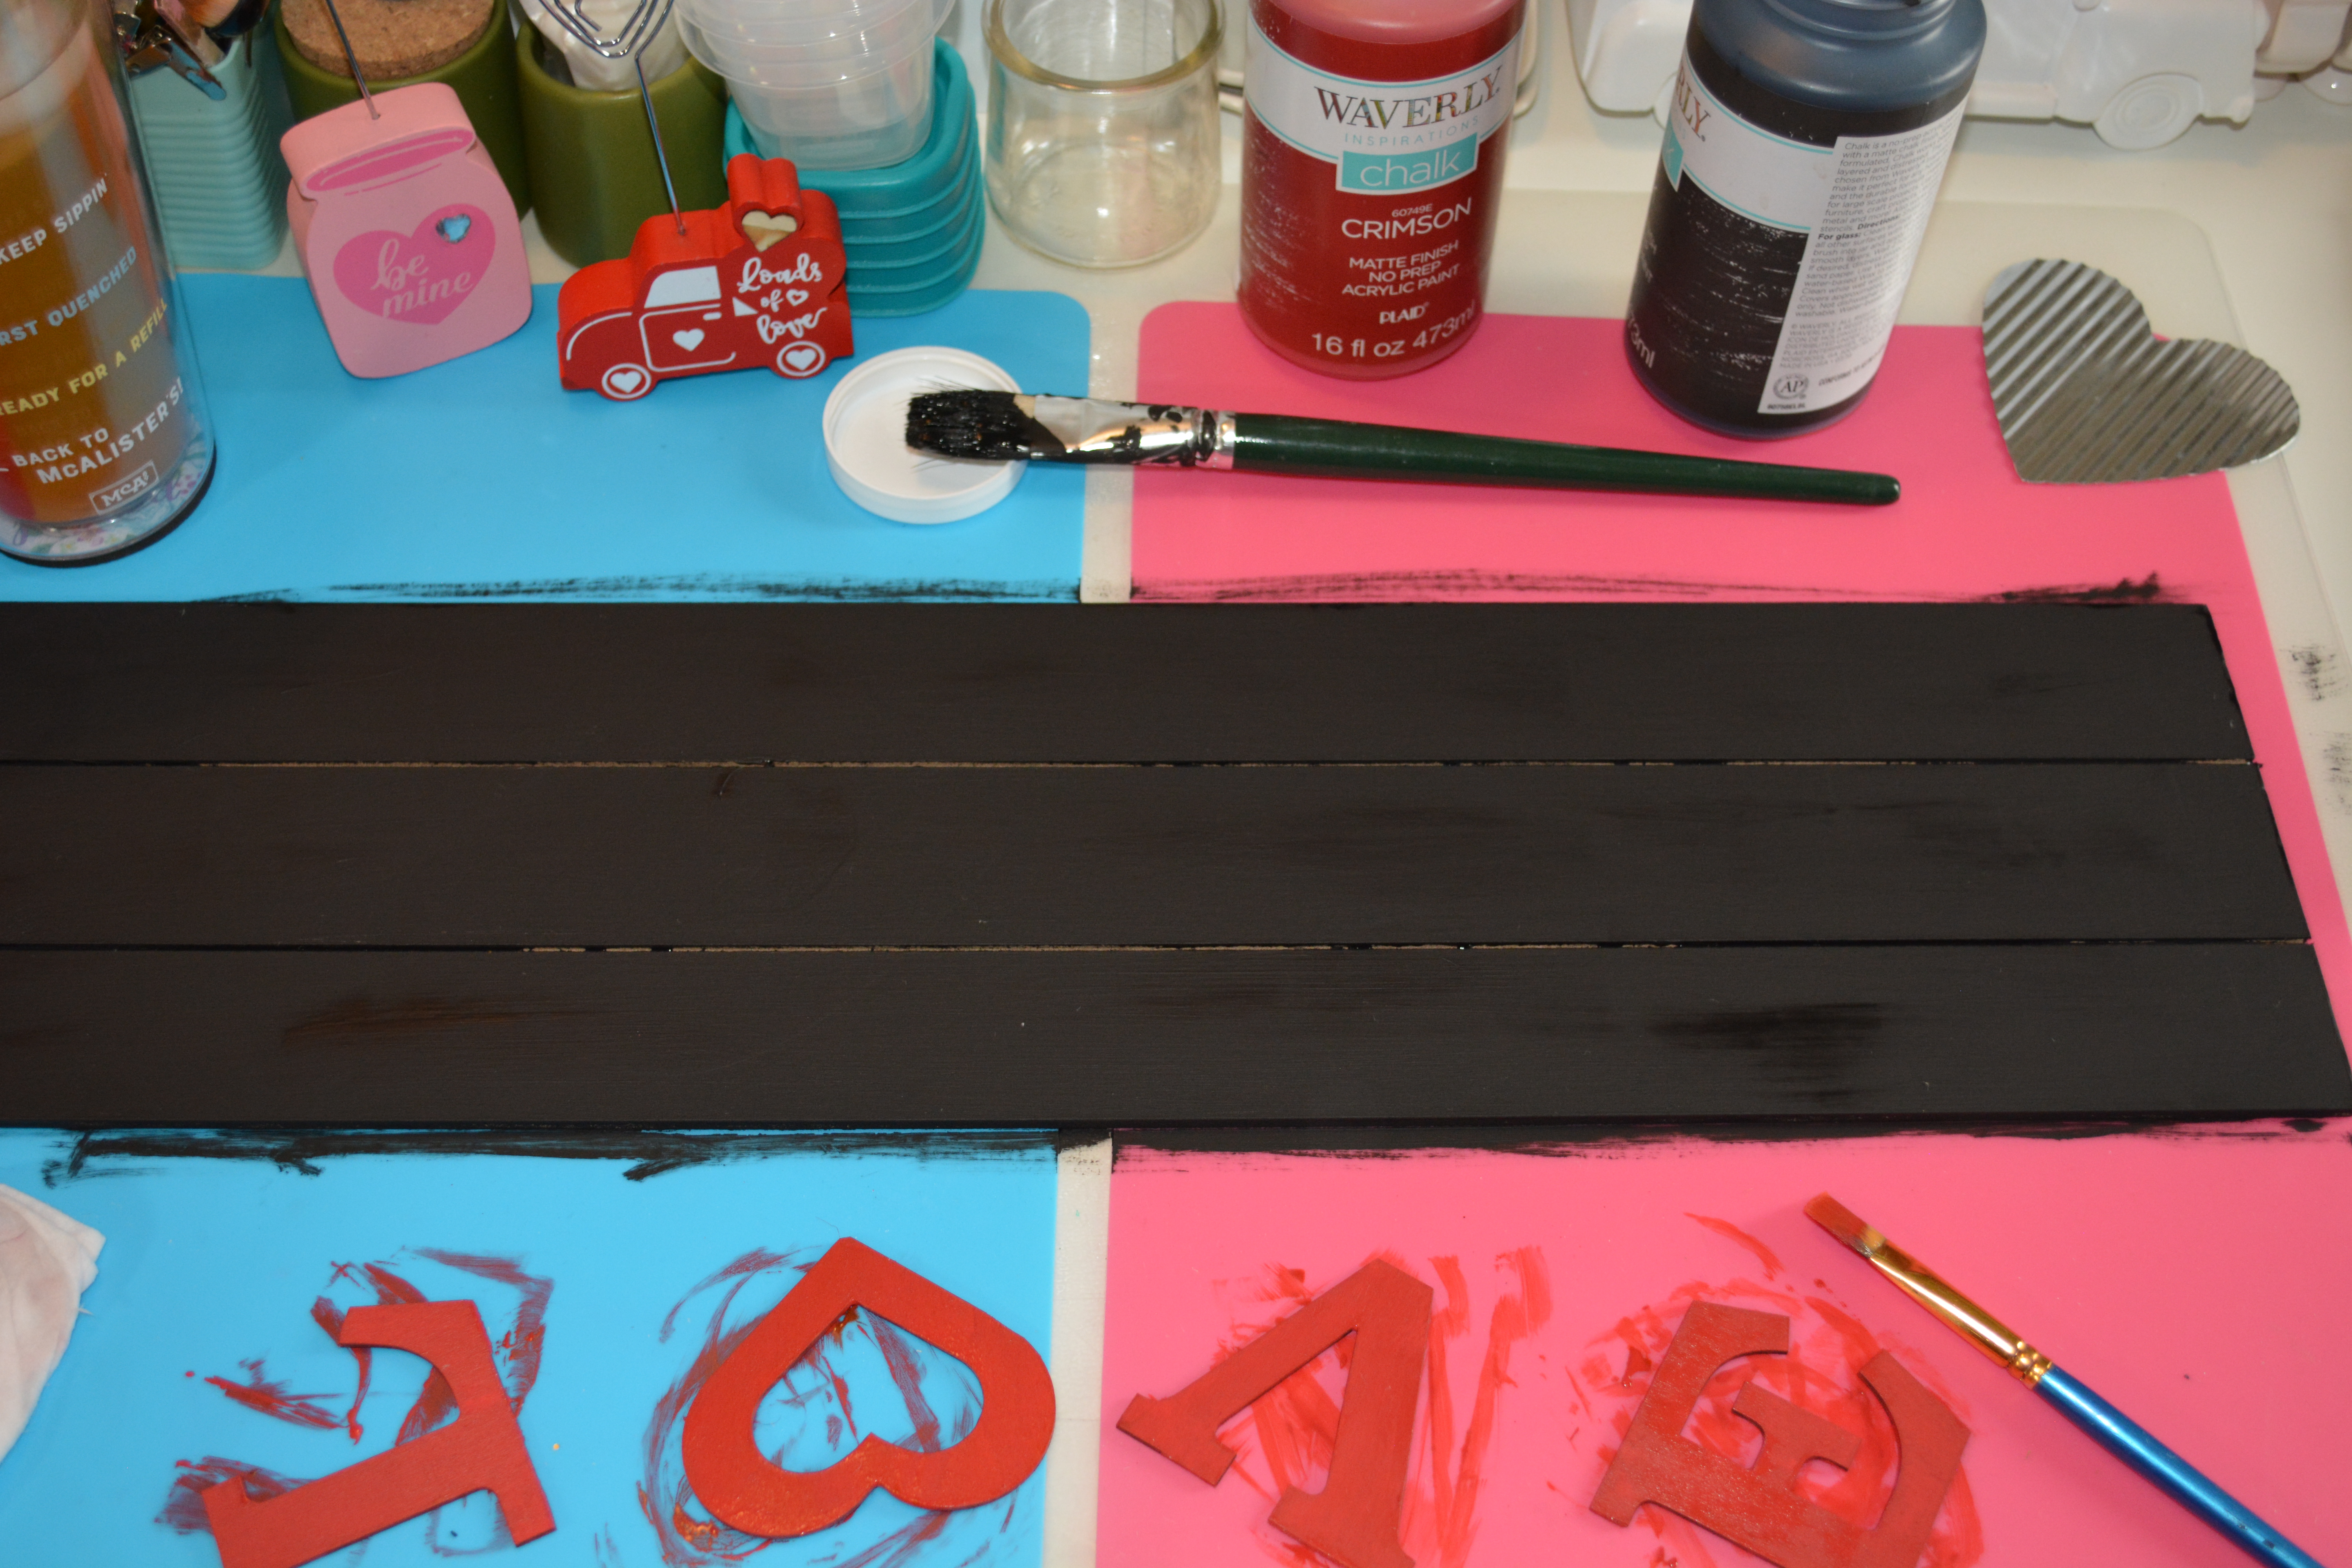
Once your pieces are ready, its time to paint. I painted the long sign with Waverly Chalk Paint in Ink. I painted the LOVE letters in Waverly Chalk Paint in Crimson. Both of these took 2 coats of paint.

Let everything dry, then hot glue the red heart to the galvanized heart. Then lay out the LOVE word down the middle of the sign. Make sure you have the same amount of space left at the top and bottom left on the sign. I left lots of space at the bottom and top so that I could add ribbon or twine and a bow. Also make sure that your letters are spaced evenly and then hot glue them on.

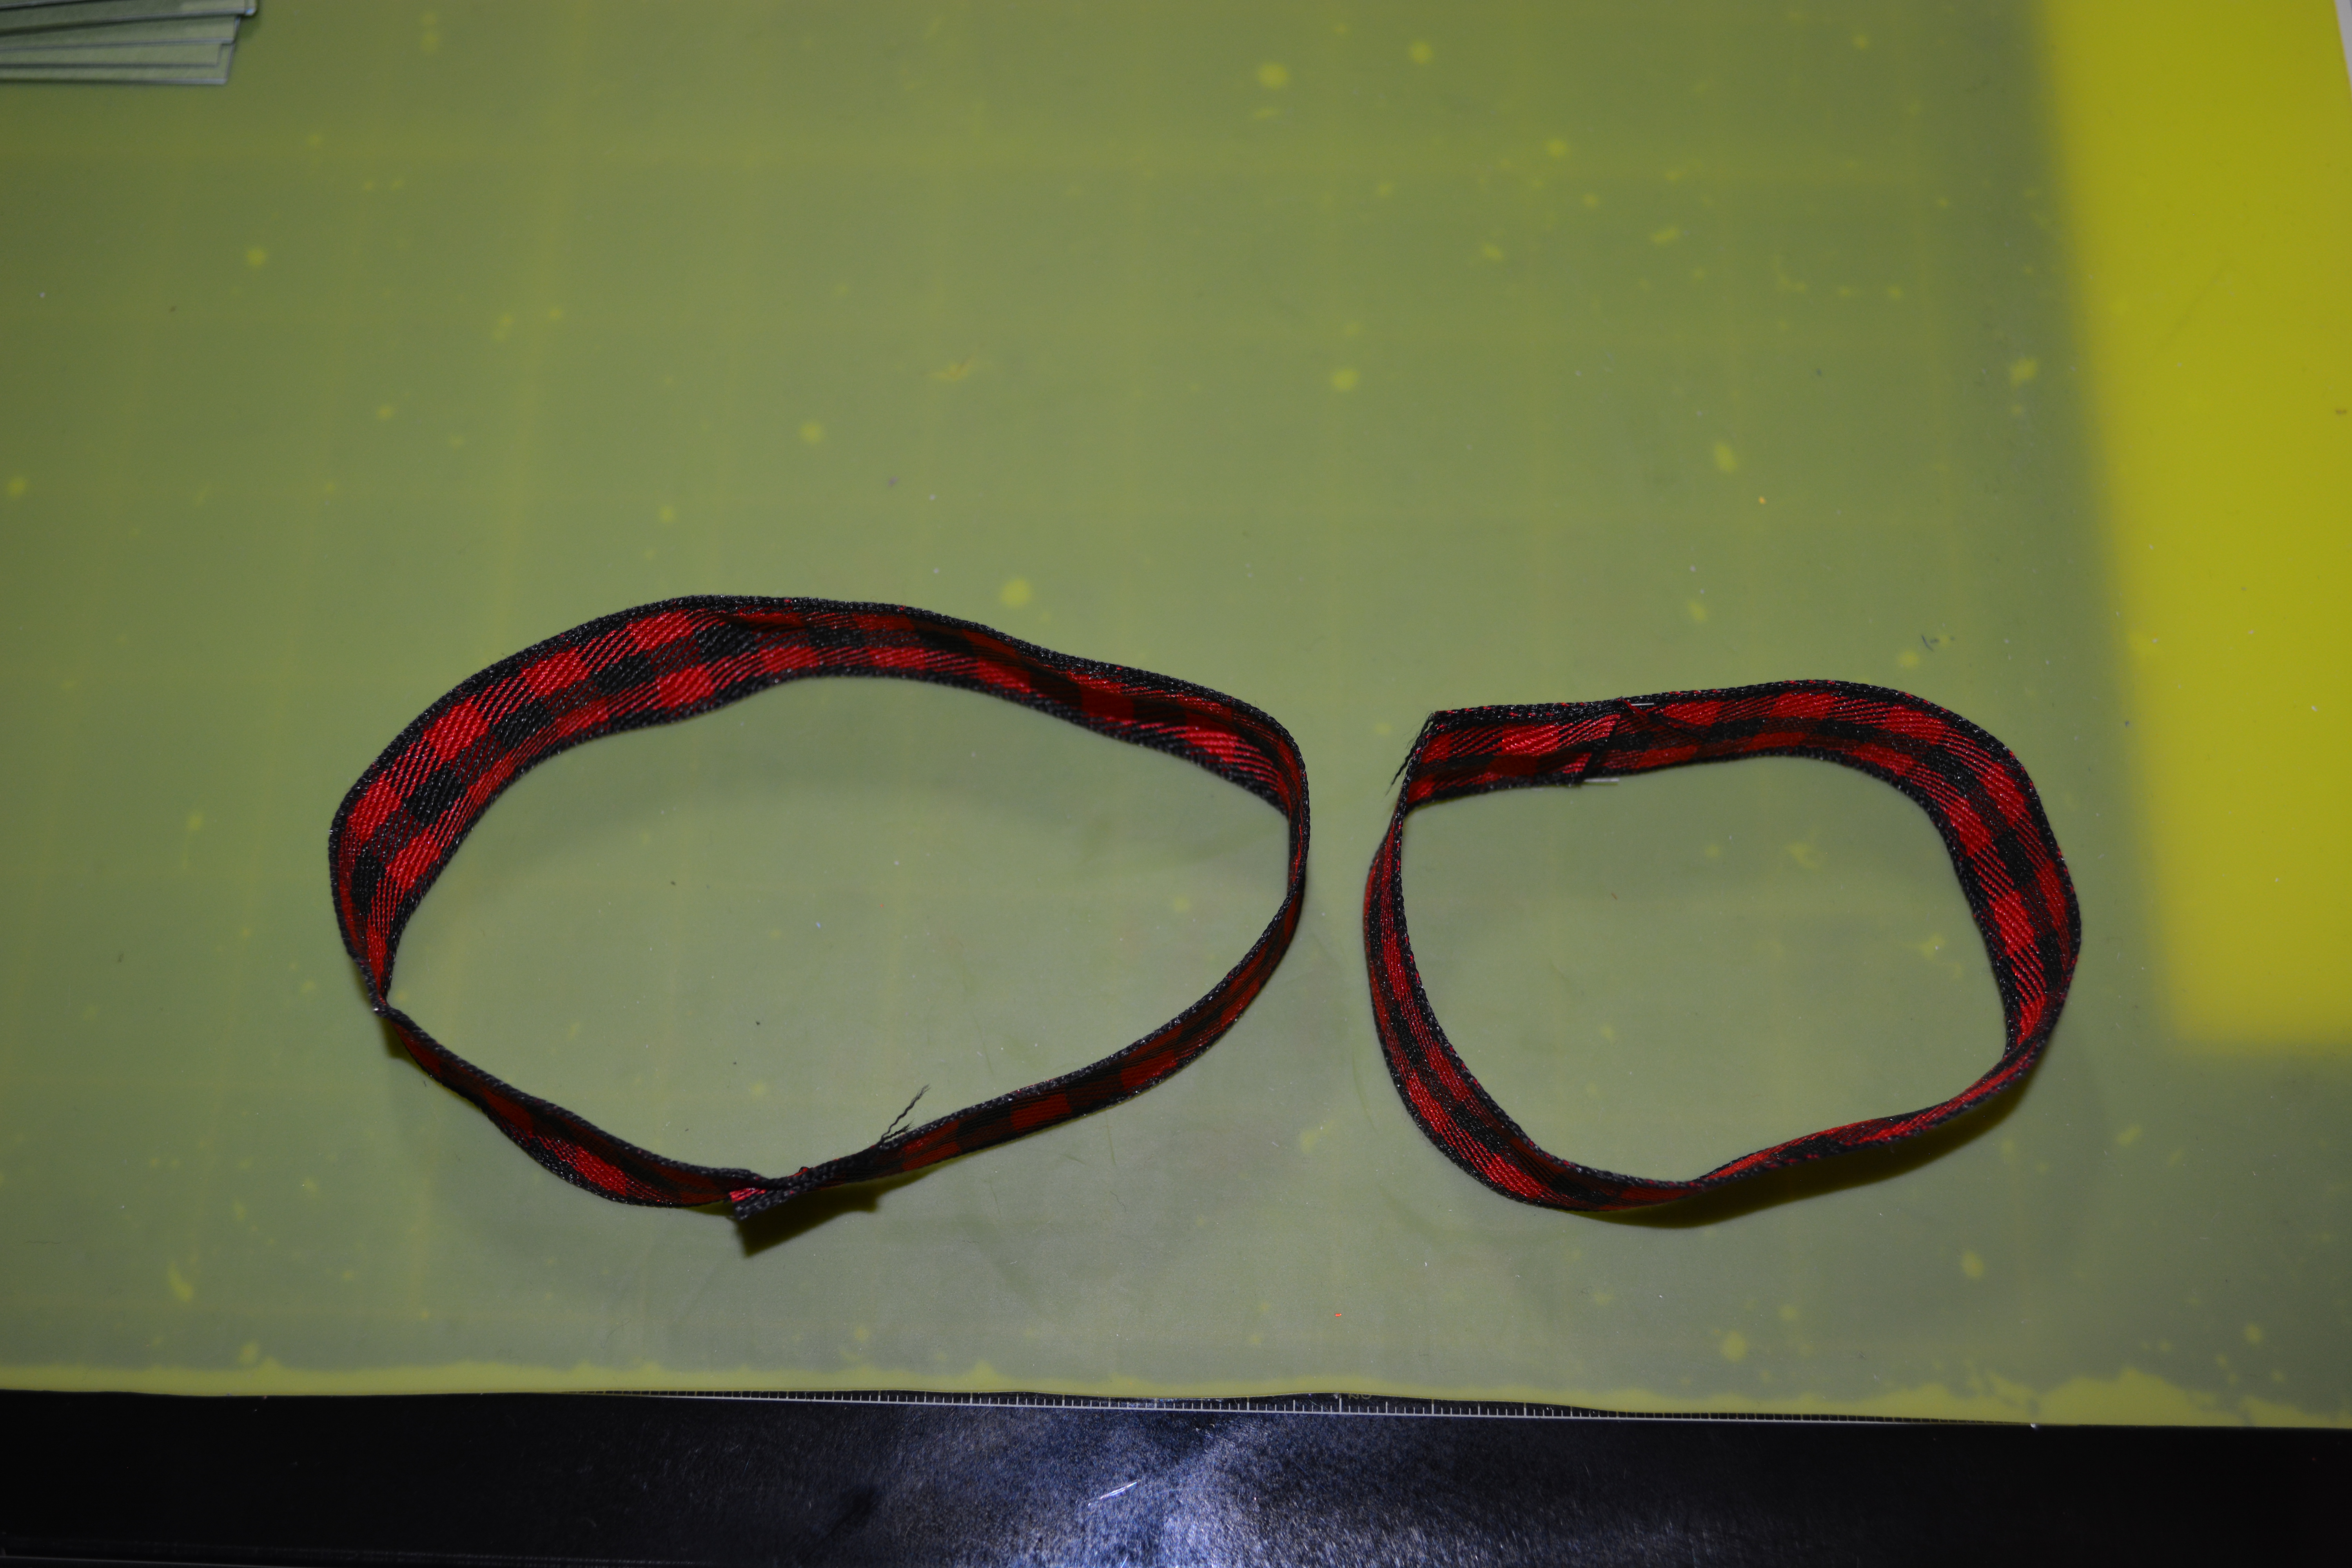
Now lets work on the bow and ribbon at the top and bottom of the sign. For the bow, take two strips of ribbon, one bigger than the other, and hot glue the ends of the ribbon together forming the circles. Then flatten out the circles and stack the small one on the bigger circle. You can hot glue the circles together if you want. After that take a small piece of ribbon and wrap it around the flattened circles to make the bow. Hot glue the ends to keep it all together. I know that was not a great explanation but I hope you can figure it out by looking at the pictures.

For the ribbon on the top and bottom, I just wrapped it around the sign. I glues then ends of the ribbon on the back of the sign. I make a crisscross and then one piece of ribbon down the center of the crisscross as I was wrapping the ribbon around. I am really picky about how the ribbon or twine lays when I do this. Finally I glued the bow to the top of the ribbon I wrapped around the top of the sign.

So this is what it looks like to not have any creative mojo. This whole project was pieced together one step at a time with no direction. I will say this though. I love this sign. It turned out way better than I ever could have imagined. Sometimes not having any kind of plan can make the best projects. What do you think? Now lets be honest. My projects do not always turn out great or even somewhat good, with or without planning. This project was just one of the few great ones that turned out without my planning. Most of the time they turn out to be a hot mess. So no worries if that happens. Its Okay!!

I want to wish you a wonderful Valentine’s Day weekend. Please Like, Share, Comment, and Subscribe. Also find me on Instagram and Facebook under Yellow Butterfly Craft Designs.

Melissa McGuire

Supplies

Long Sign- Dollar Tree

LOVE Word- Dollar Tree

Ribbon- Michael’s Craft Supply

Waverly Chalk Paint in Ink and Crimson- Walmart

Strong Tim Holtz Scissors- Hobby Lobby

Surebonder Hot Glue Gun and Hot Glue Sticks- Hobby Lobby

Valentine Bling!

Happy Friday!! We are getting closer to Valentine’s Day! I know my youngest is excited to celebrate at school because we made him a monster truck box to put his Valentine’s Day.

Today’s project is so fun. I have wanted to try and make leather earrings for a long time. I know you can cut them out using the Cricut, but I did not know I could use my die cutting machine too. Sometimes I do not want to get out my Cricut and mats and everything that goes with that so I decided to invest in some earring dies off Amazon. I am so excited about these dies and they come in so many different shapes and sizes. It is all reasonably priced and you do not have to have a die cutting machine or a Cricut to do this project!

Lets Get Started

Supplies

I know this seems like a lot of supplies but it’s worth it! You will need thin leather, earring hooks, jump rings, and needle nose pliers. If you look on Amazon, there are bundles of leather and the earring pieces for around $15.00. It is a wonderful deal. Some even include the steel roll dies. Now if you do not have a die cutting machine, a lot of the bundles come with stencils. So you can trace the shapes and then cut them out.

You will also need a tiny hole punch and possibly some fabric glue. Please know that this is an investment but you can make SEVERAL pair of earrings from these supplies.

Start by using some wire cutters and cut apart the dies you want to use. Then cut out small pieces of leather to place under the dies on the machine just like you would paper. It will fit through your machine as long as you get the thin leather. My die cutting machine is a Spellbinders Platinum. Once you have the layers together, roll it through your machine.

If you do not have a die cutting machine, then trace the pattern out on the leather and cut it out.

Once your pieces are cut you can start layering the pieces together. I die cut some hearts to add to a few pair of the earrings. To glue the hearts onto the main earring pieces I used Fabric Tack. It is amazing fabric glue and once it dries, it is stuck solid. If you are tracing and cutting out your leather, you will need a tiny hole punch to punch a hole in the top of the leather to add your rings and hooks to.

Next, sort out the hooks you want for the earrings. I have a few different styles of hooks. I also have jump rings. Some hooks I just attached straight to the leather. Others I added two jump rings to the leather and then attached those to the earing hook. To open the hooks and rings, use two pair of needle nose pliers. Clamp the pliers down on each side of the opening of the ring or hook and twist the pliers to opposite sides. Once the ring or hook is open, place the leather piece in it and twist the opposite direction to close the ring or hook. It’s really easy.

Once the hooks are on your all done. How fun is that? I love being able to mix the different kinds of leather. I will be getting all kinds of leather in different types and patterns to make more earrings. These were so easy and took me about an hour to do all of these sets. They are perfect for a sweet Valentine’s Day date night!! I will be wearing the grey and red ones to my son’s hockey games. I might add his number on them.

This was such a fun project. I think it is a great one for a beginning crafter to do. Next week I will show you have to make some last minute Valentine’s Day cards. So come back next Friday. Please Like, Share, Comment, and Subscribe! Also find Yellow Butterfly Craft Designs on Instagram and Facebook.

Psalm 51:10 “Create in me a clean heart, O God, and renew a steadfast spirit within me. 

Melissa McGuire

Supplies

Leather- Amazon

Earring Hooks and Rings- Amazon, Michaels Craft Supply

Earring Shape Dies- Amazon

Spellbinders Platinum- Spellbinder, Amazon

Hole Punch- Any office or craft supply store

Fabric Tack- Michael’s Craft Supply

Needle Nose Pliers- Michael’s Craft Supply

Love and Clay!

Happy Friday!! I hope this finds you well!

Today we are going to look at a different product. I made the flowers and hearts out of it. Can you guess what product I used?

Air Dry Clay and silicon molds! Yes clay! I do not use clay often. It is just not something I ever think of using. Clay is fun to use though because you can mold it into anything and it can be painted any color you want. I like being able to add things to projects that will not add a lot of weight to it. This sign was heavy enough as it was without adding more weight with the embellishments. Keep reading to see how I made this sweet sign!

Lets Get Started

Supplies

For this project you will need a wooden heart of some kind. I got this one at Dollar Tree. I wanted a word in the middle of my sign so I found the LOVE word. The LOVE came from Target. As far as the clay, I got mine from Stampin Up a few years ago, but you can get Air Dry Clay at any craft supply store. The silicon molds I have came from Michael’s Craft Supply, Dollar Tree, and Stampin up. I bet Amazon would have some amazing molds too. You will also need a powder bag or cornstarch. I also used paint, and hot glue.

To start this project, take a powder bag or cornstarch and cover your mold with it. This will help the clay come out of the molds easier. Next, take a small piece of the clay and push it into the mold. Once you have done that, carefully pop the clay out of the mold. This might take some bending of the molds. If it sticks add more powder to the mold and try it again. You could also use cookie cutters to shape the clay. I make several shapes at one time so that I have some on hand for when I need them. Let your clay dry over night.

Once the clay is dry, it can be painted. The wooden heart I white washed with Waverly White Chalk Paint mixed with water. The LOVE word and the clay pieces I painted with Arteza Acrylic Metallic paint. It took 2 coats of the metallic paint to cover them. Let all of that dry.

The final step is to lay the LOVE word and the clay pieces on the heart to see where they would look the best. I scattered the flowers and hearts around the LOVE word. Rule of thumb is to put things in odd numbers. It is more appealing to the eye. So most of my clusters are in sets of three and I have nine clusters around the word.

Here is the finished project. The clay pieces shine from the metallic paint. I love it because you can get so many different kinds of silicon molds to make all kinds of clay pieces. Being able to use cookie cutters too means you can make even more fun things for projects. I love this wooden heart from Dollar Tree too. It is big and I am a sucker for anything that looks like pallet wood.

I hope you enjoyed today’s project. I know it takes some time to make because you have to wait for everything to dry but sometimes that is worth it.

Please Like, Share, Comment, and Subscribe. Also find me on Instagram, and Facebook under Yellow Butterfly Card Designs.

Isaiah 64:8 But now, O LORD, thou [art] our father; we [are] the clay, and thou our potter; and we all are the work of thy hand.

Melissa McGuire

Supplies

Wooden Heart- Dollar Tree

Love Word- Target

Air Dry Clay- Art Supply Store

Silicon Molds- Dollar Tree, Art Supply Stores, Amazon

Arteza Acrylic Metallic Paint- Amazon

Waverly White Chalk Paint- Walmart

Surebonder Hot Glue Gun and Hot Glue Sticks- Hobby Lobby

Winter Fun!!!

Winter is in full swing right now. I am not much on the cold and if it is going to be cold then I feel like it might as well snow. We lived in Wyoming and Montana and their winters are brutal. So I do not miss all that snow but I would like to have enough for the kids to play in.

After taking down all the Christmas decorations, I always feel like my home is empty. For me, it is to early to put up Valentine’s stuff so I wanted something for the in-between time. I found these wooden figures at Target and was going to use them for Christmas but then thought they would look better as winter decor. It is not big massive decorations but just enough to add something to my home so it does not look so empty and depressing.

Lets Get Started

Supplies

The things you will need for this project are some wooden figures, which I got at Target. If you can not find figures like this then you can cut them out of foam core board. They are simple shapes and will cut out easily. The star shapes with snowflakes on them are from Michael’s in their discount bins. The trees that are already painted green were from a shop called Scattering Joy in Hamilton, OH. They are a wonderful little shop if you are in the area check them out!! And here is a shameless plug, some of these DIY’s I have done on here are for sale in the shop along with my greeting cards. There are SOOO many different items in the store that I buy something every time I go in.

You will also need paint of your choosing and paint brushes. I used chalk paint and paint markers. Other things I used was a scarf, felt, hot glue, and a colored pencil.

Lets start with the snowman. He was a natural wood color so I wanted to paint him white. The wood that the snowman was made of had pretty wood grain in it and I wanted that to show through. To do this, I took White Waverly Chalk Paint and mixed it with lots of water. Then I did a white wash over the snowman.

From there I used a black Arteza acrylic paint marker to draw on a mouth and eyes, and colored his hat black. For his nose I wanted something 3-D. I took some orange felt and rolled it up and glued it together. After that I cut it in a carrot shape and hot glued it on. Finally, I had a Dollar Tree scarf that I cut up and made a mini snowman scarf out of it.

I white washed the stars too. Then I took a blue colored pencil to the raised parts of the snowflakes. It really popped off the white.

Next lets look at that the deer. I used the black paint marker to give him an eye and a nose. Then I used the same scarf and cut him a small scarf for him to wear. If your scarf will not lay right just add some hot glue to it to hold it in place.

The trees I did differently. For them I took a fan brush which is pictured above and dipped it into the white wash paint and then dabbed some of the paint off. Next I lightly and at an angle, brushed the white wash paint over the trees. I did it will all of the trees. This should be done slowly and lightly with small strokes of the brush. You can build up the paint little by little.

I think these turned out really cute. They are not loud with bright colors but are just enough to add some decor till Valentine’s stuff goes up. These were easy and fast to do. I completed them in a few hours while helping kids with online schooling.

I hope you are all happy and healthy and having a great start to 2021. A few more winter DIY’s are on their way in the next week and then bring on all the red, pink and purple!! Please find me on Instagram and Facebook. Also Please Like, Share, Comment, and Subscribe!!

2 Timothy 1:7  “For God gave us a spirit not of fear but of power and love and self-control.”

Melissa McGuire

Supplies

Wooden Deer, Snowman, and Big Trees- Target

Stars- Michael’s Craft Supply

Green Trees- Scattering Joy, Hamilton, Ohio

Waverly White Chalk Paint- Walmart

Paint Brushes- Anywhere

Felt- Hobby Lobby

Arteza Acrylic Paint Markers- Amazon

Scarf- Dollar Tree

Surbonder Hot Glue Gun and Hot Glue Sticks- Hobby Lobby

What I got for Christmas 2020

I love seeing what others got for Christmas. It is especially fun to see what people have gotten craft wise. I was given a few new crafting items for Christmas and thought I would share them with you.

The first thing I got is this Waffle Flower Water Media Mat. This mat is great for water color painting or ink blending. The mat is self is a bit sticky so I holds the paper still while you are working. I will use this mainly for card making and goes perfect with the next product I will be showing you.

Over the last year, I have become a big fan of Arteza products. So I had a few things on my wish list for Christmas. I was very excited to see these water color paints from my husband. There are so many different colors and I can not wait to play with these. They come in small tubes so they will last a long time. I can use these with the water media mat!!

Here is another Arteza product. These are acrylic paints. I have the set of 12 so I was excited to receive the bigger set that contains 24. The paints come in metal tubes and while they might be small, they seem to last forever. A little goes a long way. The paint covers great and you can mix them together to create new colors.

This last Christmas present is the one I am most excited about. These are Arteza Acrylic Markers. Yep you read that right, they are acrylic paint markers. I have seen several YouTube ladies use these and rave about how great they are and how easy they are to use. These were at the top of my Christmas list and you will see me crafting with them very soon!! This is the big box of colors but they do come in a smaller pack. They also have extra maker tips in the box. It’s a great investment!!

Let me know in the comments what kind of crafty things you got for Christmas!! I would love to know if I need to add more things to my wish list for my birthday that is coming up!!

Have a wonderful day and Please Like, Share, Comment, and Subscribe. Look for me on Facebook and Instagram.

Philippians 4:13 “I can do all thing through Christ who strengthens me.”

Melissa McGuire

These products can be found on Amazon, Arteza’s website and Waffle Flower’s website.

Mini Fire Place

Christmas is a week away!! YAY!!! It is coming up fast!

So I have worked for over two weeks on this fireplace. The Fireplace itself is from Target. It was a Halloween decoration that had something to do with potions but as soon as I first laid eyes on it, I knew exactly what I was going to do with it. It was going to be transformed into a beautiful fireplace with Santa coming down the chimney. I even built a manger out of popsicle sticks to put on the mantle. This project really challenged me to think outside of the box to make each piece of this. Please come along as I tell you how I created this cute fireplace scene.

Lets Get Started

Supplies

I am not going to lie, this project has a lot of pieces. To start, I got the Potions Halloween decoration at Target. You could make one of these out of foam core board from Dollar Tree. I used elf legs from Walmart. Some of the little stuff I used was felt, floral wire, fairy lights, houses, popsicle sticks, dowel rods, buttons, garland ties, fabric and a ceramic tree. The tools I used were wire cutters, hot glue, tape, and paint.

The first step for this fireplace is to prime it. I used Waverly White Chalk Paint to do that and I only did one coat. Next I painted the main part of the fireplace with red chalk paint. I left the bottom edge and the top mantle white for now. This took to coats.

After the red chalk paint is dry, I took Waverly Chalk Paint in Hazelnut and painted the bottom and the top mantle with it. I let that dry just a bit and then dry brushed Waverly Antique Wax. This made the mantle and the bottom edge look like wood. I left the inside of the fire place black.

This next part is a bit tedious but the affect it gives is so great! I good a T-square and drew lines with a gray colored pencil to make the fireplace look like it was made out of brick. This took a bit and I started at the bottom of the fireplace and worked my way up.

Now lets work on the fire for the fireplace. I took orange and red felt and cut out things that looked like flames. You can add yellow felt too, but I did not have any on hand. Each color is a shorter flame than the one before it. On the back of the flames I hot glued floral wire to them so that I could bend them to look more realistic. Then I sprayed the front of the felt with glimmer spray. You could skip this because it does not glitter like I thought it would.

For the firewood, I cut rectangles out of dark brown felt and rolled them up and hot glued the edges. Then I brushed Waverly Chalk Paint in Hazelnut over them. I was having a hard time trying to make these pieces look like wood. Then I remembered that if you took a crafting heat gun to felt, it melts!! so that is what I did. I melted all the pieces and they looked a lot more like wood when I got done. You could use brown paper for this.

From there I cut very tiny pieces of the orange and red felt to add with the wood to make it look like it is burning,

Now lets look at the stockings. I drew a stocking shape on fabric from Walmart. Lets be honest here I cut out a stocking 4 or 5 different times until I liked the shape and size of one. Then I used that one and cute out 4 more stockings. That gave me 5 all together and they were all different patterns. For the fluffy white trim, I used a white cloth from Dollar Tree. I cut it to size and rounded the corners. Then hot glued it onto the top part of the stocking.

It’s time to add Santa! Santa need some help though. I could not find Santa legs but Walmart had these elf legs that you clip under the branches of a tree. It took some thought to turn them into Santa legs. I covered the legs with red felt and hot glued it down. Then I bent the toes of the elf backwards and hot glued them backwards. This made Santa boots instead of pointy elf shoes. It is time to add Santa’s legs! I hot glued them in place making sure his legs were seen but did not completely cover the the fire.

The final thing I created for this scene is a manger. I build it out of jumbo popsicle sticks and small dowel rods from Dollar Tree. The people themselves are buttons from Hobby Lobby. If you want to a manger scene you could just put a small one on the mantle. You do not have to build one. I just loved these buttons of all the Christmas story people and wanted to use them. I hot glued them in place. Yes it is a bit big for the mantle but I had to have the space for all the people and animals and a manger scene was a must have for me personally.

It is time to assemble everything. I started with the inside of the fireplace. I knew I wanted fairy lights inside the fireplace so I drilled a hole in the bottom back of it and fed some of the fairy lights through. Next I glued the wood and tiny pieces of felt down. After that I molded the flames the way I wanted them and hot glued them in place. I did not glue them on top of each other. I left some space between them. Finally, I moved the fairy lights around the flames and hot glued them down where they needed it. I did this will the fairy lights on so that I could see where the light would shine.

Around the top of the mantle, I hot glued 2 garland ties that I twisted together. From there I glued the stocking to it.

I had an extra tree skirt for a mini tree, so I cut it and made it a rug around the fireplace. On the rug I placed a ceramic tree on one side and a small metal house on the other side. I took some of those fairy lights and stuffed them inside the house. I placed 2 more small houses on top of the mantle and stuffed lights in them too.

The last step was to add the manger scene. I wrapped some lights around it too. Any fairy lights that were in the back of the fireplace I taped them to the back so they could not slide around. It took 2 strands of fairy lights to light up everything in and on the fireplace.

Yes this project took two weeks. Yes it was COMPLETELY worth it. I love this so much. It is Christmas all wrapped up in one scene. This is great for someone with a small apartment or if you do not want to put up a ton of decor but want a bit of Christmas. This fireplace can be decorated however you want. Lots of bottle brush trees on the top would be pretty or making lots of mini Christmas carts to line up across it. The possibilities are endless.

Thank you so much for reading to the end of this blog. I know it is a long one. Please Like, Share, Comment, and Subscribe. Also please find me on Facebook and Instagram all under Yellow Butterfly Craft Designs!

Have a wonderful weekend and I may have one more project next week!!

Melissa McGuire

Isaiah 9:6-7

6. For to us a child is born, to us a son is given, and the government will be on his shoulders. And he will be called Wonderful Counselor, Mighty God, Everlasting Father, Prince of Peace. 7. Of the greatness of his government and peace there will be no end. He will reign on David’s throne and over his kingdom, establishing and upholding it with justice and righteousness from that time on and forever. The zeal of the LORD Almighty will accomplish this.

Supplies

Fireplace- Target

Elf Legs- Walmart

Felt in Orange, Red, Brown, and Yellow= Hobby Lobby

Garland Ties- Dollar Tree

Fairy lights- Amazon

Mini Houses- Target

Small Ceramic Tree- Hobby Lobby

Material- Walmart

White Car Cloth- Dollar Tree

Floral Wire- Dollar Tree

Colored Pencil- Anywhere

Waverly Chalk Paint in White and Hazelnut- Walmart

Red Chalk Paint- Walmart

Waverly Antique Wax- Walmart

Mini Tree Skirt- Walmart

Surebonder Hot Glue Gun and Hot Glue Sticks- Hobby Lobby

Believe!! The Polar Express!

A favorite movie in my house at Christmas time is The Polar Express. My boys love it and it is tradition for us to watch it all as a family. Aidan is 16 and does not believe in Santa anymore but he does keep the magic going for his brothers. He always says he hears the bell when his little brother asks. To see my little guy Jesse light up with Aidan’s answer is amazing. My other son Connor has not let on if he still believes in Santa or not and I am to afraid to ask.

I wanted to create something that my boys could take with them when they leave the house. Aidan only has a little more time left with us until he graduates and I want him to remember the magic that he keeps alive for his brothers. That is when I came up with this project. These shadow boxes will always remind the boys of the magic of Santa and our time together watching The Polar Express. One day they will have their own kids and really see how special that magic is.

Lets Get Started

Supplies

You can use what ever size sign or box you want. You will have to adjust the writing to fit your box. I used the back of the green sign for all three of my boxes. Dollar Tree always has signs that size. I painted them with Waverly Chalk Paint in White and Ink. I used my computer to make and print the words on 65 lb card stock. To distress the card stock I used distress ink from Tim Holtz but you can use a tiny bit of brown paint. I also used leather cord, Mod Podge, hot glue, and of course silver bells.

I started by scrapping the glitter off of the front of the sign. I do this because I am painting the whole sign. Take the signs and paint them all white. Do the front, back, sides, give it all a good base coat. Let it dry. Then paint what is the front of the sign black with the Ink colored chalk paint. Also do the sides and the sides of the inside of the box. Mine only needed one coat. Now paint the center of what is the back of the sign with the white chalk paint. That took me two coats of paint too. Let that dry.

While your box is drying, start working on your words. I kept playing with the size and printed these out a few times. These are the sizes of fonts that I settled on. Since I knew I wanted to distress the paper I used cream colored card stock to print out the final words on. If you do not have access to a printer, you can use sticker for the words.

Instead of cutting the words out, I carefully tore the paper all the way around the words. It makes it look like it is old paper. After that I smashed the paper in my hands and crumbled it up and flattened it back out. Then I took the distress ink and applied it all around the edges and dabbed it in the middle. If you use paint, dry brush it on very lightly. You can build up the paint until you like it.

I applied Mod Podge to the back of the pieces of paper. Make sure to not get it on the font because it will smear the ink or paint. I placed them down inside the shadow box.

Then I looped a small piece of leather cord through the bell. Hot Glue the ends of the leather cord together and glue it inside the box. Finally, add a bow. I did ask my son what color he thought the bell was in the movie, and he said silver. That was after I had distressed three silver bells and made the copper color. lol I went through the frustration of painting the bells for nothing. My son thought that was hysterical.

I gave these to my boys and my oldest two (who think they are funny) told me they could not hear the bell, but my little one went running though the house showing everyone and ringing the bell. They loved them. Children only believe in Santa for so long. I know we only have a few more years left with my little one because he is 7. It is nice to have something like this for them to still keep the Christmas magic alive and going. This was a lot of fun to make too. It was worth painting bells that did not need to be painted and the 20 times I printed the words.

Thank you for joining me for a bit of an emotional post for me. I do hope you enjoyed it. Please Like, Comment, Share, and Subscribe. Also find me on Instagram where I am showing some easy ornament DIYs and on Facebook all under Yellow Butterfly Craft Designs.

Merry Christmas!!

Melissa McGuire

Supplies

Signs- Dollar Tree

Waverly Chalk Paint in Ink and White- Walmart

Card Stock- Michael’s Craft Supply

Distress Ink- Simon Says Stamp

Ribbon- Michael’s Craft Supply

Leather Cord- Michael’s Craft Supply

Silver Bells- Michael’s Craft Supply

Mod Podge- Hobby Lobby

Surebonder Hot Glue Gun and Hot Glue Sticks- Hobby Lobby

Double Duty Christmas Pillows

The older I get the more I love a great throw pillow! I do not have them on my couch because, well, I have boys and they destroy them. So I have to stick them in other spots. My craft room chair is one place and my bed is the other and I stack as many as I can. Yes the men in my house hate me sometimes!

These Christmas pillows are going to pull double duty. They have a Christmas pattern on the front and what I consider Winter on the back. Yes I know that the backs of the pillows are a lot of red and that is normally Christmas but the red matches the rest of my decor.

Lets Get Started

Supplies

You do not need a ton of supplies. I used kitchen towels and place mats as the pictures on the pillows. I also used fat quarter material from Walmart as the backing for the pillows. You can use one of two methods to create the pillows. I used both methods. To join the material together, you will either need a sewing machine or fabric tack. I like Frabri-Fix. As far as a sewing machine, I have a Singer that is a few years old. Sewing is not what I do best so please do not criticize me for my sewing ability. I had to phone a friend to get through the sewing part to this project.

You will also need a ruler and something to cut the fabric with. I have a large cutting mat with an acrylic ruler and a rotary cutter. And of course pillow stuffing!

To start you must decide what size you want your pillow to be. Some of the towels I wanted to make sure had the same border all the way around. For example, with this gnome towel, I had to make sure the red stripe would not show. Also keep in mind you need you need to leave about an inch a half an inch all the way around the piece you are cutting to allow for the seams when gluing or sewing.

Once you have your towels or place mats cut, then lay it on top of the fabric you are using for the back. Cut the back fabric to be the same size as the front. Use your ruler to help keep things straight. If you need to draw lines on the fabric to help you, then use chalk or a pencil. I have a large acrylic ruler so I used it. Make sure you have good scissors when cutting fabric. If they are dull then they will not cut your fabric straight or well.

After you have your pillows cut, place your pieces both with the patters facing each other. When you make pillows, you want the two fabrics or patters that will be on the outside, to start on the inside first. From there you can start sewing or gluing.

When I glue fabrics together I pull up small pieces of the fabric up and place glue down on the edge of the bottom fabric. Then place the top fabric over it and push the two fabrics together. Do this all the way around the pillow but leave a good 5 inch gap where you do not attach the fabrics together. You have to have a spot to put the stuffing in. Now you need to let the fabric tack set for 24 hours before you can move onto the next step.

If you are sewing the fabrics together the make sure you leave the same openings.

Next flip your pillow right side out and start stuffing the pillow with pillow stuffing. I buy the cheap pillows from Walmart to stuff my pillows. It is more cost affective for me. Fill the pillow as full as you want it but keep in mind you still have to seal up the opening and that can be hard to do if the pillow is to full.

To seal your pillow, flip the edges in side the pillow and either glue or sew it shut. I used these little clips to help hold the opening closed. It makes it easier for me to sew it shut.

How cute are all of these? I made a big pillow too, out of the material I got at Walmart. These pillows will be out until Valentine’s Day! The red ones I will put out for Valentine’s Day. They really are pulling double duty and then some. I think the gnomes are my favorite. Since we either used a sewing machine or fabric glue, these are machine washable too.

Thank you for coming to the blog today to see this cute pillow project. Over on Instagram I am posting a few super easy Ornament Crafts. Go take a look! It is Yellow Butterfly Craft Designs over there and on Facebook.

Please Like, Share, Comment, and Subscribe!

Melissa McGuire

Supplies

Fat Quarters- Walmart

Towels and Place Mat- Dollar Tree

Towels- Dollar General

Pillow Stuffing- Cheep pillows from Walmart, Any Craft Store

Fabric Tack- Any Craft Store

Sewing Machine and Sewing Supplies- Use what you have.

Ruler- Anywhere

Scissors- Anywhere

Clamps- Dollar Tree

Trees and Sleighs

Happy week before Christmas! I hope your shopping is done and your decorations are up. While my decorations are up, my shopping and for sure my wrapping is still not done. I am close though. All three of my boys are home doing online schooling so getting things ready for Christmas has been a challenge. We all have to make the best of it at this point.

Lets talk about today’s project. I bought this sleigh last year at Target and did not know what to do with it. So this year a challenged myself to use it. I think it turned out great and it is sitting in my craft room. I love decor that just flat out makes me happy especially cause this year I have seen it a lot.

Lets Get Started

Supplies

As I mentioned before, I found the sleigh at Target last Christmas but thrift stores might have something similar. The tree is from Dollar tree and I used garland ties too. I also used some flowers from the Dollar Tree, and fairy lights that I ordered off of Amazon. Now in the top picture you can see some fabric in the sleigh and that is from Walmart. That was one of those things I added in as I was crafting. I used hot glue to put all this together.

The first step was to add the fabric to the inside of the sleigh. To do this I just laid it down in the sleigh and started rolling the sides up and gluing them down. Make sure you do not roll up so much fabric that you pull it up from the middle of the sleigh. I folded and glued little by little as I went around the sleigh.

Next I placed the tree in the sleigh. This took some creativity to keep the tree upright but with some plastic bags and a bit of the fabric I got it to stand up straight. I added the garland ties to the tree is several places up and down the center twisting them around to make more branches. This makes the tree look fuller. Then I decorated the tree. I started with the fairy lights. I got them from Amazon and they are batterie operated. I prefer to order them from Amazon because I can get 10 to 12 in a back and it is cheaper than buying them from Dollar Tree. Then I had a strand of red berries that I got at Dollar Tree and added those around the tree.

That is where I thought I would stop. The tree looked so bare though. I did not want to use ornaments. So I decided to put red and white flowers on the tree. Some were single flowers and others were paired together.

The tree and sleigh both needed something else. Something to tie them together per say. I had fabric left so I cut it into strips and tied the fabric strips into bows. I glued a big one on the front of the sled and then a few more smaller bows on the tree. That was just what it needed.

The last step was adding some little presents under the tree and inside the sleigh.

This little tree would be perfect for a dorm room, or small apartment. Like I said my tree is sitting in my craft room on a small table. I put one of my shadow box signs to the side of it. It really is beautiful.

Thank you so much for coming back to the blog. Christmas is getting closer but I still have a bit more to show you before the big day. Please come back to see it all! Also please Like, Share, Comment, and Subscribe. Also look for Yellow Butterfly Craft Designs on Facebook and Instagram!

Have a wonderful day!

Melissa McGuire

Supplies

Tree- Dollar Tree

Garland Ties- Dollar Tree

Fabric- Walmart

Fairy Lights- Amazon

Flowers- Dollar Tree

Berry Garland- Dollar Tree

Sleigh- Target

Surebonder Hot Glue Gun and Hot Glue Sticks- Hobby Lobby

Wall Stickers!

We made it to day 5 of the 5 Days of Christmas!! YAY!! Today’s project is making signs with wall stickers. You can do this with window clings too but I do not think they look as nice. I am really proud of how these signs turned out. This is one of those projects that you can really jazz it up or leave it plan depending on your taste.

Lets Get Started

Supplies

For this project you will need some of the Dollar Tree long signs. They have come out with these long signs for several holidays so they should not be to hard to fine. If you can not find them you could get wood from the hardware store or use foam core board. The next thing you will need are wall stickers or window clings. I also used some paint and Mod Podge.

I started by painting both boards with Waverly Chalk Paint in White. I only did one coat of white because I knew I would be adding more layers of colored paint. Lets look at the stary sky one first. To do this take any kind of black paint and roughly paint the board. While it is still wet take a clean brush and get very little white paint on it and dry brush it over the board. I also used a teal color. Purple and a dark pink would also work well. I went back and forth with the white, teal, and black paint adding it to where I thought it was lacking. After I was happy with how the sky looked, I mixed some shimmer paint and the white paint with some water. Then with a pointy brush I took the pointy brush loaded with the paint and water mixture and tapped it on my hand, over the board to make the splatter dots. This is messy but it makes it look like stars. To me, it is worth the mess.

As for the second board, I painted a road black and the sky with white and blue. I tried to channel my inner Bob Ross to make happy little trees with some green paint. It did not work well but at least I tried. Free hand painting is not something I am good at so I tried to improve when I can.

Once everything was dry, I stuck the stickers on each board. If the stickers do not stick, use a very light coat of Mod Podge on the back of them. If you put to much, you will be able to see it from the front of the sign so go at it with a lite hand.

Now if your sign does not have a hanger on it, just add one with some twine or ribbon and hot glue.

How awesome are these!!?? Like I said before, I am really proud of these signs. They look great and it would be something I would consider selling if I did not like them so much. It’s amazing what you can do for just a few bucks. These are so easy and the can really step up your Christmas decor game.

Thank you so very much for joining me all week for the 5 Days Of Christmas. I really appreciate it. I have loved all the comments!! I have a few more Christmas projects coming next week then we are going to change gears a bit. Please stay on the look out. I have another double duty coming too!!

Please Like, Share, Comment, and Subscribe! Also you can find me on Facebook and Instagram!!

Have a wonderful day and a great weekend!

Melissa McGuire

Supplies

Long Signs- Dollar Tree

Window Stickers- Walmart, Dollar Tree has them too.

Paint- Use what you have on hand.

Mod Podge- Hobby Lobby

Twine or Ribbon- Any Craft Supply Store

Surebonder Hot Glue Gun and Hot Glue Sticks- Hobby Lobby