Welcome to 5 days of Halloween crafts. Most of the crafts this week will be fast and cheap. We are going to start with these two signs.
Supplies
Dollar Tree for the win on this one. I bought both of these signs at Dollar Tree. They have several styles of DIY signs right now for Halloween. I also used Waverly Chalk Paint in the color Ink and White. For the red paint, I used to red acrylic paint I had on hand that I am trying to use up.
Once I had everything painted I though the signs needed something more so I used Dollar Tree Halloween Stickers. Other supplies are paint brushes and glue for the stickers.
Let’s Get Started
To start these wall hangers I painted the BOO with Ink Waverly Chalk Paint and EEK with red acrylic paint. Both only took one coat. Each have a different texture to them since I used different kinds of paint. Please use what ever color and type of paint you want to or have on hand. Purple and orange would also be great colors to use.
Next I took a fan brush and brushed the edges of each word with White Waverly Chalk Paint. To do this, lightly load up the brush with paint and tap of the brush on a scrap sheet of paper to get some of the paint off of it. This will keep it from clumping up the paint when you touch it to the words. Swipe the brush over the words to add some interest to them.
Once painted and dry, I thought they still looked bare. I dug though my Halloween stash and found these felt Dollar Tree Halloween Stickers. I spread them out across both words until I was happy with how they looked.
Here is a closer look at the wall hangers. I love projects like this that are fast and each cost about $3.00 each. That is very affordable.
I hope you enjoyed day 1 of 5 days of Halloween. Please let me know what you think!
Happy Monday and have a great week. Join me tomorrow for two blog posts. Tool Tuesday will take a look at paint brushes and also another Halloween craft will be posted.
Thank you for joining me! Please Like, Comment, Share, and Subscribe!
Have a great day!
Melissa McGuire
Supplies
EEK and BOO Word Hangers- Dollar Tree
Waverly Chalk Paint in Ink- Walmart
Waverly Chalk Paint in White- Walmart
Red Acrylic Paint- Tuesday Morning (any craft store or Walmart)
Fall is in the air! It is my favorite season. I love making crafts for fall. The colors are bright and amazing. Jewel tons are finally in fashion. So lets kick off the fall season with three really easy projects that take very little time to create and are easy on the pocketbook.
Project #1
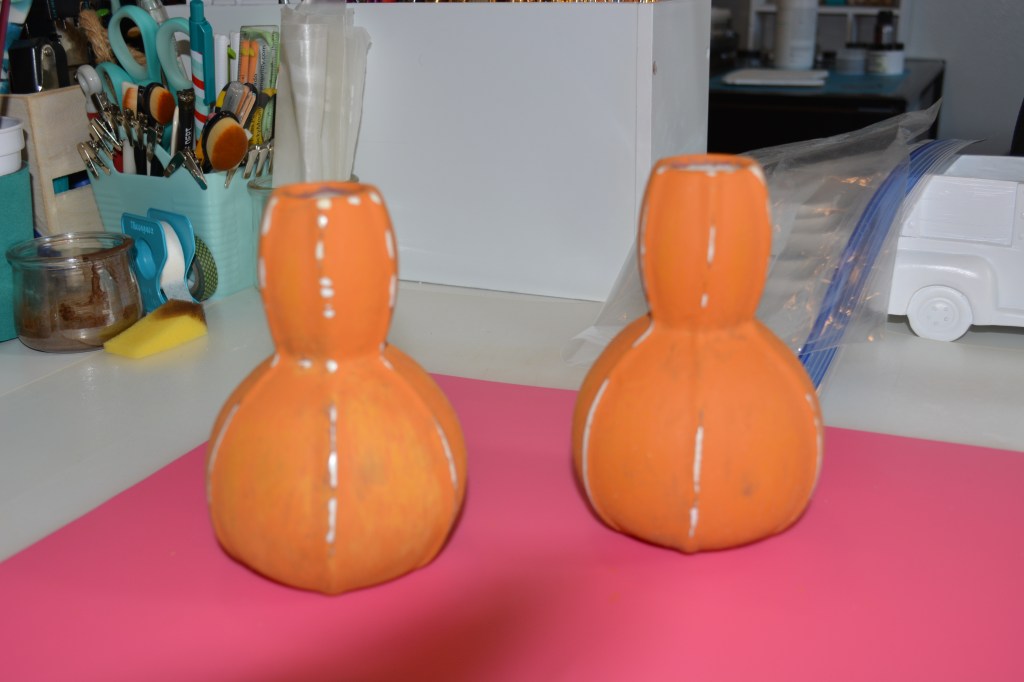
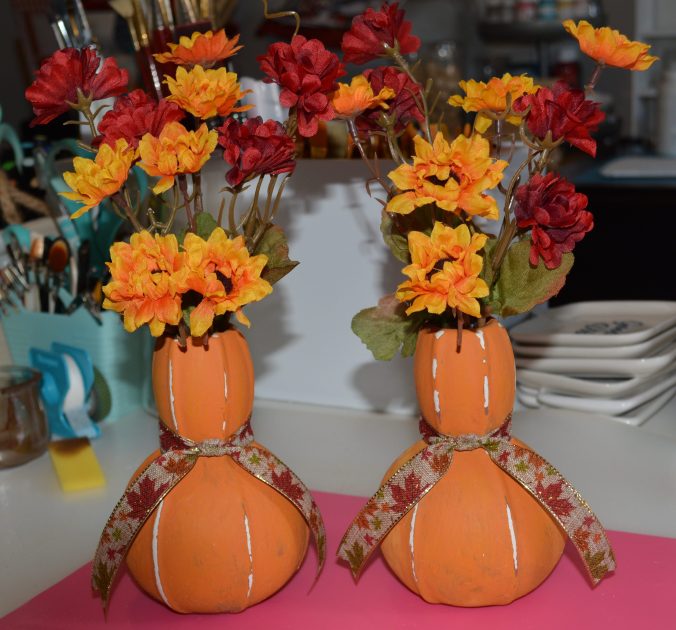
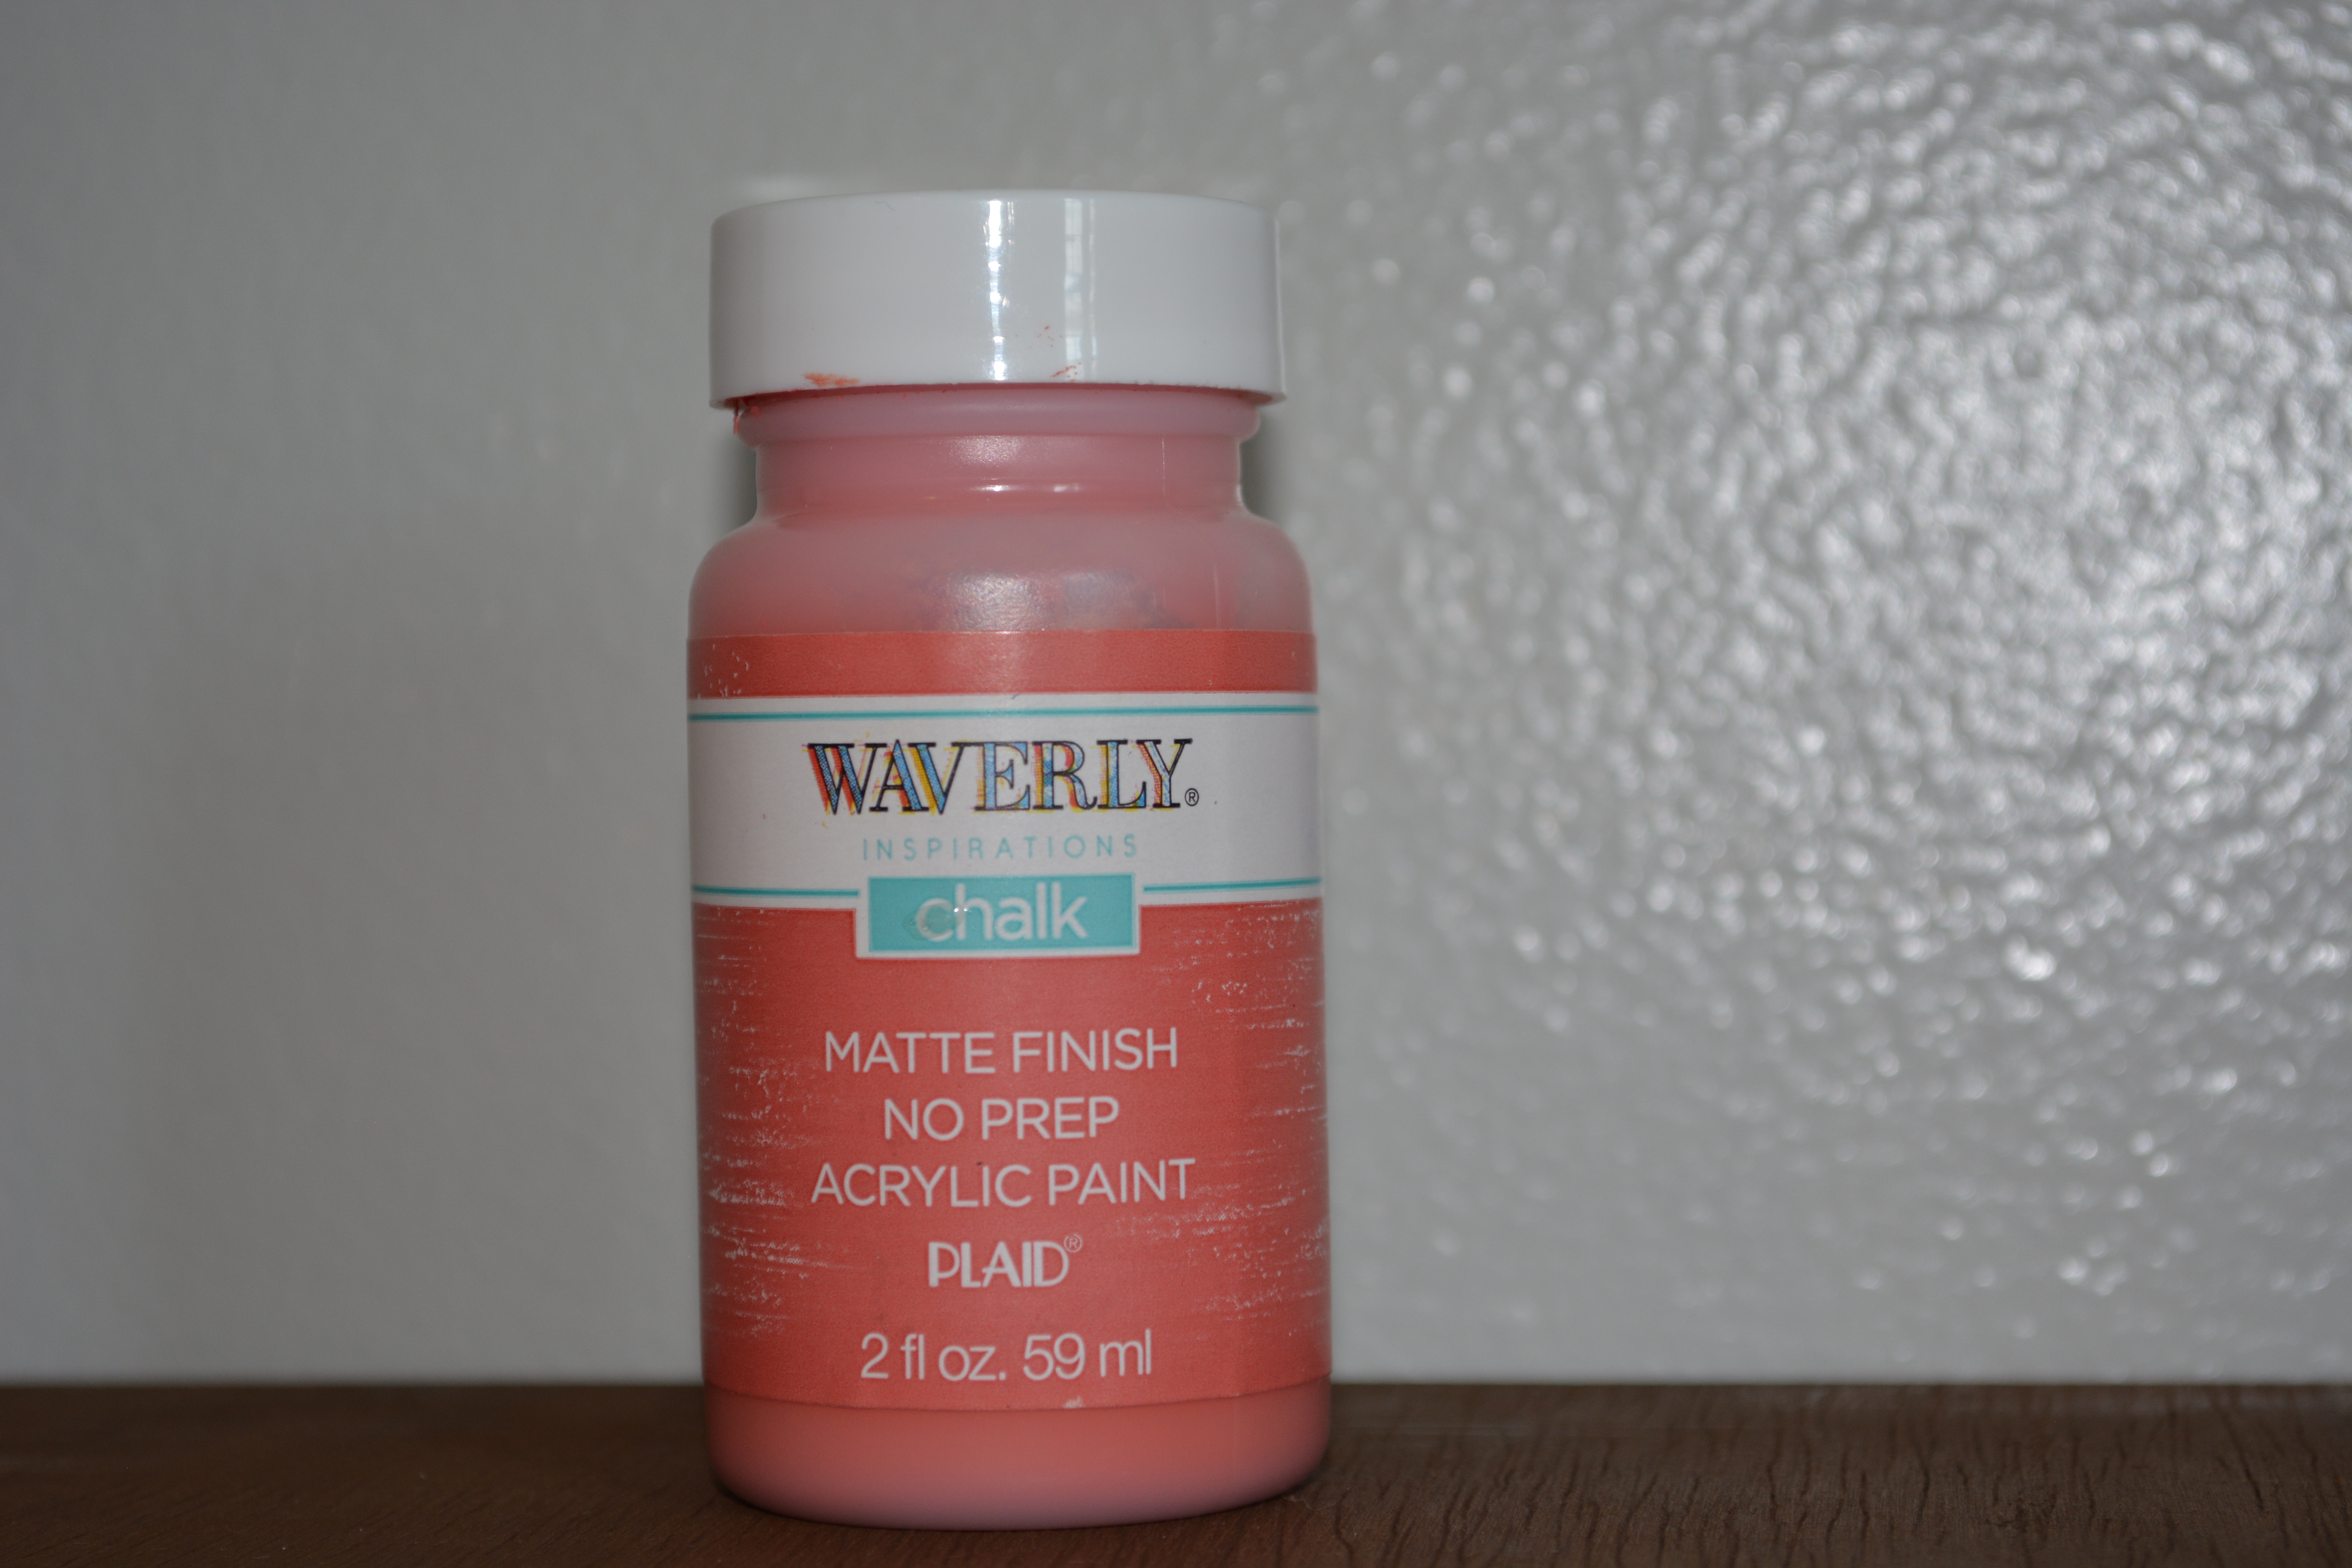
The first project is cute gourd flower vases. You will need as many vases as you want to make. I found 2 of these white vases at Dollar Tree. They come in all kinds of colors. You will also need paint if you want to change the color of the vases. I used Waverly Chalk paint in Pumpkin. Finally pick your favorite fall flowers. Mine are from Dollar tree.
A few extra supplies you will need are paint brushes, ribbon, and a sanding block.
The first thing I did was to paint the vases with a mixture of a maroon paint and a copper color. It looked horrible and that is being kind. This is what I call a crafting mishap. It just did not turn our how I was hoping. So I changed gears and painted them with Waverly Chalk paint in Pumpkin. It took 2 coats of paint to cover the vases.
Next I took a sanding block and sanded down the edges of vases. This make the vases look like gourds. The white on the vase showed though great.
The final steps are to add ribbon if you want to and arrange your flowers and you are done!
They are so perfect for fall. This project would be great as a start to a center piece for a table scape or something simple on end tables. It can round our any decor.
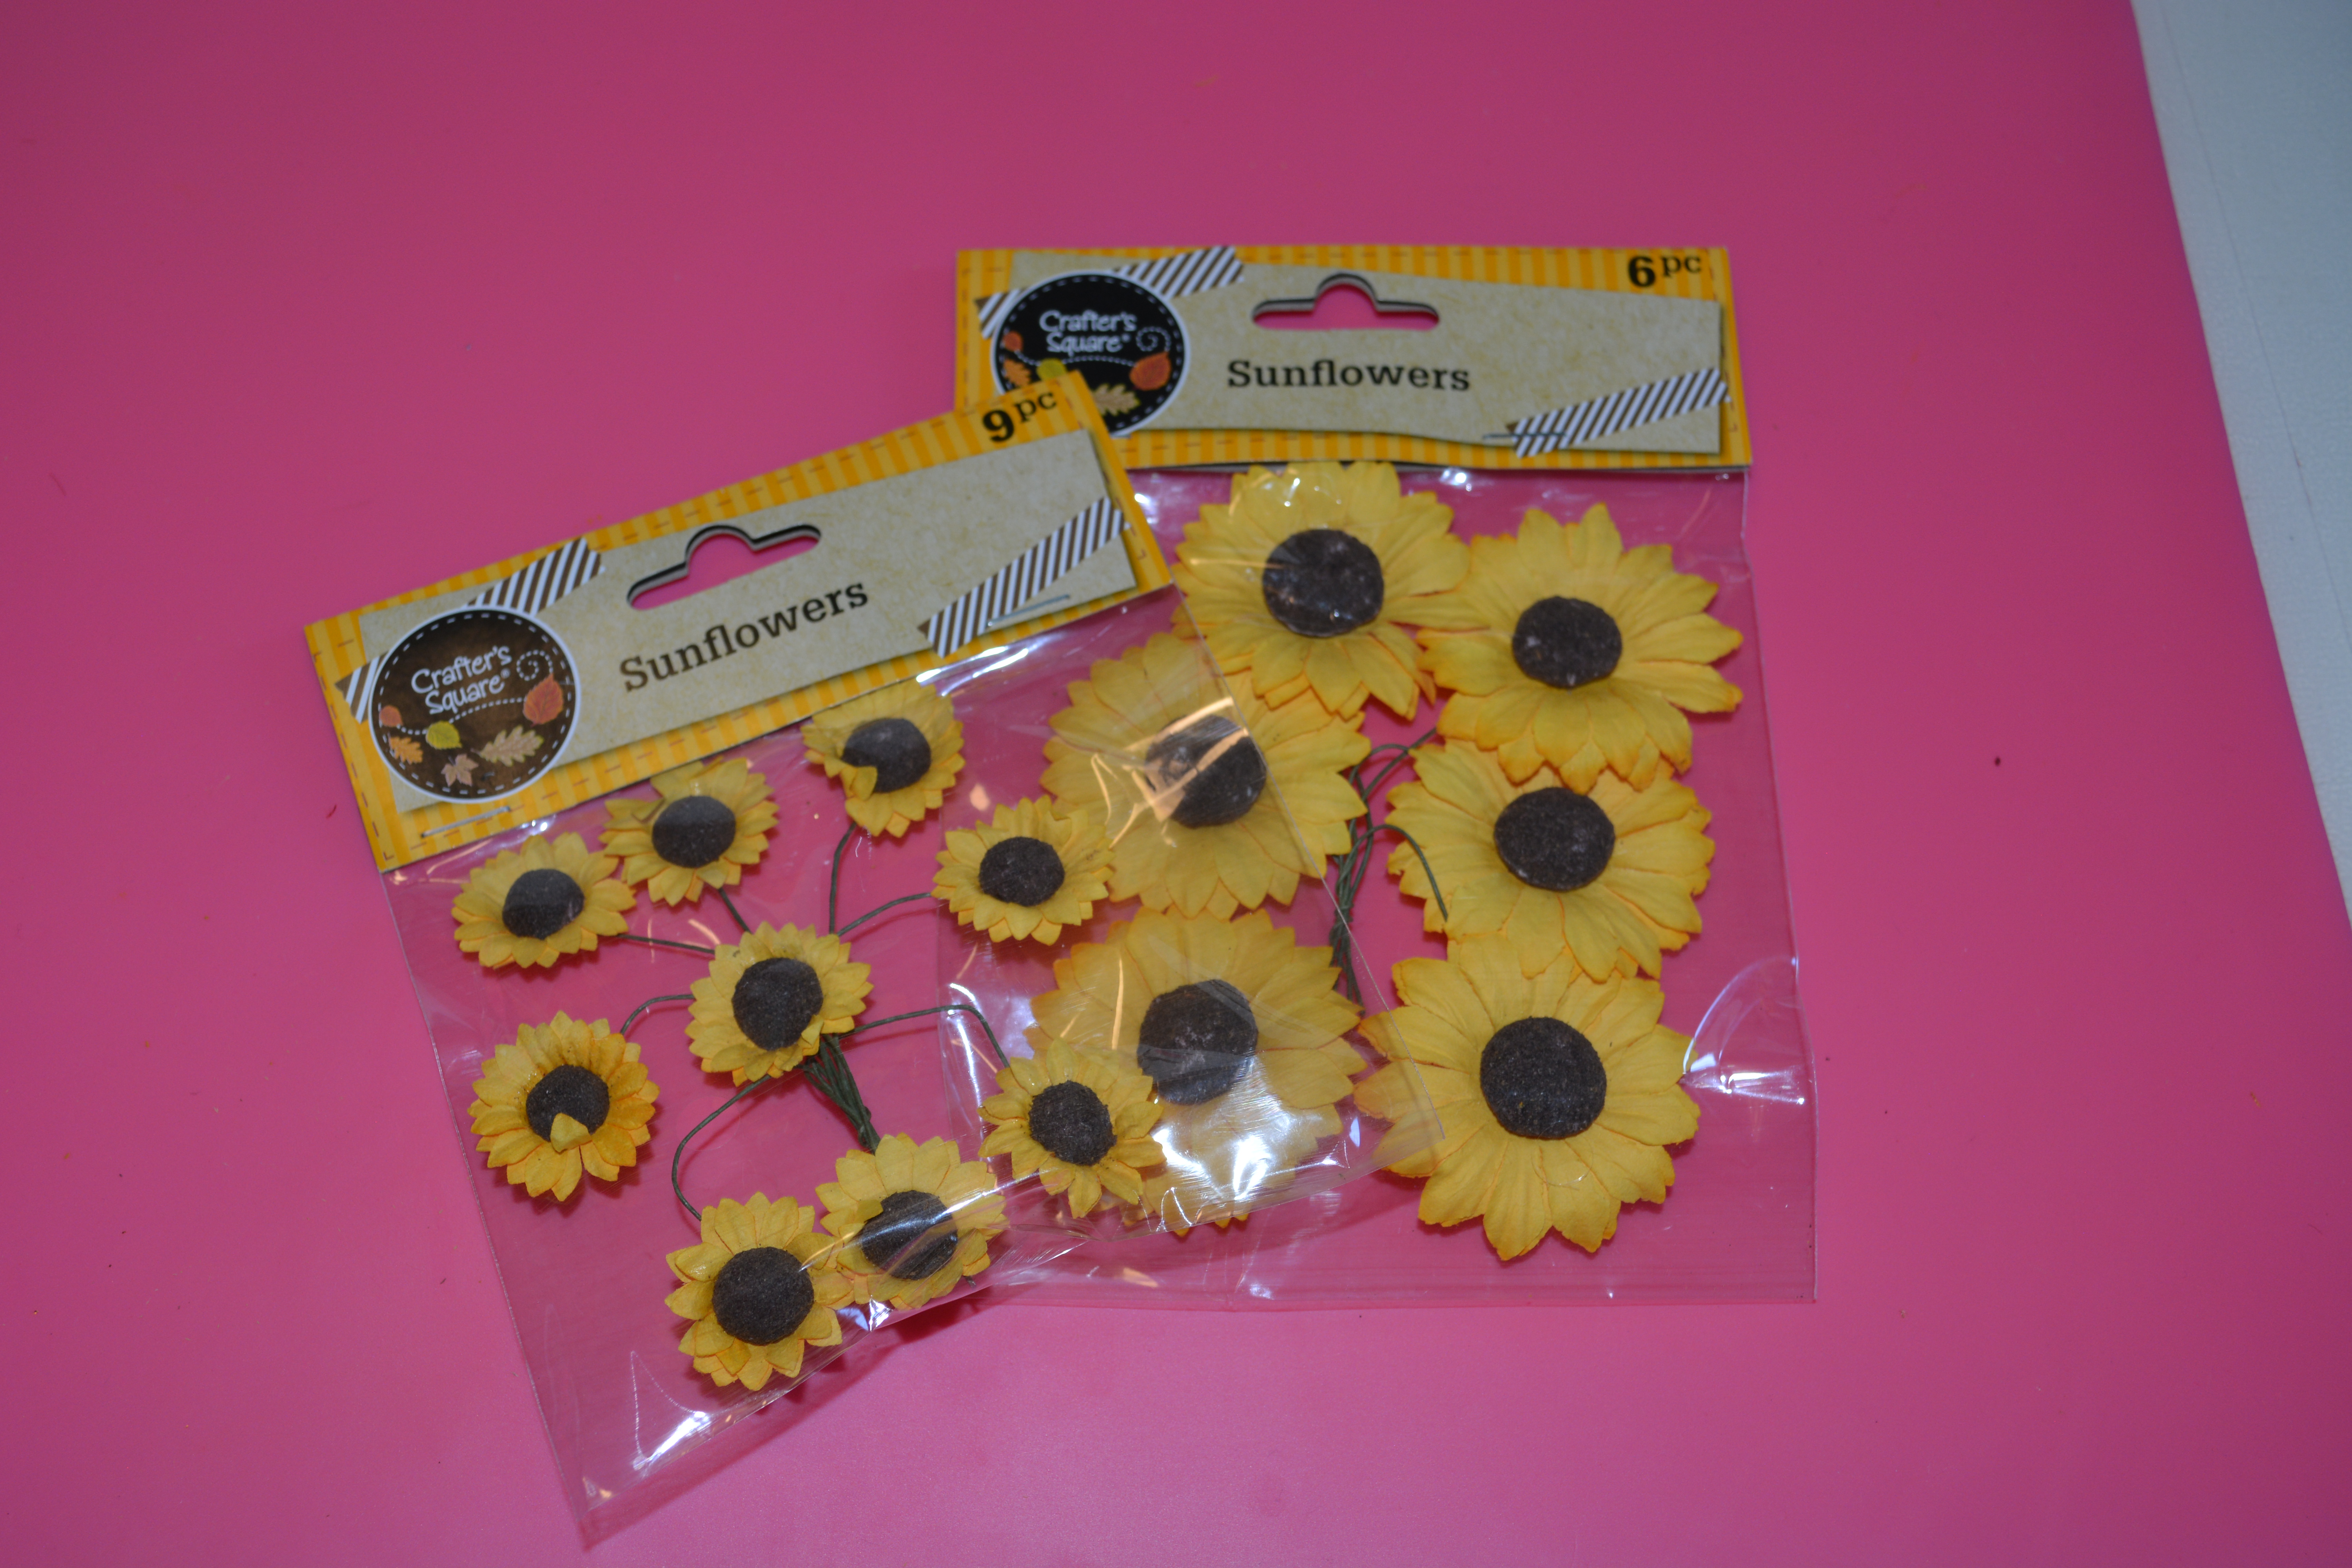
Project #2
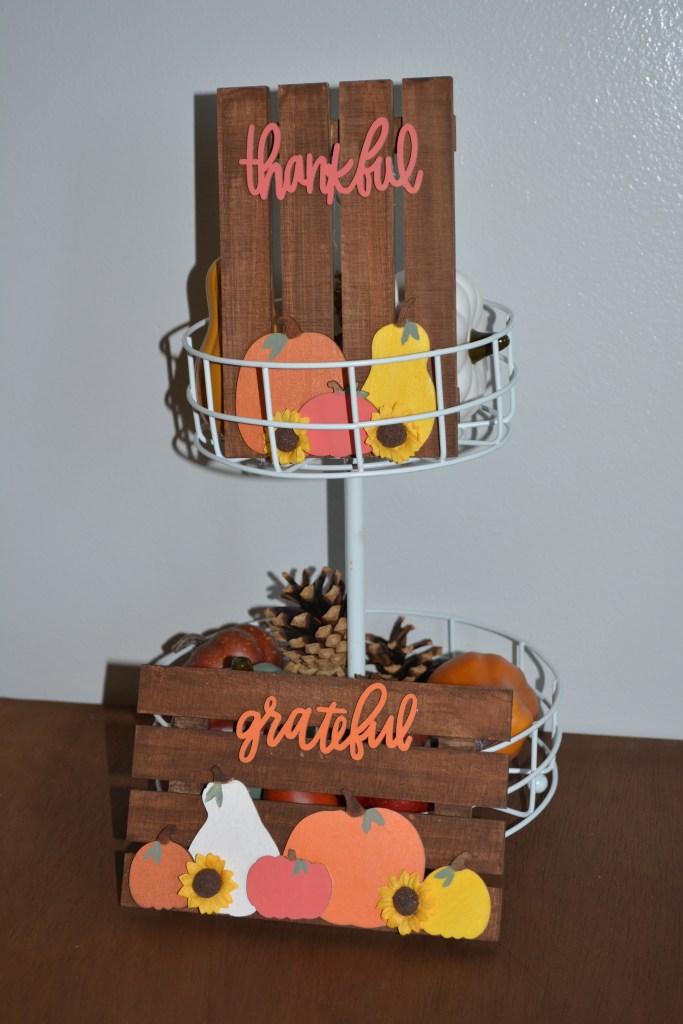
This project might look like it takes a lot but it goes fast. You will need some small pallets and sunflowers from the Dollar Tree. I found the words and pumpkins at Target in the Bullseye Playground. I used two different kinds of Waverly Chalk paint in Maize and Rhubarb and also Waverly Antique Wax.
You will also need Glue and paint brushes.
The first thing I did to start this project was put some Waverly Antique Wax in a cup and put a few table spoons of water in it and mixed it together. This thins the paint out and makes it more like a stain instead of thick paint. I brushed the stain all over both pallets and let them dry.
While that was drying, some of my pumpkins and words were not the colors I was looking so I painted them with chalk paint. Another option for painting the items is to use paint pens. This actually works really well and something I will do from now on because it is easier.
From there I started placing the words, pumpkins and flowers on the pallets to see how I wanted to arrange them. I also painted leaves on the pumpkins to give them a face lift. Once arranged, I glued them on. I used hot glue for the pumpkins and flowers and a liquid glue for the words. I am not real good at using hot glue on thin words like this without making a big mess.
These look really great on their own or in 3 tiered trays. They make the perfect focal point.
Project #3
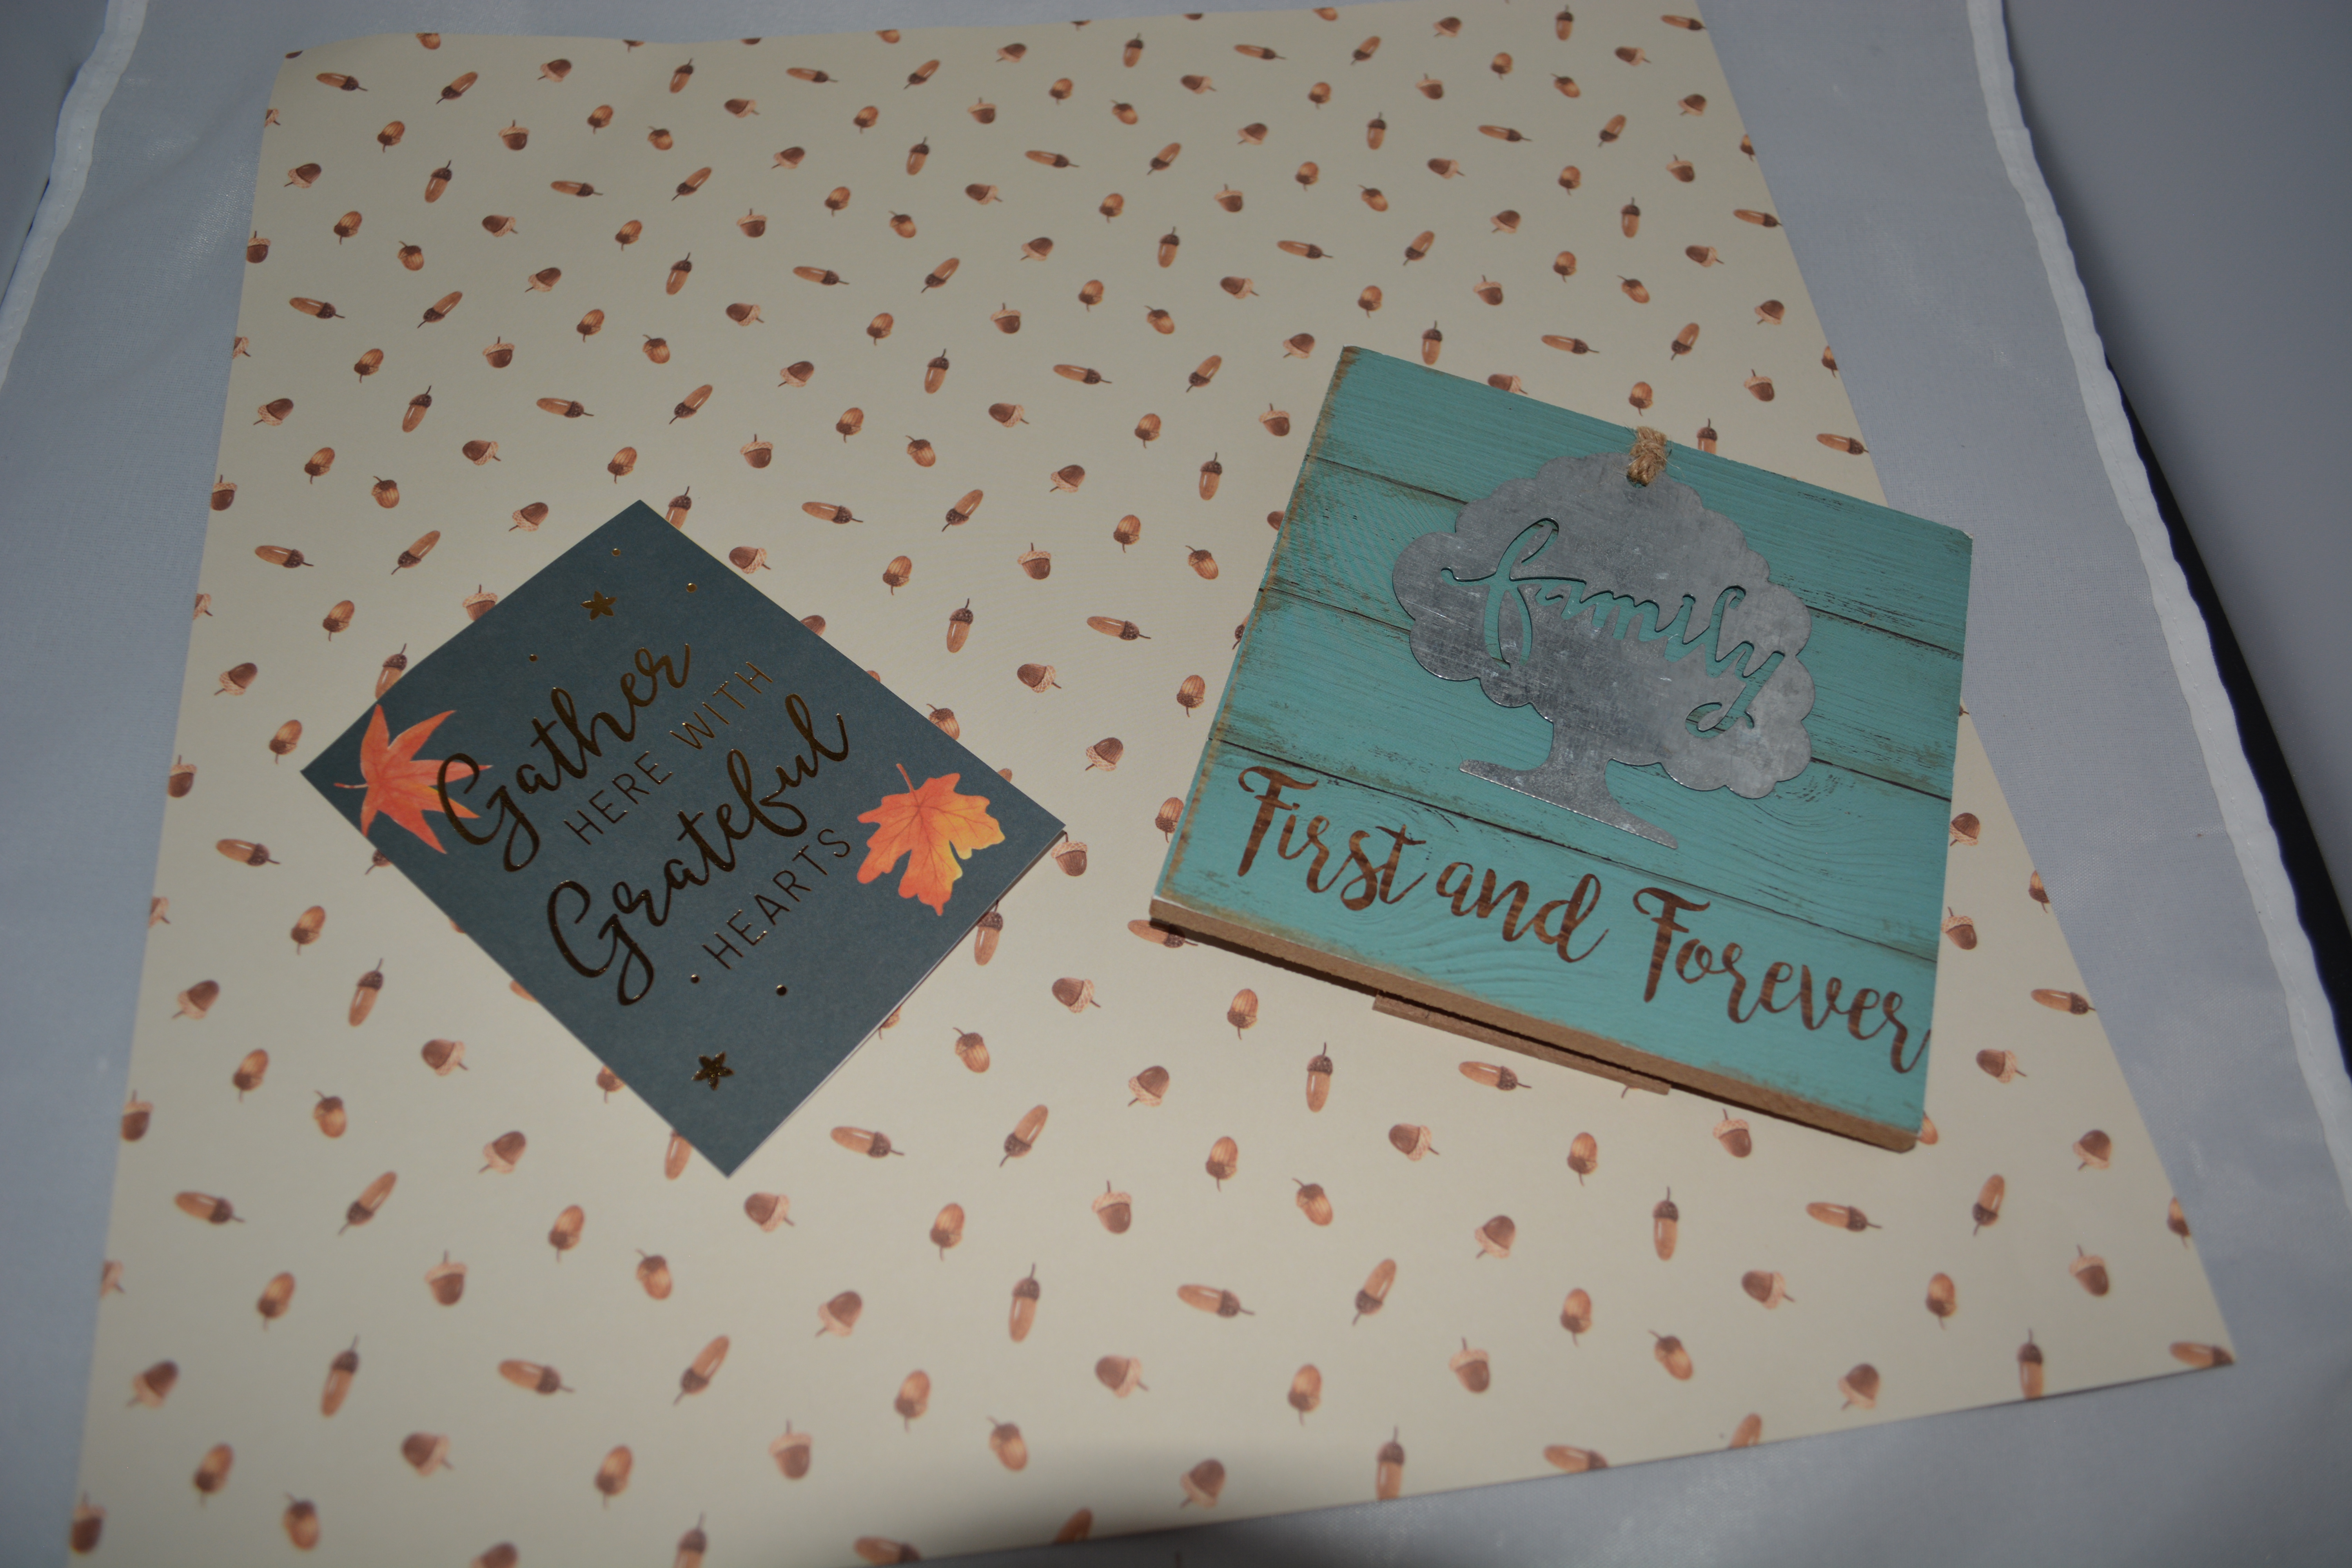
For the third project you will need a standing plaque and flowers from Dollar Tree, scrapbook paper from Hobby Lobby, Mod Podge, and hot glue gun. The paper with the words on it came from a large paper pack from Michael’s Craft store. You will also need a sanding block or sand paper and a paint brush.
To start off this project, I put Mod Podge all over the plaque in a thin layer and placed the scrapbook paper on the top of it, smoothed out the bubbles, and then let it dry. That is important. It is easier to do the next step if the Mod Podge is dry. Once dry, take a sanding block and in a downward motion and run it along the the edge of the plaque. This will scrape the extra paper off of the plaque and you are left with a perfect edge. To me this is better than cutting the paper to fit the plaque.
Now lets move onto the paper with the words. I did not want the words in the center or straight on the plaque. So I put it at an angle on the left side. Do what ever is pleasing to your eye. To glue it down I used more Mod Podge. I covered the plaque in Mod Podge and placed the words down and put Mod Podge over the top of it too. This will seal everything in.
Once this was done, I thought it looked plain and needed some distressing. This is optional but I took some Tim Holtz Destress ink and ran it along the edge of the plaque. It was an orange rust color. You could use paint to do this too. Just make sure you have a very light hand. The good thing is if you get to much paint on it, you can wipe it off because the Mod Podge is protecting it.
Finally I hot glues the sunflowers on and some extra leaves I cut to size and glued those on too.
This is the final project. This plaque is about a 3×3 size but you are not limited by size on this one. You can use what ever size you want and decorate it as you see fit.
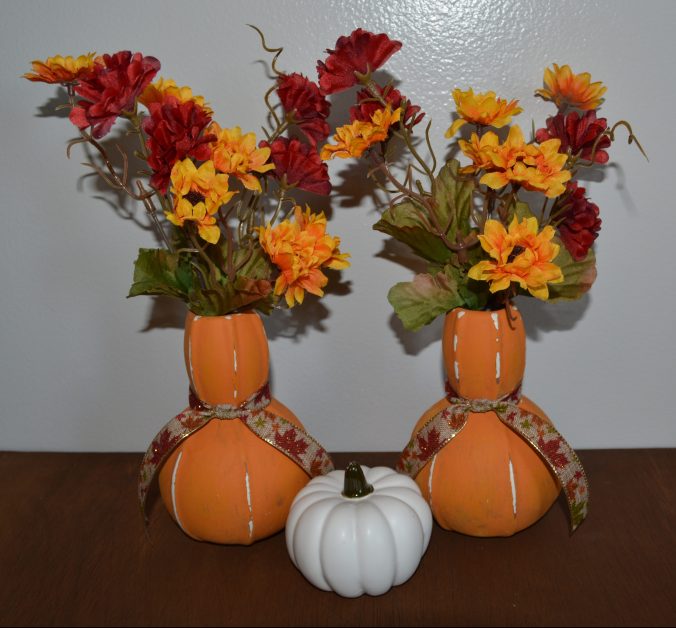
I hope you enjoyed these three simple fall decor projects. I truly enjoyed making them and I have them all up in my home.
Thank you for joining me, I am doing a full week of Halloween projects next week! Please join me. Also please Like, Share, Comment and Subscribe!
Please stay safe and healthy
Melissa McGuire
Supplies
Project #1
Flowers- Dollar Tree
Vases- Dollar Tree
Pumpkin Waverly Chalk Paint- Walmart
Ribbon- Michael’s Craft Store
Paint Brushes- Anywhere
Sanding Block or Sand Paper- Anywhere
Project #2
Mini Pallets- Dollar Tree
Sunflowers- Dollar Tree
Fall Words- Target
Small Pumpkins- Target
Rhubarb Waverly Chalk Paint- Walmart
Maize Waverly Chalk Paint- Walmart
Waverly Antique Wax- Walmart
Surebonder Hot Glue Gun and Glue Sticks- Hobby Lobby
Liquid Glue- Any Craft Store
Paint Brushes- Anywhere
Project #3
Plaque- Dollar Tree
Scrapbook Paper- Hobby Lobby
Sun Flowers- Dollar Tree
Mod Podge- Any Craft Store
Sanding Block or Sand Paper- Anywhere
Surebonder Hot Glue Gun and Glue Sticks- Hobby Lobby
Hello all! I know it has been a while. Quarantine threw me for a loop and having my kids home full time made it hard to get any thing done. It has been a summer like none other. I hope you all are well and healthy!
Well one other reason I have not been posting is because I moved craft rooms. My middle son needed a room by himself so that meant we had to move everyone’s bedroom around. This also meant that I would finally get the craft room I had been dreaming of for so long.
The process started by moving my two youngest sons out of the room over our garage. Then we pulled up the carpet. My husband did that job for me. From there I painted the walls a very light grey, almost a white color. I had some great friends that help me lay flooring and it looks fantastic! Finally, the day came to move ALL of my craft stuff in the new room. As you will see from the pictures bellow, there was a lot to move in.
Lets Start are the door of the room when you first walk in!!
The one thing you should know is that I was obsessed with the old truck long before the old truck was cool! So as you walk into my new craft room you are greeted with a cute truck rug from Big Lots. This is also a good picture of the new flooring we put down. It is peel and stick flooring from Lowe’s. I love the rustic dark color of the flooring and I am glad we put it down. Last week I spilled paint on it and it cleaned up like a dream!
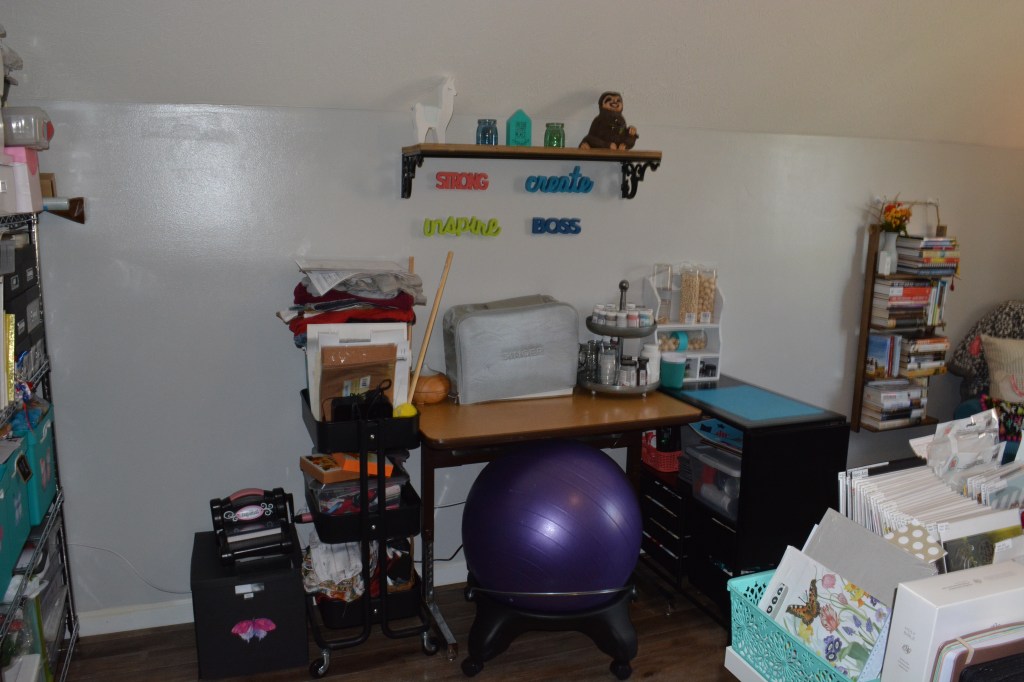
This is my craft room as a whole. I have my big desk directly in front of the door. To the left is a sewing table and a paint table. In the back of the room on the left side of the window is a reading and prayer nook. To the right side of the window in the back is lots of 12×12 paper and my Cricut station.
Here is a closer look at my sewing station and paint table. Everything I need for sewing is in the cart to the left of the table. The top of that cart is where my family puts everything that needs to be mended. Anyone else have a spot like that in their house?
The paint table on the right is a Cricut station from Michael’s Craft Store that did not make the move over without losing its wheels. This cart holds a good majority of the wood stuff I have and paints of all kinds. I can now paint projects and not have them sitting all over my desk. It is amazing!
This is by far one of my favorite things about this new craft room. With a house full of boys, I wanted to create a get-a-way for myself. So I found the chair at a second hand store for $15.00 and put a cover on it from Amazon. The foot stool is from Hobby Lobby along with the big Lama pillow. The bookshelf to the left of the chair is a clearance shelf from Hobby Lobby and it beautifully holds some of my favorite books. The table to the right of the chair is from the At Home store and is just perfect for the space. This is the perfect, cozy little nook for me to relax and read or watch TV. I love that I can change the decor depending on the season.
In front of my window I have some cubes. One has decor and beautiful flowers. While the other one has my favorite rea truck tarte burner and most of my small ribbon.
On the right side of the room behind my big desk is my Cricut station, die cut board and 12×12 paper. I love that I can see some of my most used steel dies with a big magnetic board I made a few years ago. I did not have room for the board in my old craft room but here it has the perfect home. Under it is another Cricut cart from Michaels’s Craft Store. I holds all my vinyl and heat presses. It is out of the way but can wheel out as soon as I am ready to use it.
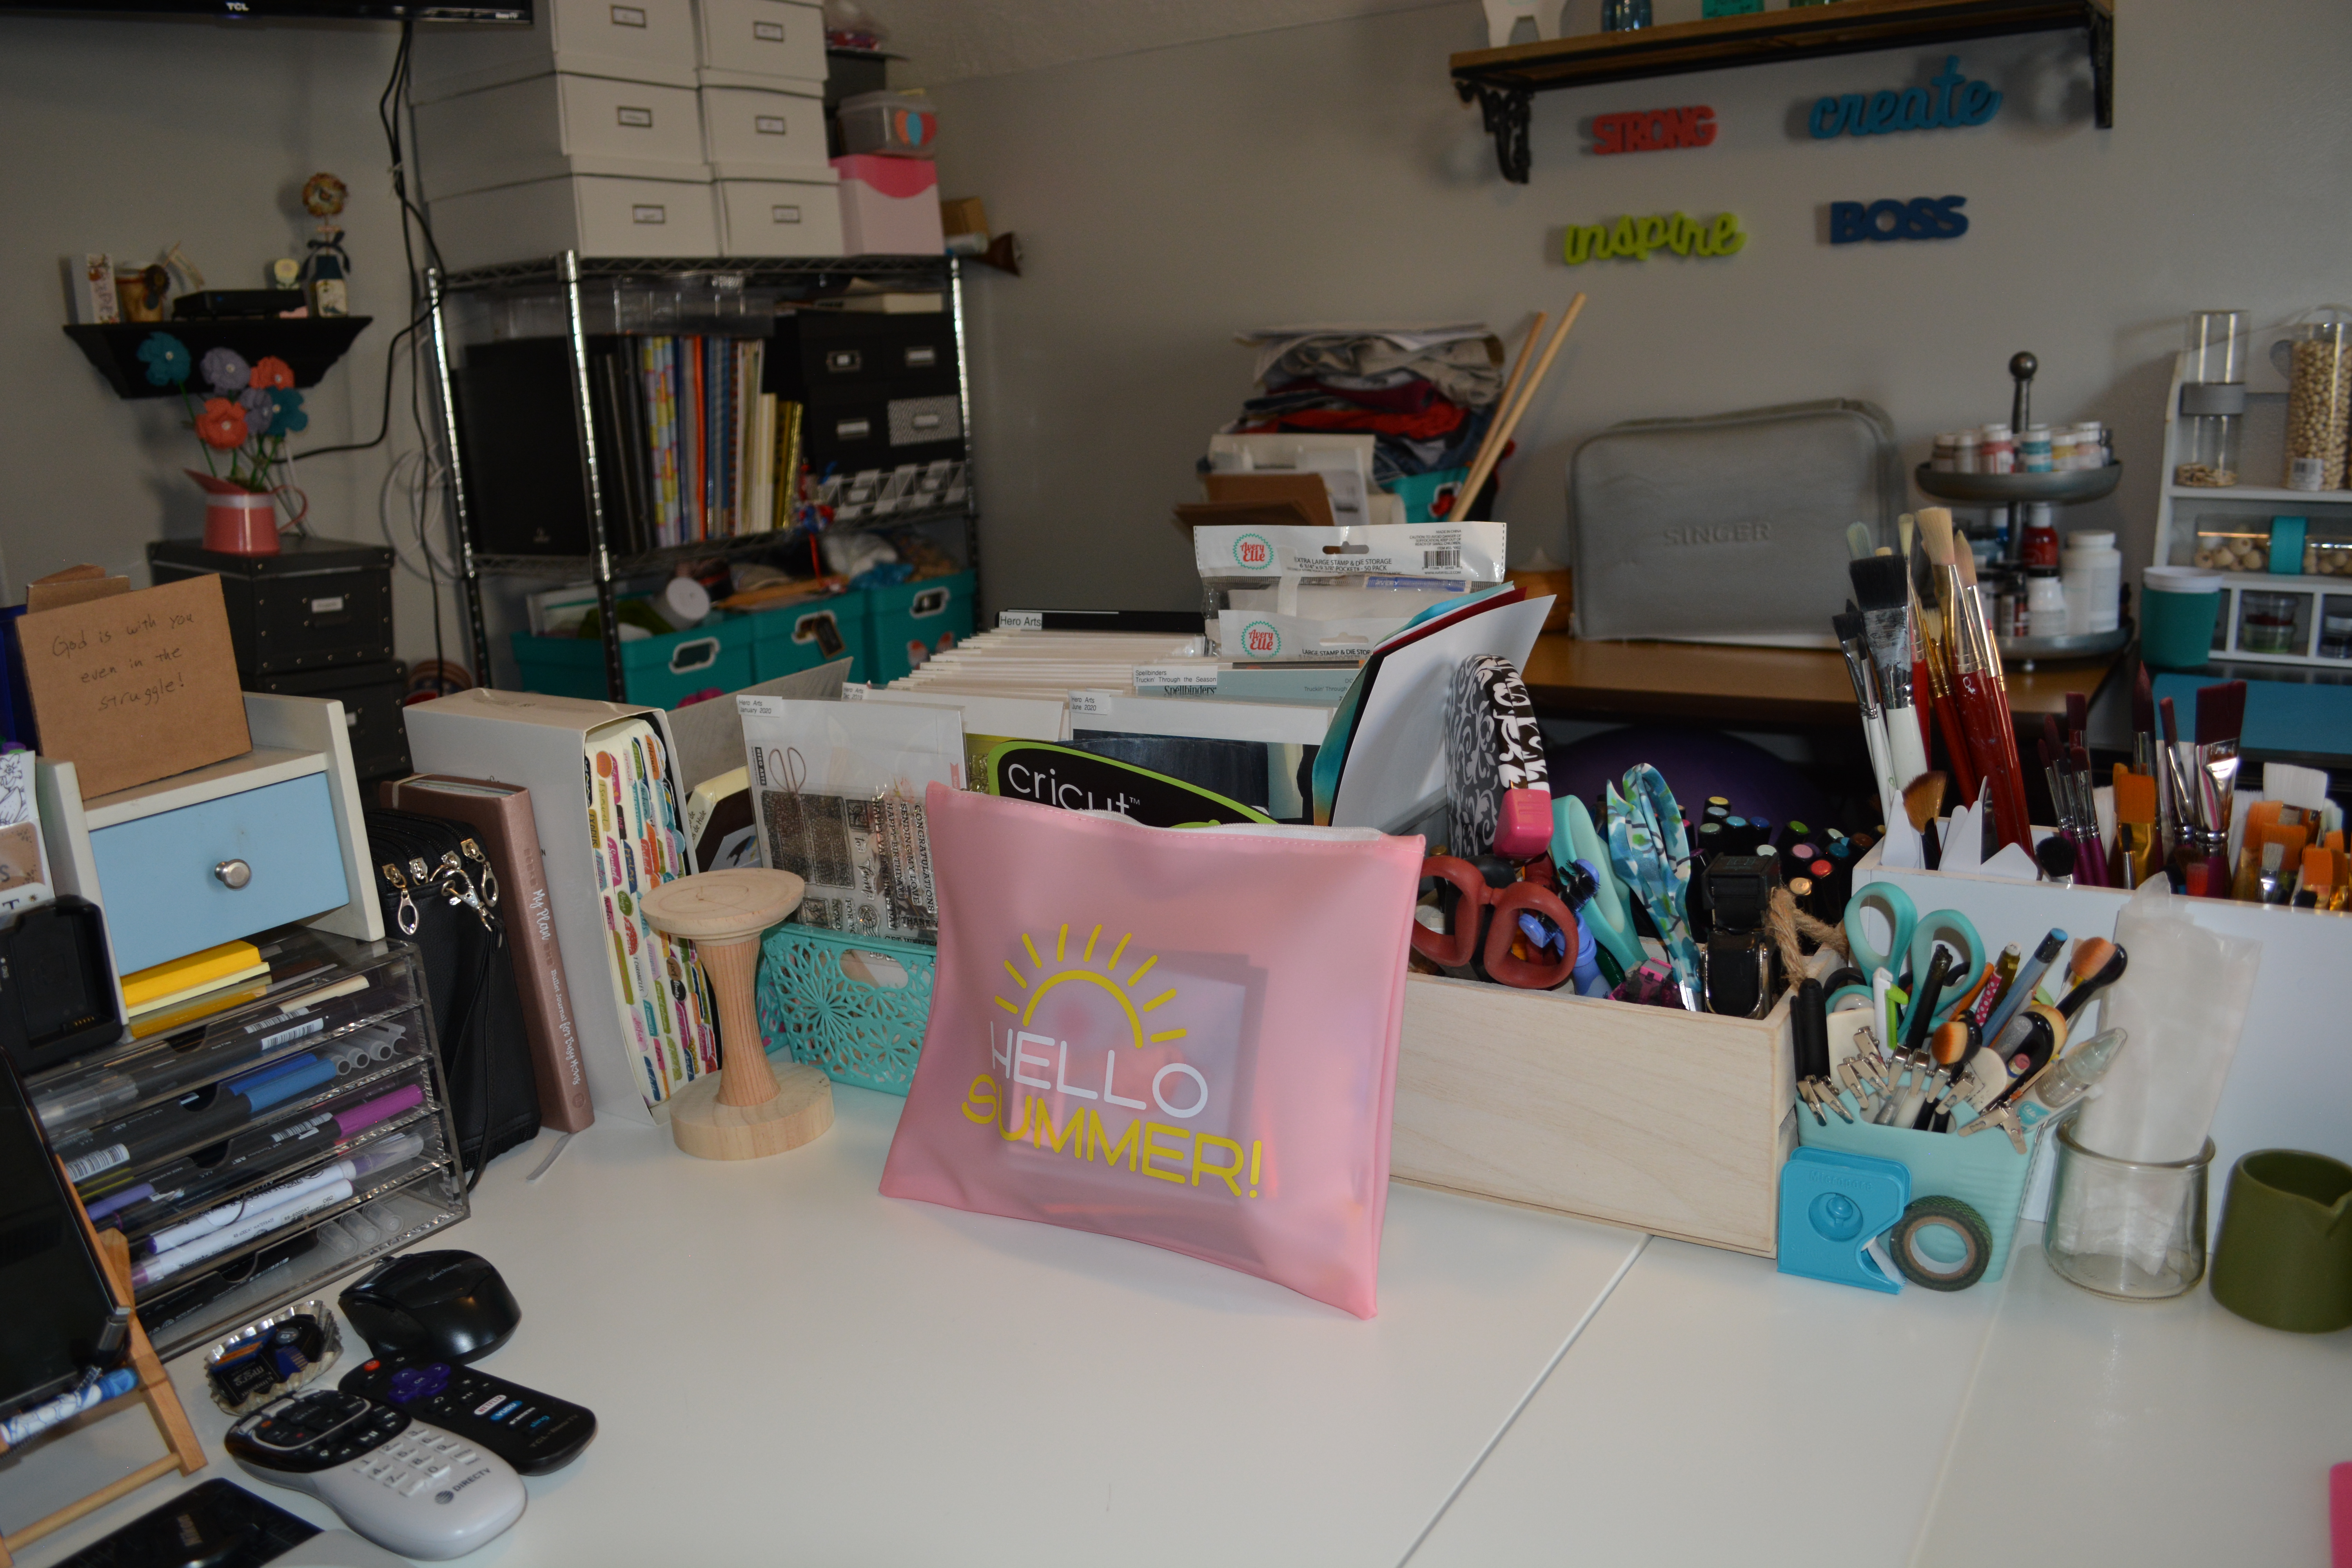
This is behind my desk. It is a lot but I am the kind of crafter that has to have everything at arms reach. I do not want to have to search for anything or get up to get anything especially when I am paper crafting. Lets start on the far left of the picture. This is a good picture of my 12×12 paper tower. Next to that is another Michael’s Craft Store carts. It holds my Gemini die cutting machine and under that is embossing folders and other steel dies.
The First set of white cubs hold my name brand paper, extra paper, extra paint and paint sprays. On the top is envelopes, precut card bases and my Platinum die cutting machine.
The black shelf next to the white cubes holds more paper, embossing powders, travel craft bag, and scrap paper. On the top of the shelf and in the three drawer unit there are all kids of rubber and clear stamps.
The other black shelf that is part way blocked has the essencials. So glue, tape, thin dies, and anything else I want in arms reach. On the top of the two black shelves are two white containers that holds Washi Tape. And on the far right I have another white cube that holds more stamps.
Now lets look at the ink pad holders that are hung on the wall. Two of the are from Organize more and the third is a cassette tape holder from Napa Valley Cassette Tape Company that I spray painted white. You can find these ink pad holders in a variety of sizes and they hold the ink well.
We are finally at my desk. This is where things are kind of a hot mess. Organized chaos is what I call it. The desk is from Ikea and so is the 8 cube shelf. There is everything from paper and stamp blocks to brads and embossing powder in the top part of the shelf. The bottom holds things that I do not need as often. I have a glass craft mat on the top of my work surface. It is fantastic and nothing sticks to it. Then I have a silicon mat on top of that. It is great for working with hot glue and paint. The top of my desk has things like a variety of different kinds of marker and paper punches. There are several different types of glue and rulers all right there at the ready.
This is the side part of my desk. I have a Journaling Bible and colored pencils. Then I have several bins. These bins hold my big stamp sets and sets of stamps I want to do projects with. Next to that is a box I got from Hobby Lobby that holds my bigger scissors and any other tool I might need. Then there is another box with several different kinds of paint brushes. It sits here so that I can reach them from my main desk and also my painting station. I have several small dishes there too. I use these for almost any project I do. They are very handy.
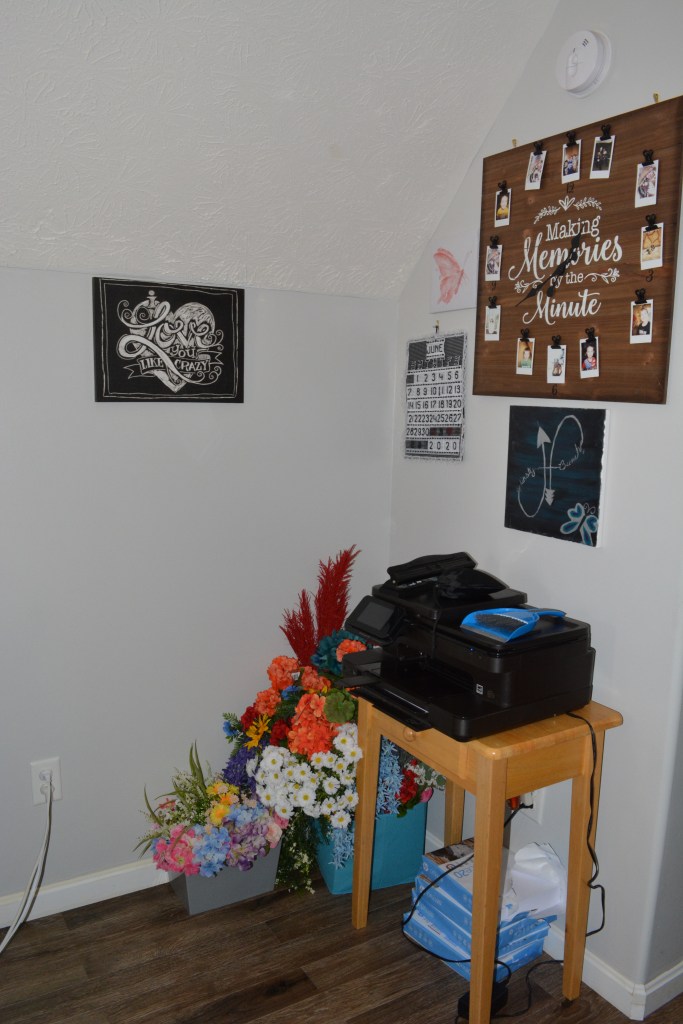
At the front of my room on one side of the door there is a printer and my fake flower stash.
On the other side of the door I have a big metal shelf that holds a lot of my extra supplies. Also it holds holiday stuff. It is also where my tv is which is an essential for my craft room.
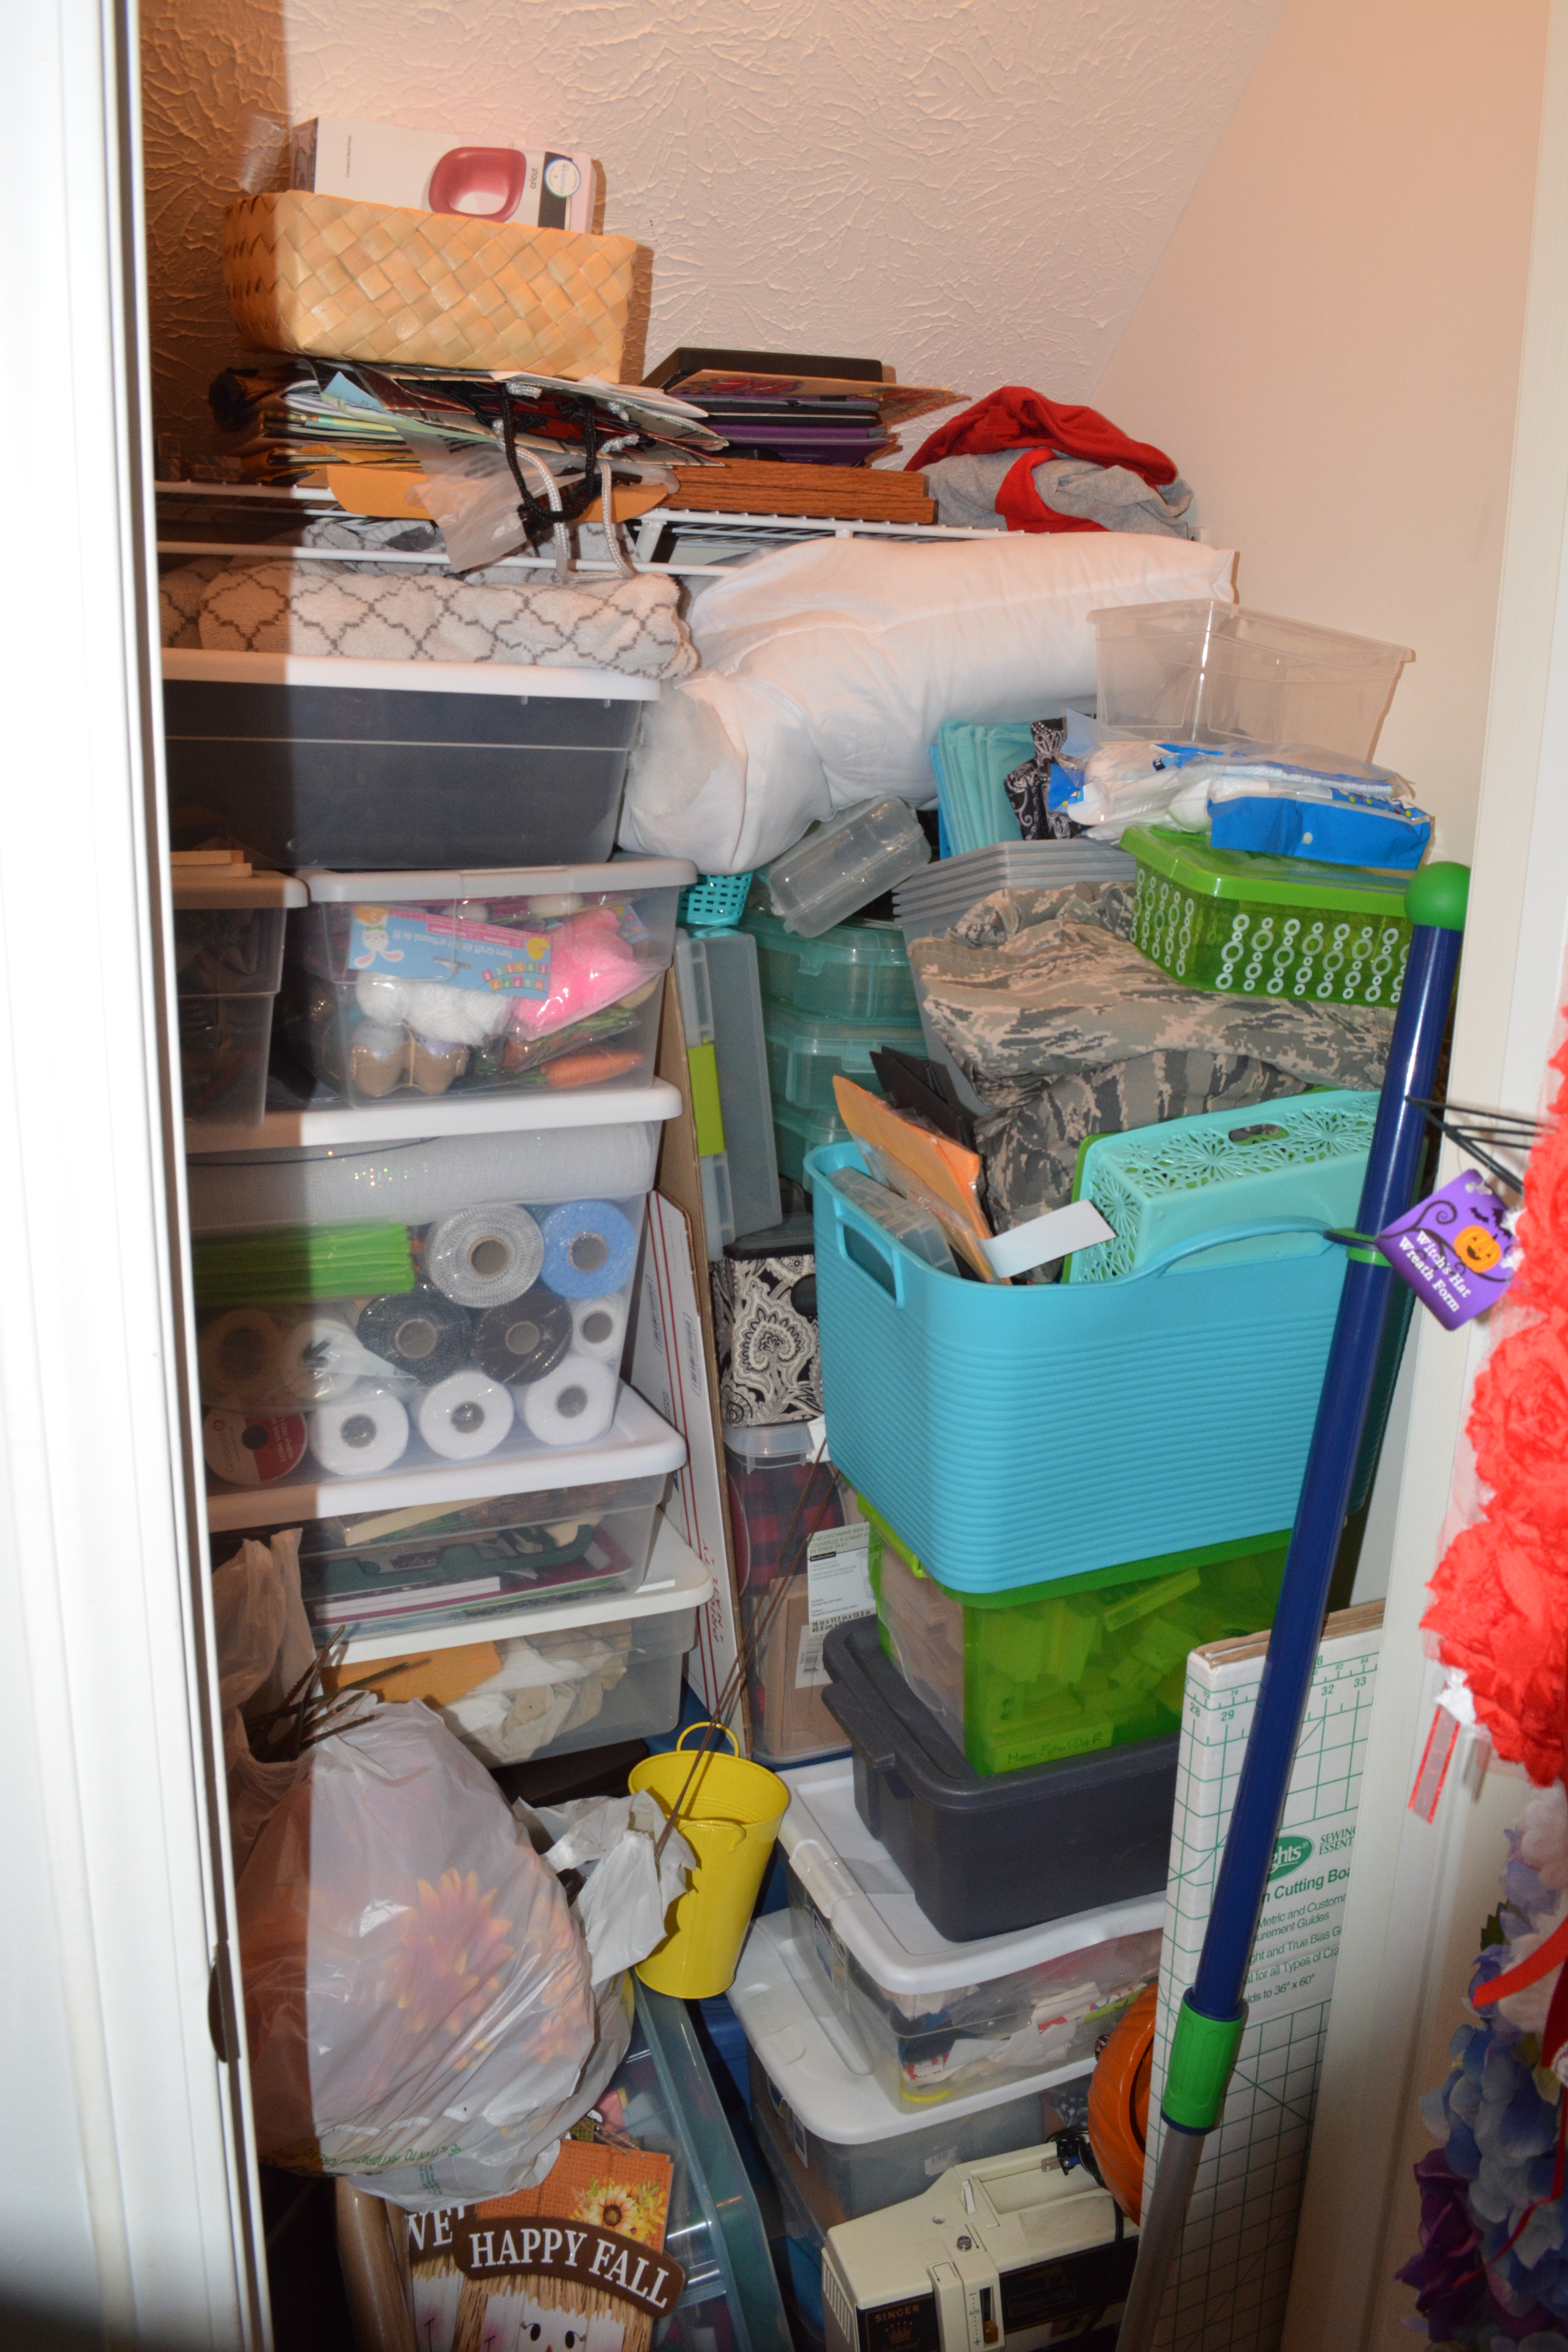
My other HOT MESS spot is my closet. This has even more supplies. It is the best storage spot. It holds so much of my extra stuff. Storage was a very important thing for me to have in this room.
Other storage that I have around the room are these drawer units from target. They hold lots of stuff and I have a few under my desk and in the closet. I keep several things in stock in my room. Wood pieces, Dollar Tree signs, extra paint, extra paper, and many other things. A lot of my supplies are seasonal so I buy extra to have all year round.
Thank you for joining me on a tour of my craft room. It is a dream room for sure. I am blessed and grateful for having such a great space. It is a true sanctuary for me.
I will be getting back into posting twice a week. Tool Tuesday will be back along with lots of Fall crafts. Please Like, Comment, and Share. Also Subscribe!!
My house has been looking pretty depressing since I took all the Easter decorations down. I decorate my home from the start of September all the way through Easter, so after Easter my house looks pretty bland. My decor needed a face lift.
I saw a YouTuber use candlesticks to add height to different places in her home. She did not put candles on the top of them though. I loved the look and wanted to see what I could do to use the candlesticks I had. I found some small vases at Target and wanted to redo a crate from Easter. One quick online shop from Michael’s Craft Store and a curb side pickup and I was ready to get busy.
Supplies
Now, I do not advise you leave the house right now during the quarantine for COVID-19. I will say though that Walmart has craft stuff so if you are there for food you can venture over to the craft section. Michael’s and Joann Fabric do curb side pickup if you order online and they have it in stock at the store. Amazon is also another great option.
So onto the supplies you will need. I picked up 4 vases from the Target Dollar Spot. 2 of each kind of vase. Since I wanted to have some variety I used flower pots too. I also wanted to redo the little mini crate I used to put Easter eggs in. Now I have a ton of flowers on hand but I also picked up some from Michael’s online. Please get the flowers you love. I ordered some succulents from Amazon. As usual, I used some chalk paint. If you are going to paint things, just use the colors you like. I also used some paint brushes, ribbon, twine, a bit of hot glue and floral foam.
Lets Get Started
So my picture taking was at the bare minimum for this project for some reason. I did not take pictures of me painting anything. I will just explain what I did. To start, I painted the flower pots all white with Waverly White Chalk paint. It only took one coat because of the texture of the pots. Next I painted 2 of the vases with Pool Waverly Chalk Paint, and 2 vases with the Rhubarb Waverly Chalk Paint. All the vases took three coats of paint because the surface of the vases are smooth. Now the paint will scratch off very easy. If you do not want that to happen, you will have to seal it with something like Mod Podge. I did not do this step.
While the pots and vases were drying, I cut all the stems off the bunches of flowers with some strong wire cutters. From there I had to decide which kind of flowers to put in each container. For the flower pots, I cut some floral foam and put it in the bottom. Then stuck the stems in one at a time. I used lavender for these. They have a great look and color. You can get them almost anywhere but Walmart has the best for the price. After the stems were in place, I pushed moss into the cracks and across the top to cover the foam. Please arrange the flowers to your liking. It really is a personal preference.
For the vases after they were dry, I divided the flowers from the three bunches I had bought. Then arranged the flowers in them until I was satisfied with how they looked.
The flowers in the vases looked plain. I have some green and pink burlap from Dollar Tree and tried that on the vase. It was not what I was looking for so then I tried some twine. BINGO!! That did it. I tied knots on 2 of the vases and bows on the other 2.
Lets move onto the crate that I wanted to redo from Easter. I cut floral foam to fit in the crate. Then started picking and arranging the succulents in it. There were several small gaps so I filled that in with moss.
Here is where you get to hear about one of my “OH CRAP” moments. I tipped up the crate and realized it has open spaces in it so I could see the floral foam from the outside. Yep it looked horrible. I had 2 options. The first was to take everything out of the crate, cut the floral foam down, put it back in, fill in around the foam with moss, and the put it all back together. Or two, put something around the outside of the crate to conceal my mistake.
I chose to wrap some of the pink burlap ribbon around the crate and hot glued it. I then added a bow made out of burlap.
Here are the final products!! My husband said they look like things you could buy at the store. They turned out great. It was just what my house needed. They were easy and this is something you can recreate with things you have at home.
I wanted to show you how I styled the flowers. They are in my dinning room up against a bold blue accent wall. It brightens up the room since sunlight does not enter the room at all. I painted some of the candlesticks a long time ago and I did not like all of them having candles on them. The flowers make a great addition instead of a bunch of candles.
I hope you love these vases and flowers as much as I do. Please leave me a comment or find me on Facebook and Instagram under Yellow Butterfly Craft Designs.
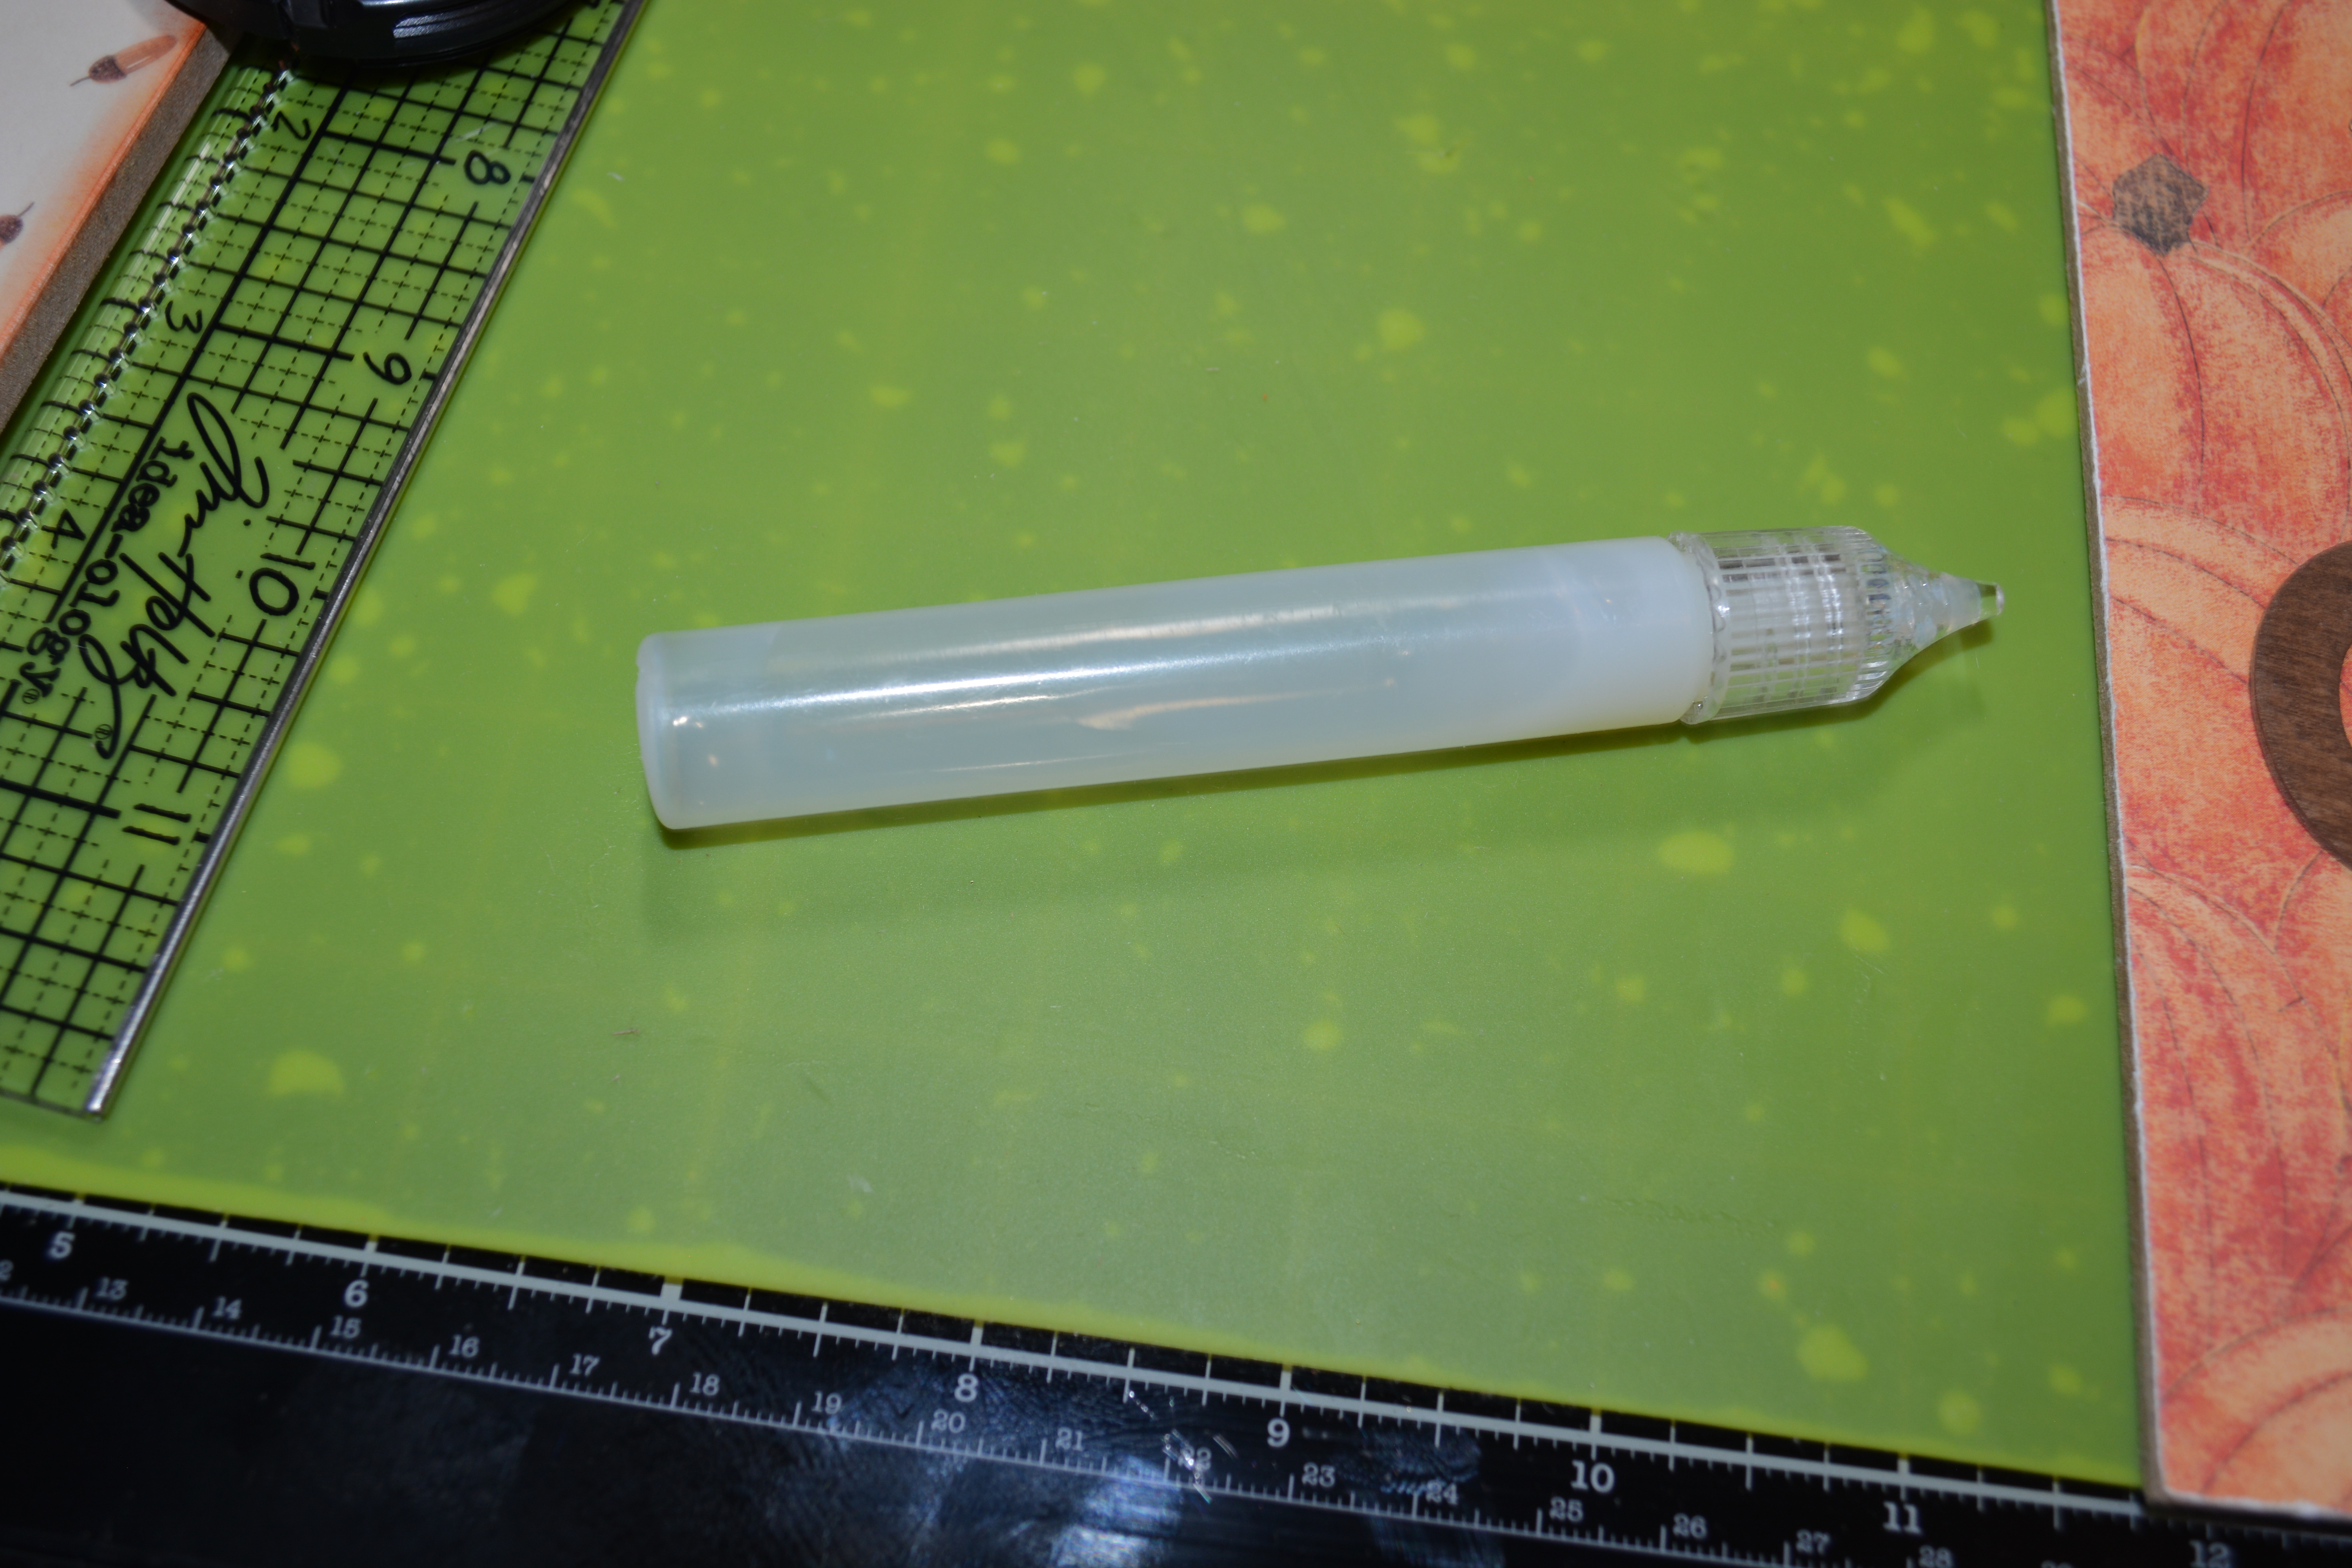
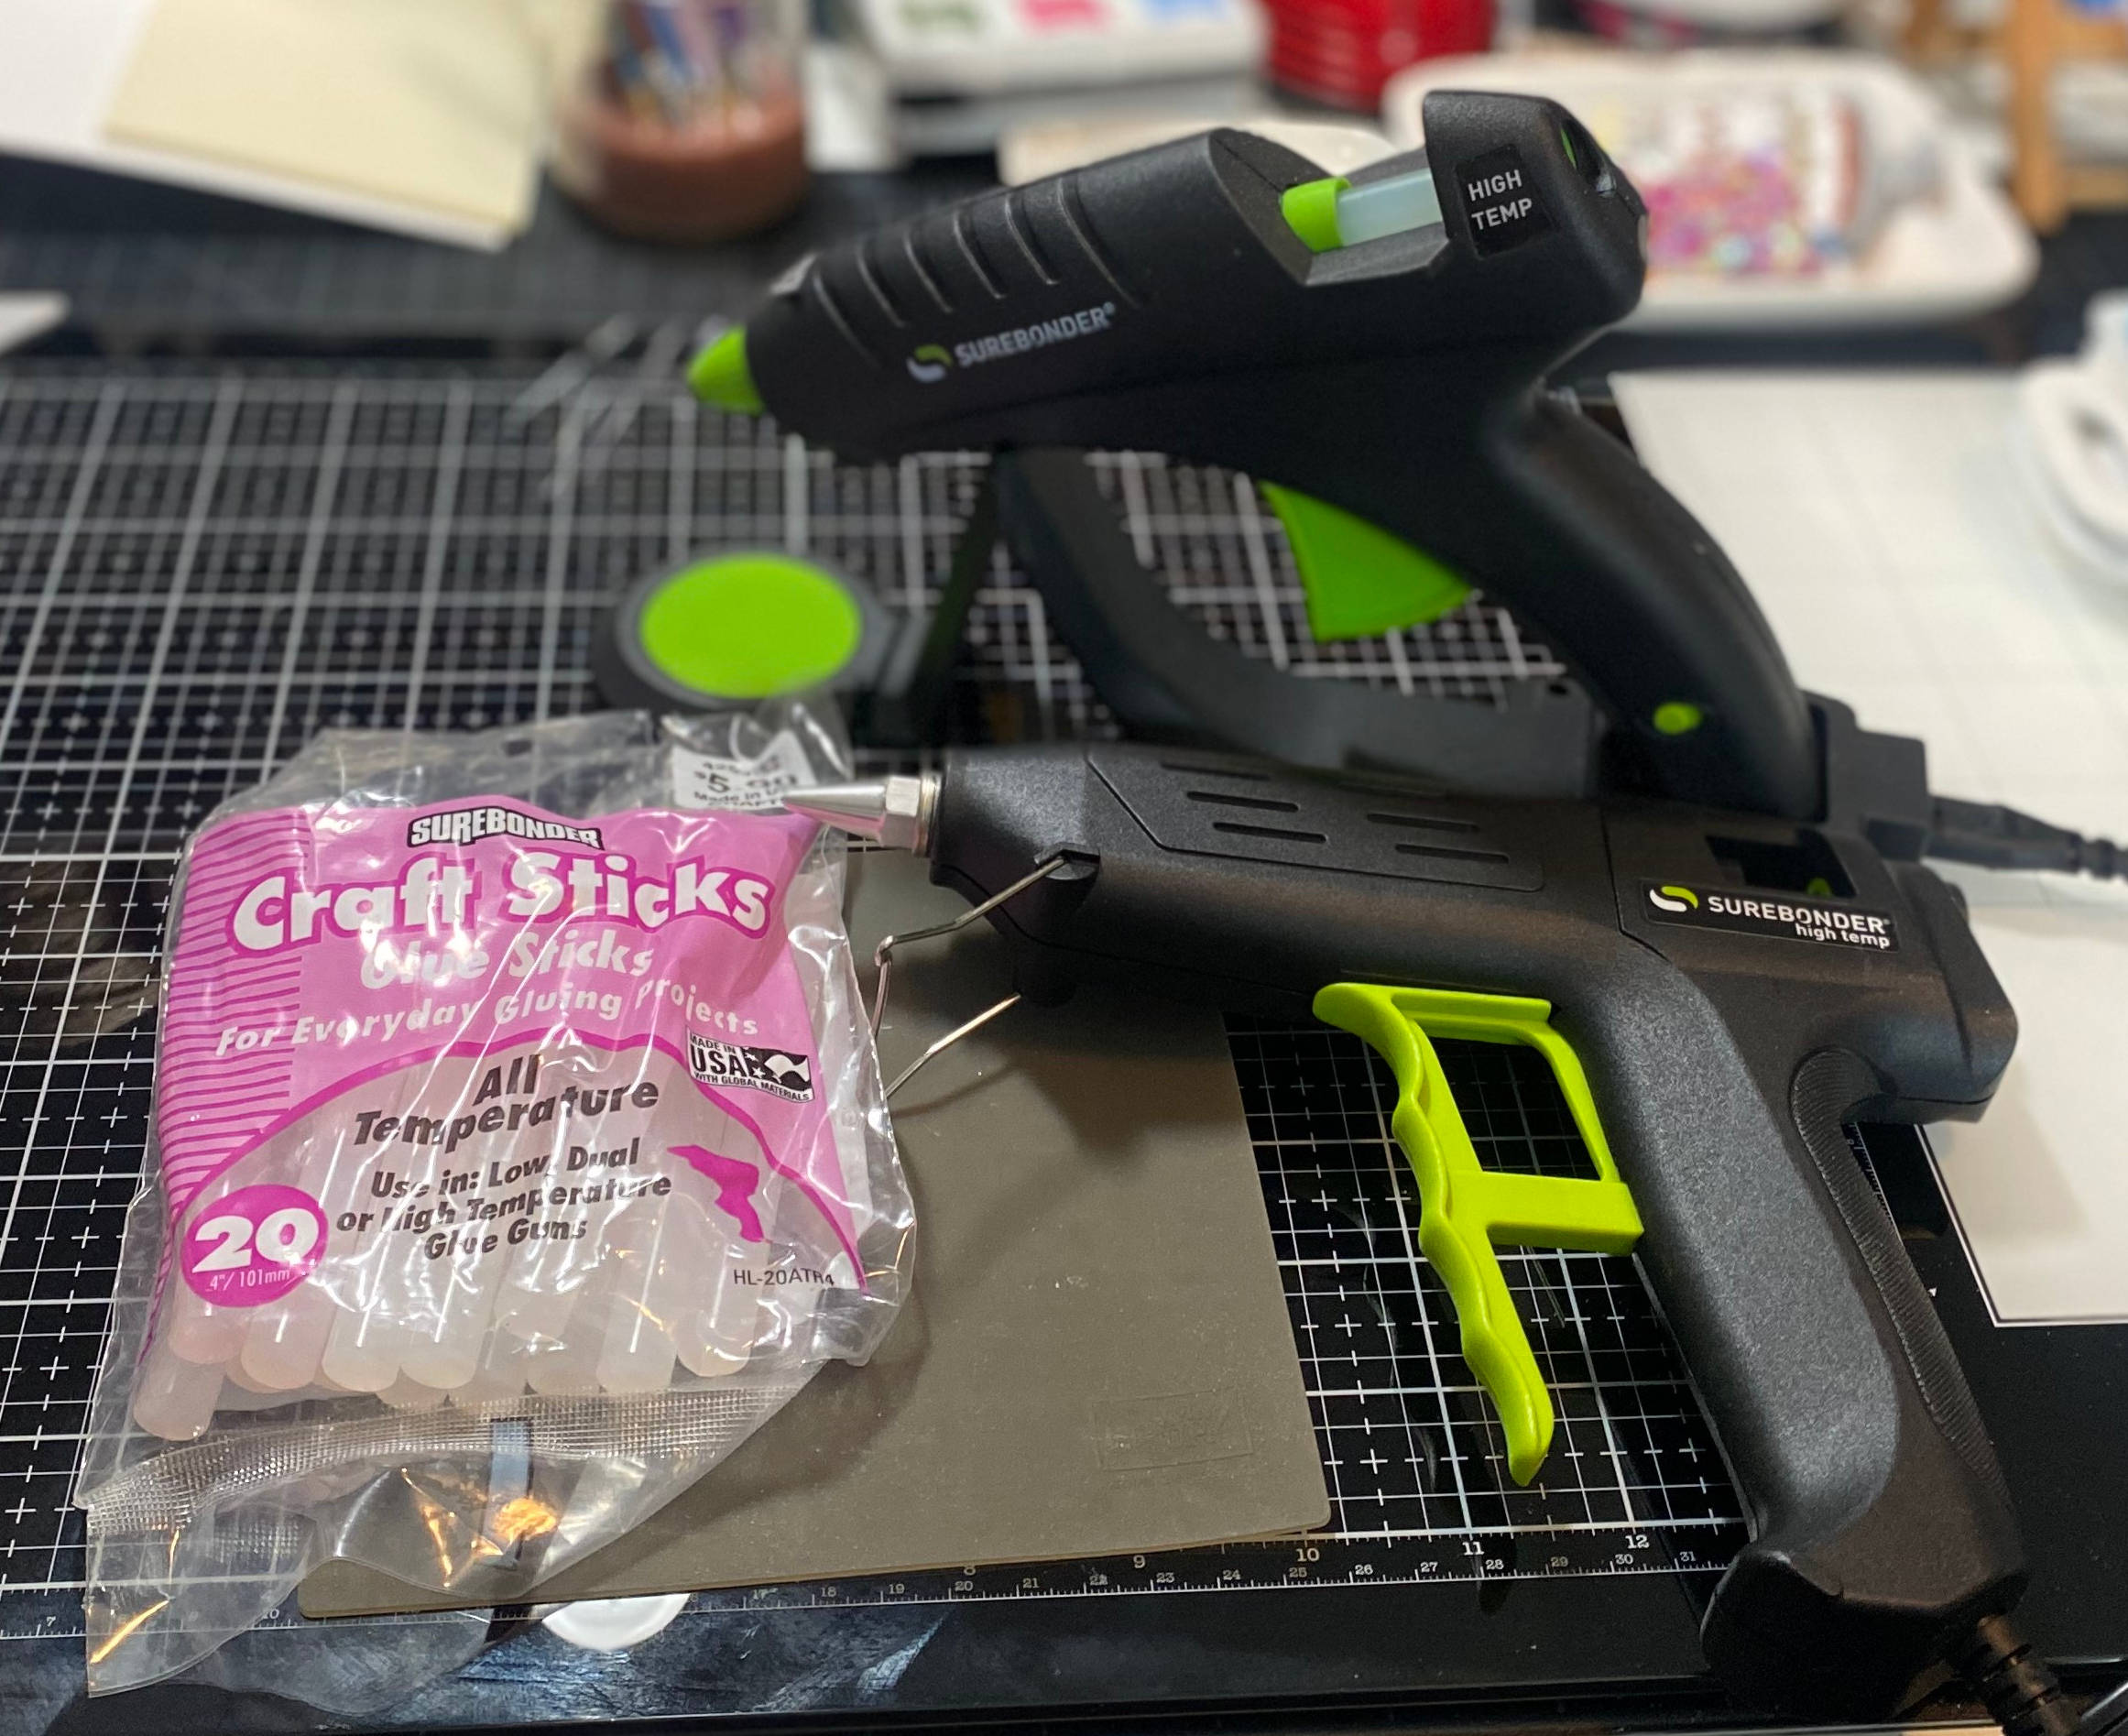
WARNING!!! If you are like me, a hot glue gun can be dangerous. I burn my fingers all the time when I use them but they are one of the best tools in my craft room. Now not all hot glue guns are created equal. Not all hot glue sticks are either. I have had the cheap tiny guns and they will do okay but they are hard to use and do not stand up well. They also drip glue. It was because of this that I decided to invest in a new one. After doing my research, I went with the brand Surebonder.
Surebonder makes several different size glue guns and also several different sizes glue gun sticks. The bottom glue gun in the picture above has a fine tip for tiny details. It is a high temp gun and does not drip. The top glue gun has a stand and it is cordless. Once heated up, it can go a full 2 minutes before you need to put it back on the stand to heat up again. This is great for a craft desk like mine because I can put this thing anywhere and I do not get tangled in the cord. It has a bit bigger tip to push out more glue.
Surebonder makes full size hot glue guns all the way down to the small mini ones. They vary in tip sizes. Some come with cords and some that are cordless. There is even some industrial ones that work off of batteries. They also have ones that have two different heat settings. You have the option of a low heat setting and a high heat setting depending on your project. I honestly have never used the low heat setting on a hot glue gun because for me it dries to fast.
Lets talk about hot glue. Right now I have the Surebonder brand hot glue sticks and I love them. It is just the basic glue sticks. They come in mini sticks, ones that are about double that size and also long spirals. I prefer the mini ones unless I am doing a lot of gluing. There are other brands of glue sticks too like Gorilla Glue makes some that are extra strong. The glue sticks come in different colors. I have never used them but I think they would be great for the right project. There is also different types of glue sticks depending on the material you are gluing together. You can for sure find something that will work for you with any project.
Over the years I have found some things that make it easier when using a hot glue gun. One is a silicon pad.
I have a grey small pad and it works great. They are not just for hot glue but for any kind of glue. The pads come in a few different sizes. I can see the value in having one that is bigger. It would give you a big space to work on without worrying about glue sticking to your work surface and damaging it. The hot glue or almost any kind of glue peals right off of the silicon without damaging it. That also means if you are gluing a project together and the glue leaks out, the project will not stick to your work surface. This pad is worth its weight in gold.
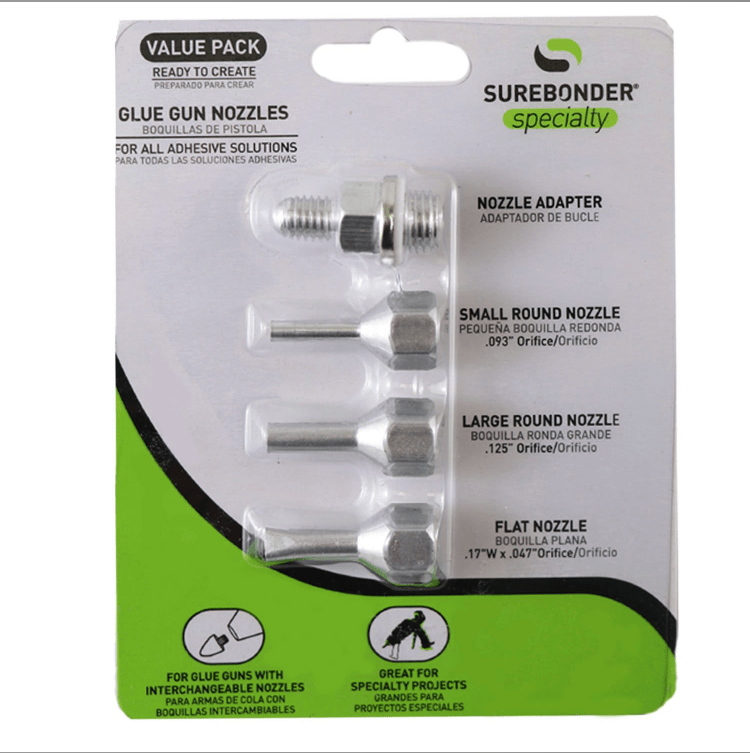
The other thing that Surebonder sells is attachment tips for their glue guns.
I have these but have yet to use them. I am curious about the flat nozzle. I think it would be great for things like ribbon or thin pieces of wood. You might see these in a future post.
Finally the last thing I want to talk about are tools you can use to keep you from touching the glue. I am pretty sure I no longer have finger prints anymore because I have touched hot glue so much and have peeled the skin off of my fingers. It happens every single time I used the hot glue guns. So I was on the hunt to see what else I could use to hold small pieces in place while the glue sets. I tried my scissors but then glue stuck to them along with what ever I was gluing. There are silicon finger covers but I do not need 10 sleeves for one finger. Then like always Dollar Tree to the rescue. I bought one of their small silicon spatulas. It works perfect. That spatula saves my fingers because they are not even close to the heat. It holds things in place without the glue sticking to it. I am very happy with it.
I hope you enjoyed our little deep dive into the world of hot glue guns. You can find Surebonder glue guns and glue on Amazon or at Hobby Lobby. That is not the only brand out there though. Walmart, Michael’s Craft Store and many other places sell hot glue guns. Find what works best for you.
If you have any questions you can comment on here or you can find Yellow Butterfly Craft Designs on Instagram and Facebook.
Thank you for joining me again and as always stay safe and healthy! I will have another craft project for you at the end of the week!
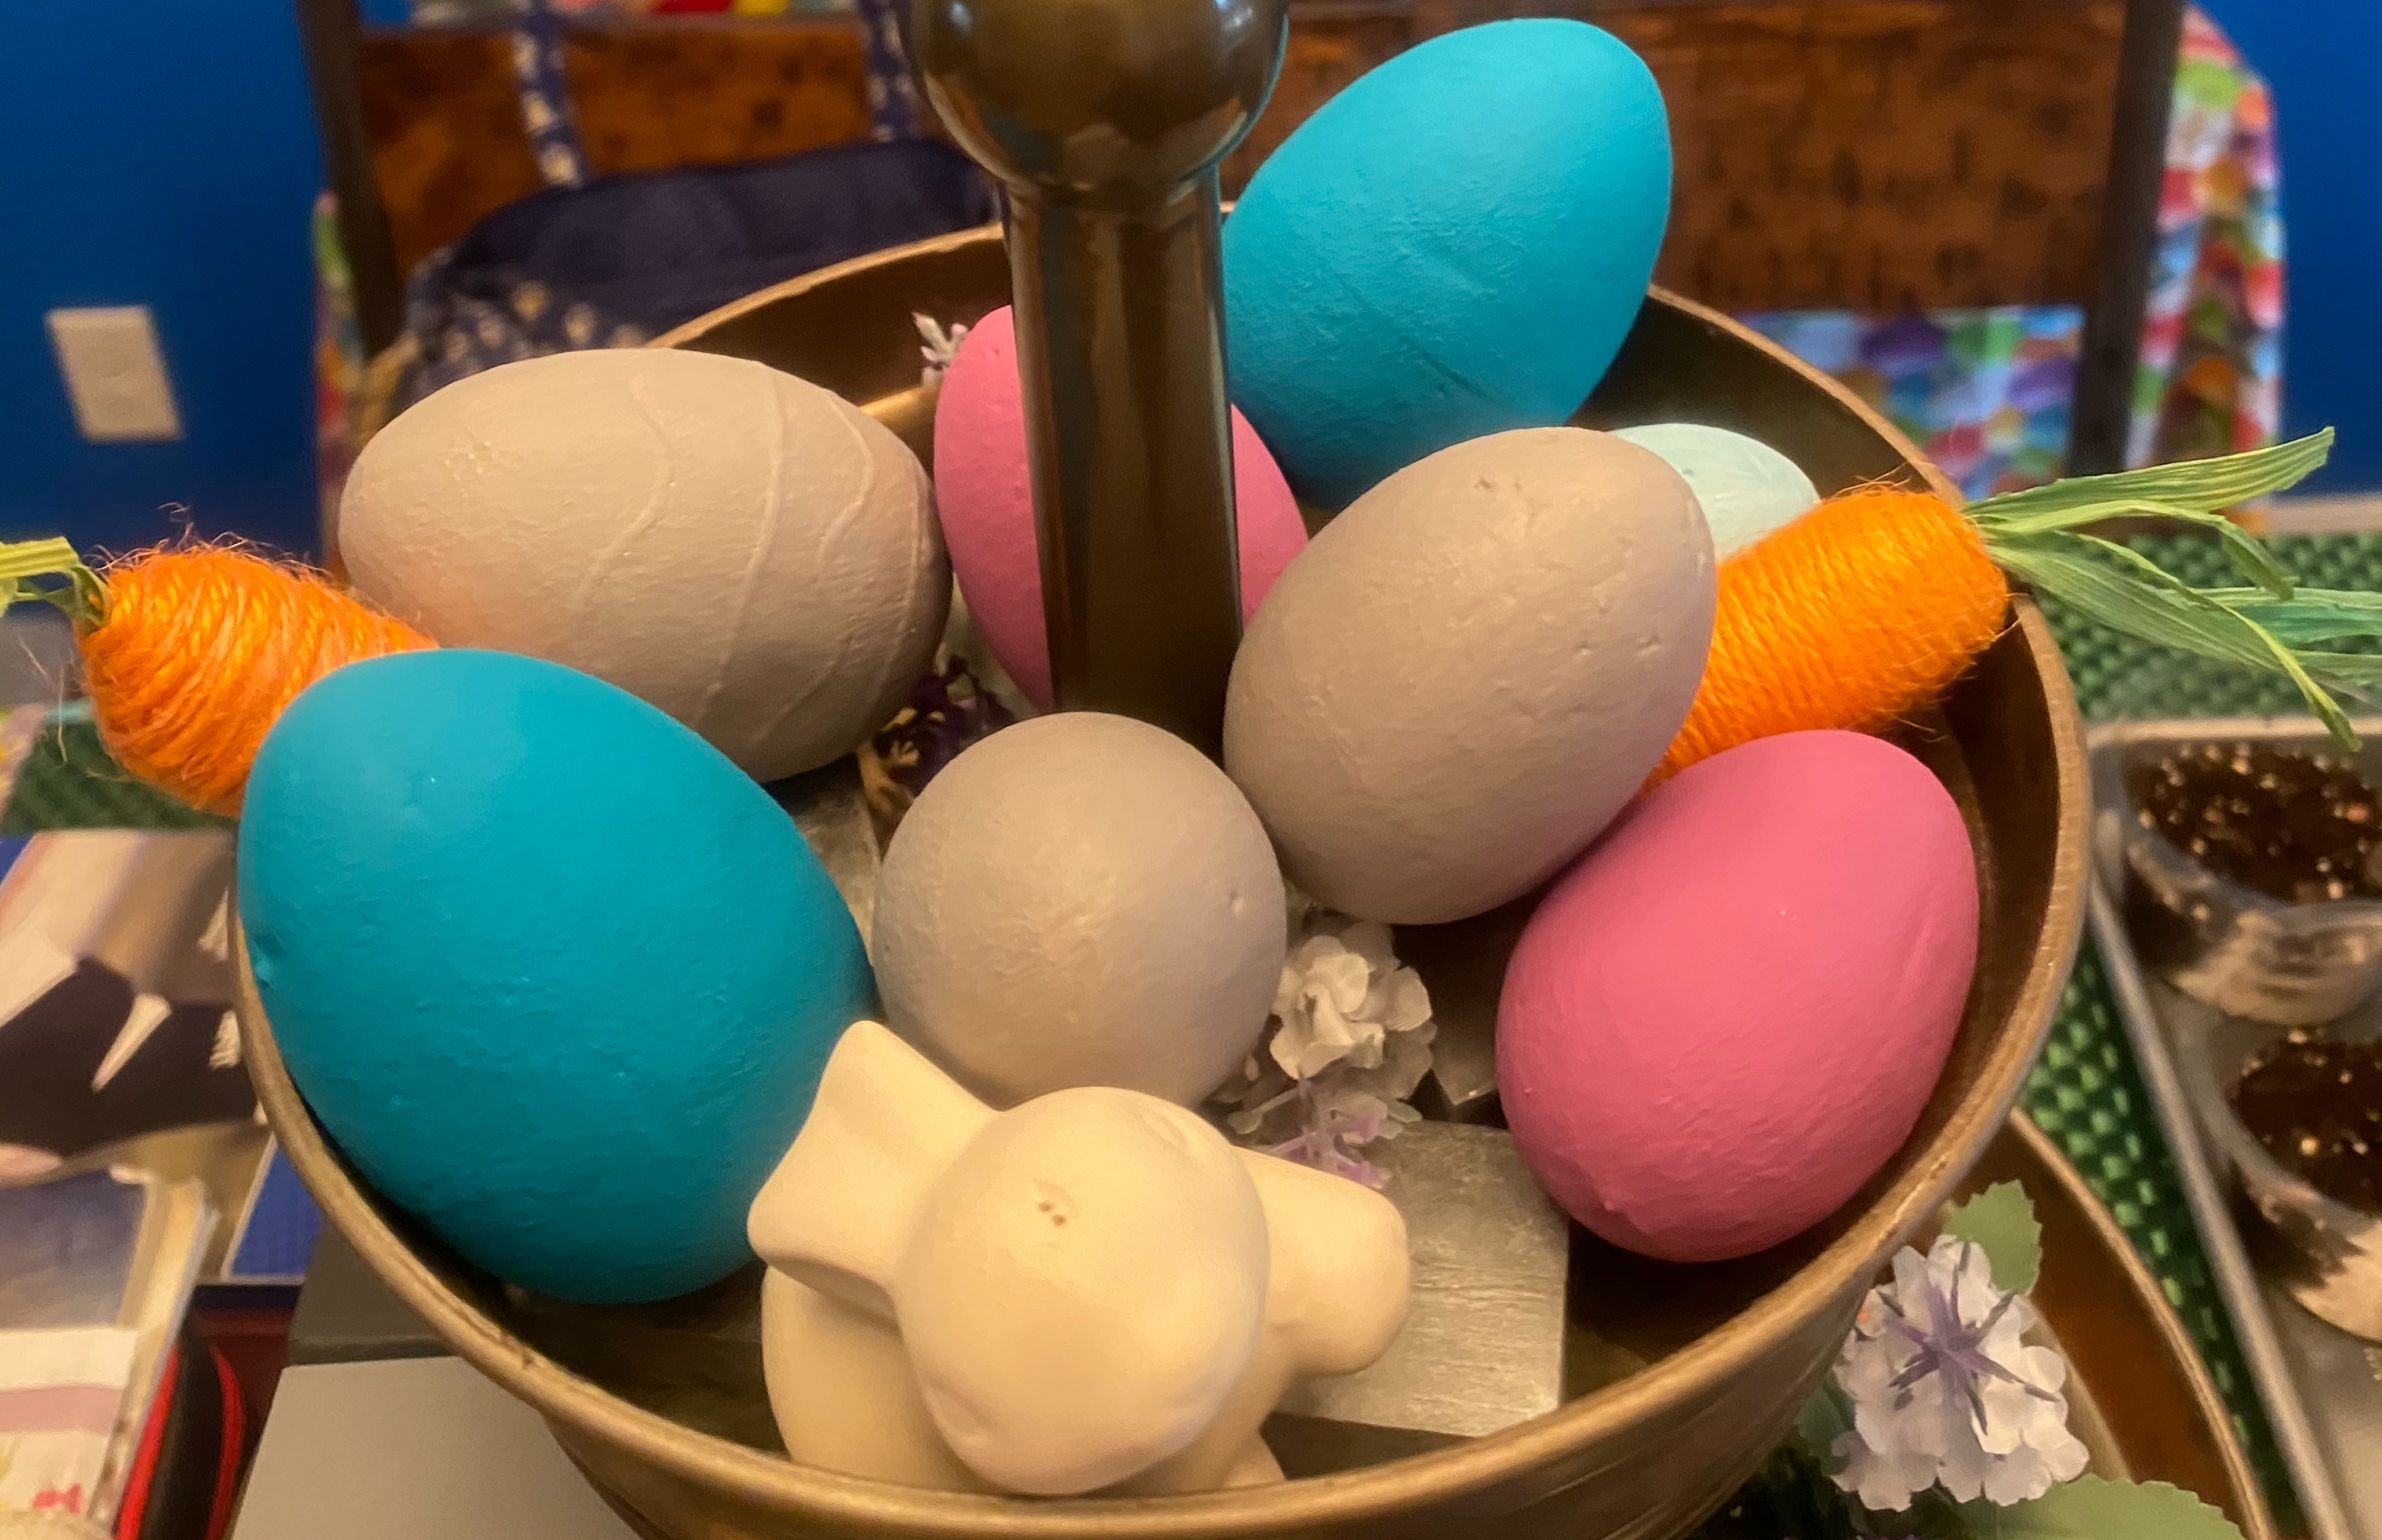
Last year during Easter, one of my favorite things to do was paint Dollar Tree picks with chalk paint. I prefer the Waverly brand chalk paint that is sold at Walmart. The paint is thick and covers most things with one coat. I love painting the picks with it because it makes them look like they are made from cement. The glitter on the picks gives the eggs texture which helps make it more like cement. Please read on to see how I made these!
Supplies
I do not advise you go out during COVID-19. Please shop your stash at home and stay safe and healthy.
I had a ton of large and small egg picks from Dollar Tree on hand. I also used White, Merlot, Steel, and Pool Waverly Chalk Paint. Use any colors of paint you have on hand. Once you pull the picks off you will need some wood filler. Finally, paint brushes. I have several on hand but I like the ones that are a big thicker because it puts the paint on thicker.
Lets Get Started
I left the eggs on the picks to start. The white chalk paint makes a great primer. I gave each of the eggs a good thick coat of white chalk paint.
Once the white paint dried. I started painting the eggs different colors. Now I used small flower pots and a cup to prop up the eggs. It is a great way to let them dry. I added 2 coats of paint to them and let the eggs dry in between each coat.
We are almost done! After the eggs are dry, pull the picks out of them. Now if you do not mind the paint coming off and there being a small hole on the bottom of the eggs then you are done. But if you are like me, that hole would drive me crazy. So I too some wood filler and covered the holes up. After the wood filler dried I painted over it with the what ever color the egg ways.
Once the eggs dry you are good to go. I have them in my very bare tiered tray. They have a great farmhouse look to them but with a splash of color to them to make them look more like Easter eggs.
Thank you for joining me again. I am on Facebook and Instagram. Please like and comment on this post. Also if you have any questions please ask away. Let me know if there is anything you would like to see on the blog. I am always open to suggestions.
Stay Safe and Healthy
Melissa McGuire
Supplies
Large and Small Egg Picks- Dollar Tree
Waverly Chalk Paint in White, Steel, Merlot, and Pool- Walmart
I was watching a tutorial on YouTube a few weeks ago by Courtney from the channel Creative on the Cheap. She used foam bunnies and painted them to look like chocolate bunnies. I have never seen this done before so I thought I would give it a try. The bunnies look good enough to eat!
Supplies
I do not advise that you go out and buy any of these products during COVID-19. Please stay safe and healthy. I had all of this stuff on hand. I used the bunny and large egg picks from the Dollar Tree. Along with 2 plaques from the Dollar Tree and one from Target.
You will also need a craft knife, hot glue and hot glue gun, paint brushes, sand paper, Mod Podge and scrapbook paper. To make the bunnies look brown, I used brown Truffle Chalk Paint and for the plaques you will need White Chalk Paint by Waverly. As for the words on my plaques, I used rubber stamps and a Versafine Onyx Black ink pad. Please feel free to use stickers or write your on words on them.
Lets Get Started
Pull of the pick part from the bunnies and eggs.
Pull off the eyes and tail from the bunnies.
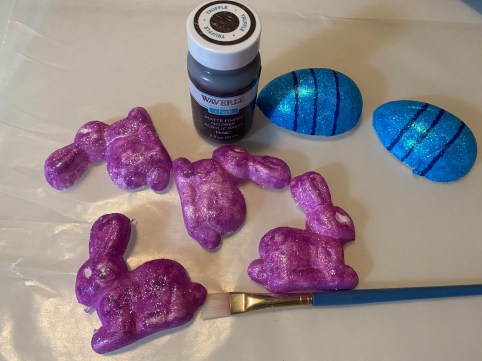
I started by deciding how many bunnies and eggs I needed. Keep in mind you are cutting them in half so you will get 2 bunnies or eggs out of 1. I pulled the picks out of two bunnies and one egg. The bunnies have eyes and a fluffy tail so I pulled those off too.
Cute the bunnies in half.
They will look like this.
Do the same with the eggs.
Now it is time to cut the bunnies and egg in half. There is a seam where there are two parts to each figure from where it was glued together. Cut on that seam very carefully. You can always sand down the backs of the figure later if they do not cut even.
Here is where you get to make these bunnies and eggs look like chocolate. I used a paint brush and the Waverly Truffle Chalk paint to paint them all. It took 3 thick coats to cover all that glitter. By the way, I hate glitter so any reason for me to cover it up is a good reason!
It is time to get our plaques ready to go. First you have to remove the embellishments that are on the plaques. I use a scraper to do that. If the paper on the plaques tears then use a bit of sand paper to smooth it out. These signs had some pretty bright and bold prints on them so I painted them with Waverly White Chalk paint. Just one coat will do the trick and hide that color.
Once the paint was dry, I picked out a few pieces of scrapbook paper from the mounds and mounds of paper that I have. My husband calls it my special paper. He thinks he is funny.
I painted a thin layer of Mod Podge over the plaques and set the paper on top of them. You do not need to cut the paper to the size of you plaques. We will worry about that later. Make sure to push all the bubbles out if you get any under the paper. LET THIS DRY! Once it is dry, take sand paper along the edges of the plaques in a downward motion and it will sand the paper off. This will leave you with a very clean edge. You can put a layer of Mod Podge over the top of the paper but I did not.
I put hot glue on the back of the bunnies and egg and placed them on the plaques were I wanted them. For the words I used a old rubber stamp set that I have had for a while. I stamped the sayings on white paper with Versafine Onyx Black Ink. Then I cute the paper down into strips and glued them to the plaques. On the small bunny on the top right, I stamped everything on the plaque itself. In place of the stamps you can print sayings from the computer, or use stickers. Either will work.
And that’s it! You have bunnies and eggs that look good enough to eat. I was amazed at how real these chocolate like figures turned out. The texture from the glitter gives the figures some depth. It adds to the realness of them. This was one of my favorite Easter crafts to do.
Thank you for joining me. If you are looking for more fun Easter DIYs please look back at my last few blog posts. You can also find me on Facebook and Instagram under Yellow Butterfly Craft Designs. As always please stay safe and healthy.
Melissa McGuire
Supplies
Bunny and Egg Picks- Dollar Tree
Plaques- Dollar Tree and Target
Pinblade Craft Knife- Amazon
Waverly White Chalk Paint- Walmart
Waverly Truffle Chalk Paint- Walmart
Paint Brushes- Craft Stores, Walmart
Surebonder Hot Glue and Glue Gun- Hobby Lobby, Amazon
Scraper- Dollar Tree
Sandpaper or Sanding Block- Dollar Tree
Mod Podge- Dollar Tree, Craft Stores, Walmart
Stamps- Not sure. There is no company name on them
Versafine Onyx Black Ink- Michael’s Craft Store, Hobby Lobby
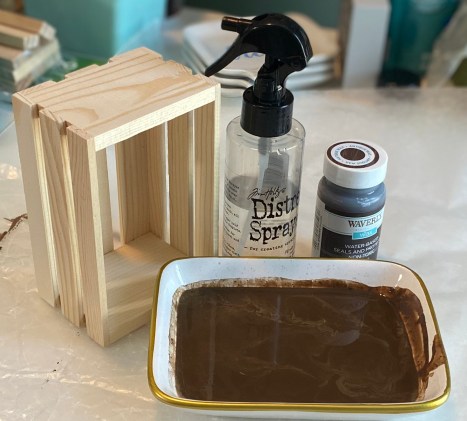
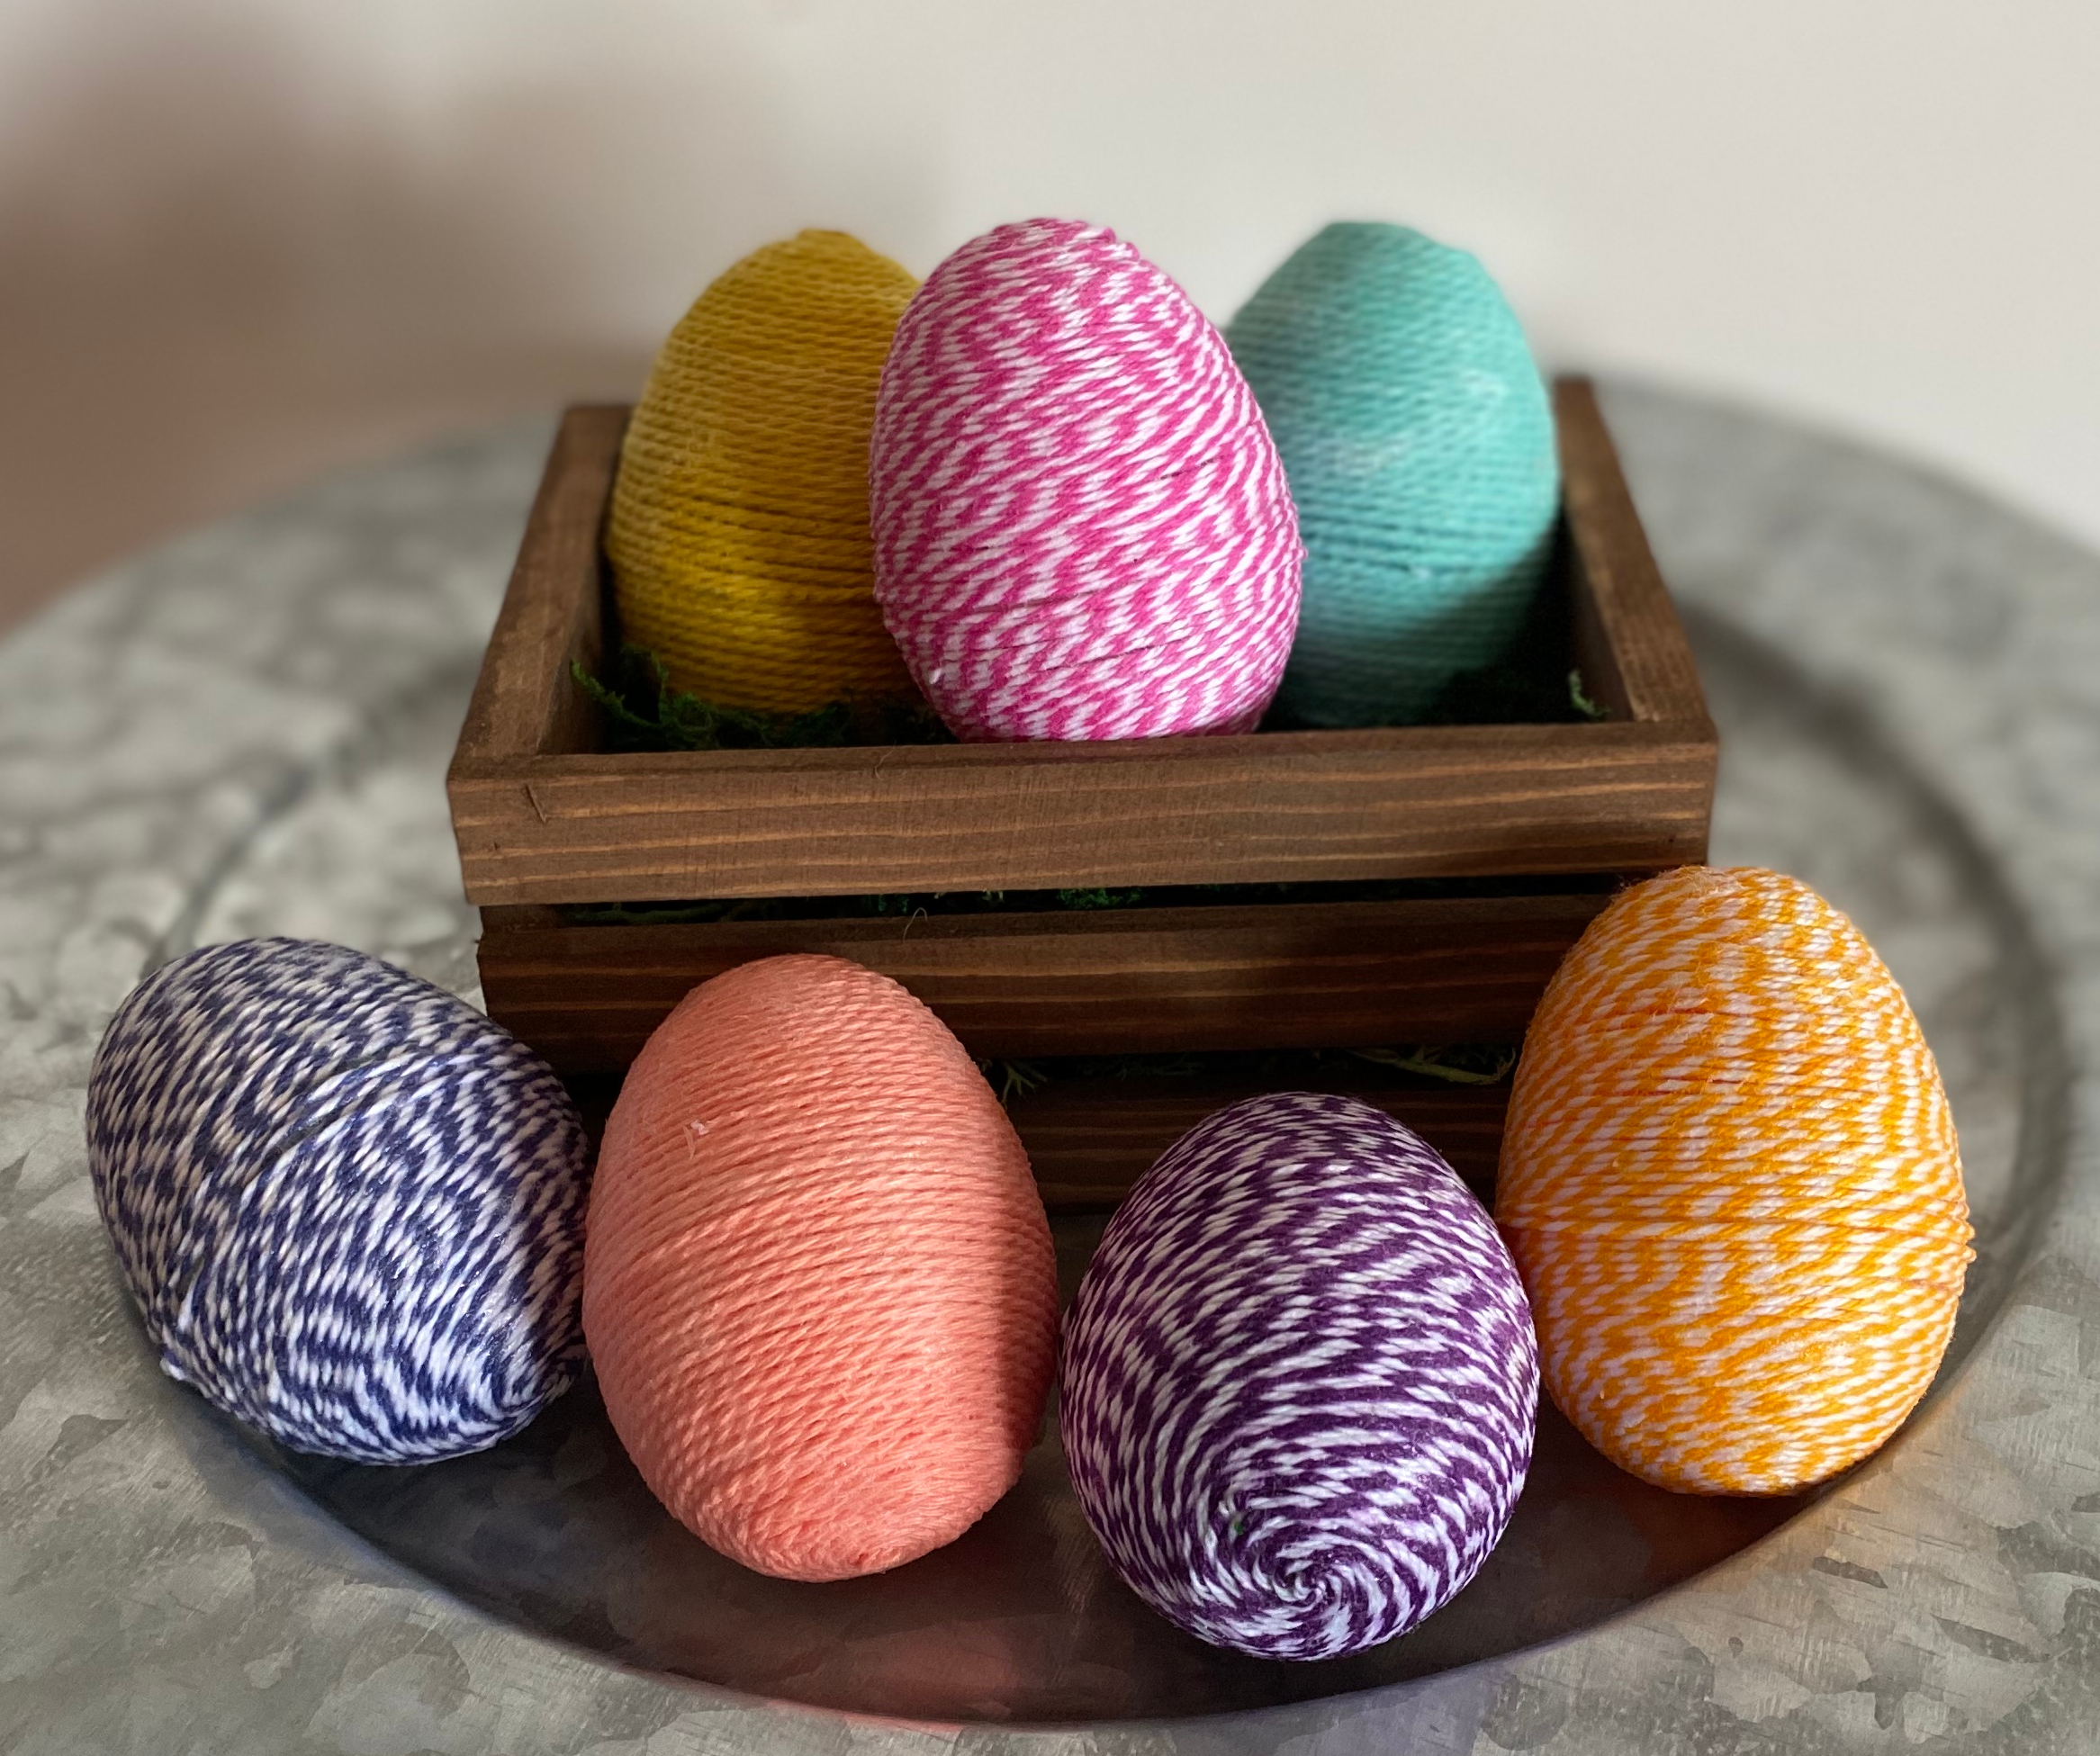
I love to do crafts with the plastic Easter eggs every year. This year I did not have any ideas so I went to Pintrest to look for inspiration and like usual it did not disappoint. There were eggs covered in so many different things like lace and fabric, but the ones I liked the most were the eggs covered in twine. I do not have a shortage of twine that’s for sure which meant I had the supplies on hand. I must say though I do not advise you go out shopping. Please stay at home and be safe and healthy and shop your crafty stash.
Supplies
For this project you will need plastic Easter eggs, Mod Podge, and of course twine. I will be using a crate and moss because I wanted something to put my eggs in once they were done but you do not need to do this step. If you use a crate of some sort then you might need paint if you want to paint it. It would be handy to have a paint brush or a paint sponge if you have them. I also used a craft knife and scotch tape but those are optional too.
Lets Get To It
Now this is not a fast project. It does take some time and some patience. I started by threading the twine up though one of the holes on the inside of the plastic eggs and putting some scotch tape on the inside of the egg to hold it in place. I did change things up some after my first egg though. I did not like that the hole was not in the cent of the top of the egg so I used a craft knife to make a hole in the top and bottom of the egg to string the twine though.
Once the twine is secure take your brush and load it up with Mod Podge. Paint it onto the top of the egg so that it is covered. Then start twisting the twine on the top of the egg in a circular motion to make a spiral. I used a skewer and a small silicone spatula to help press the twine onto the egg because my finger kept sticking to the twine and pulling it back off the egg. Continue the process of adding some Mod Podge all around the egg and then wrapping the twine around it.
Do the egg in two parts. First wrap the top part of the egg in twine and then cut the twine leaving about 3 inches to tuck inside the egg. Then start the bottom part of the egg by doing the same steps as you did to start the top. Once you have secured the twint inside the egg, place the left over piece from the top of the egg inside and close it up. When I got to the middle of the egg with the second piece of twine, I made sure the egg was covered well with the twine and then cut the twine and pushed it down well against the egg trying to get it in between the twine that I have wrapped around. Then I covered the ending with Mod Podge. I also covered the whole twined egg with Mod Podge to make sure it was all secure and let it dry on parchment paper.
You can use any kind or color of twine for this project. If you have neutral decor, you could use just the regular brown twine. This project is very customizable to the decor and colors in your home.
Now lets work on the crate. I only want to stain the crate. I did not want an opaque look to the paint. So I took Antique Wax paint and added a lot of water to it and mixed it together. You can turn almost any kind of paint into a stain by adding a lot of water to it. The more water you add, the less color you will get when you paint your project.
The final step is to add moss to the bottom of you crate and add the eggs to it. This has been a great little addition to my Easter decor. I love the eggs and they were fun to make. I hope you love this project too. It is a perfect one to do while watching TV.
Thank you for joining me and please stay safe and healthy.
Tools are an important part of crafting. The bad thing is there are so many out there that I thought I would break it down for you all. I call the series Tool Tuesday. I will do a post every Tuesday explaining a different tool each week and why I use it. Keep in mind these are the things that are staples in my craft room and they might not work for you. Also do not feel like you need it all. Crafting is my passion and job so I have an abundance. With that said I thought a series would be a great way to show you all the things I use in my craft room.
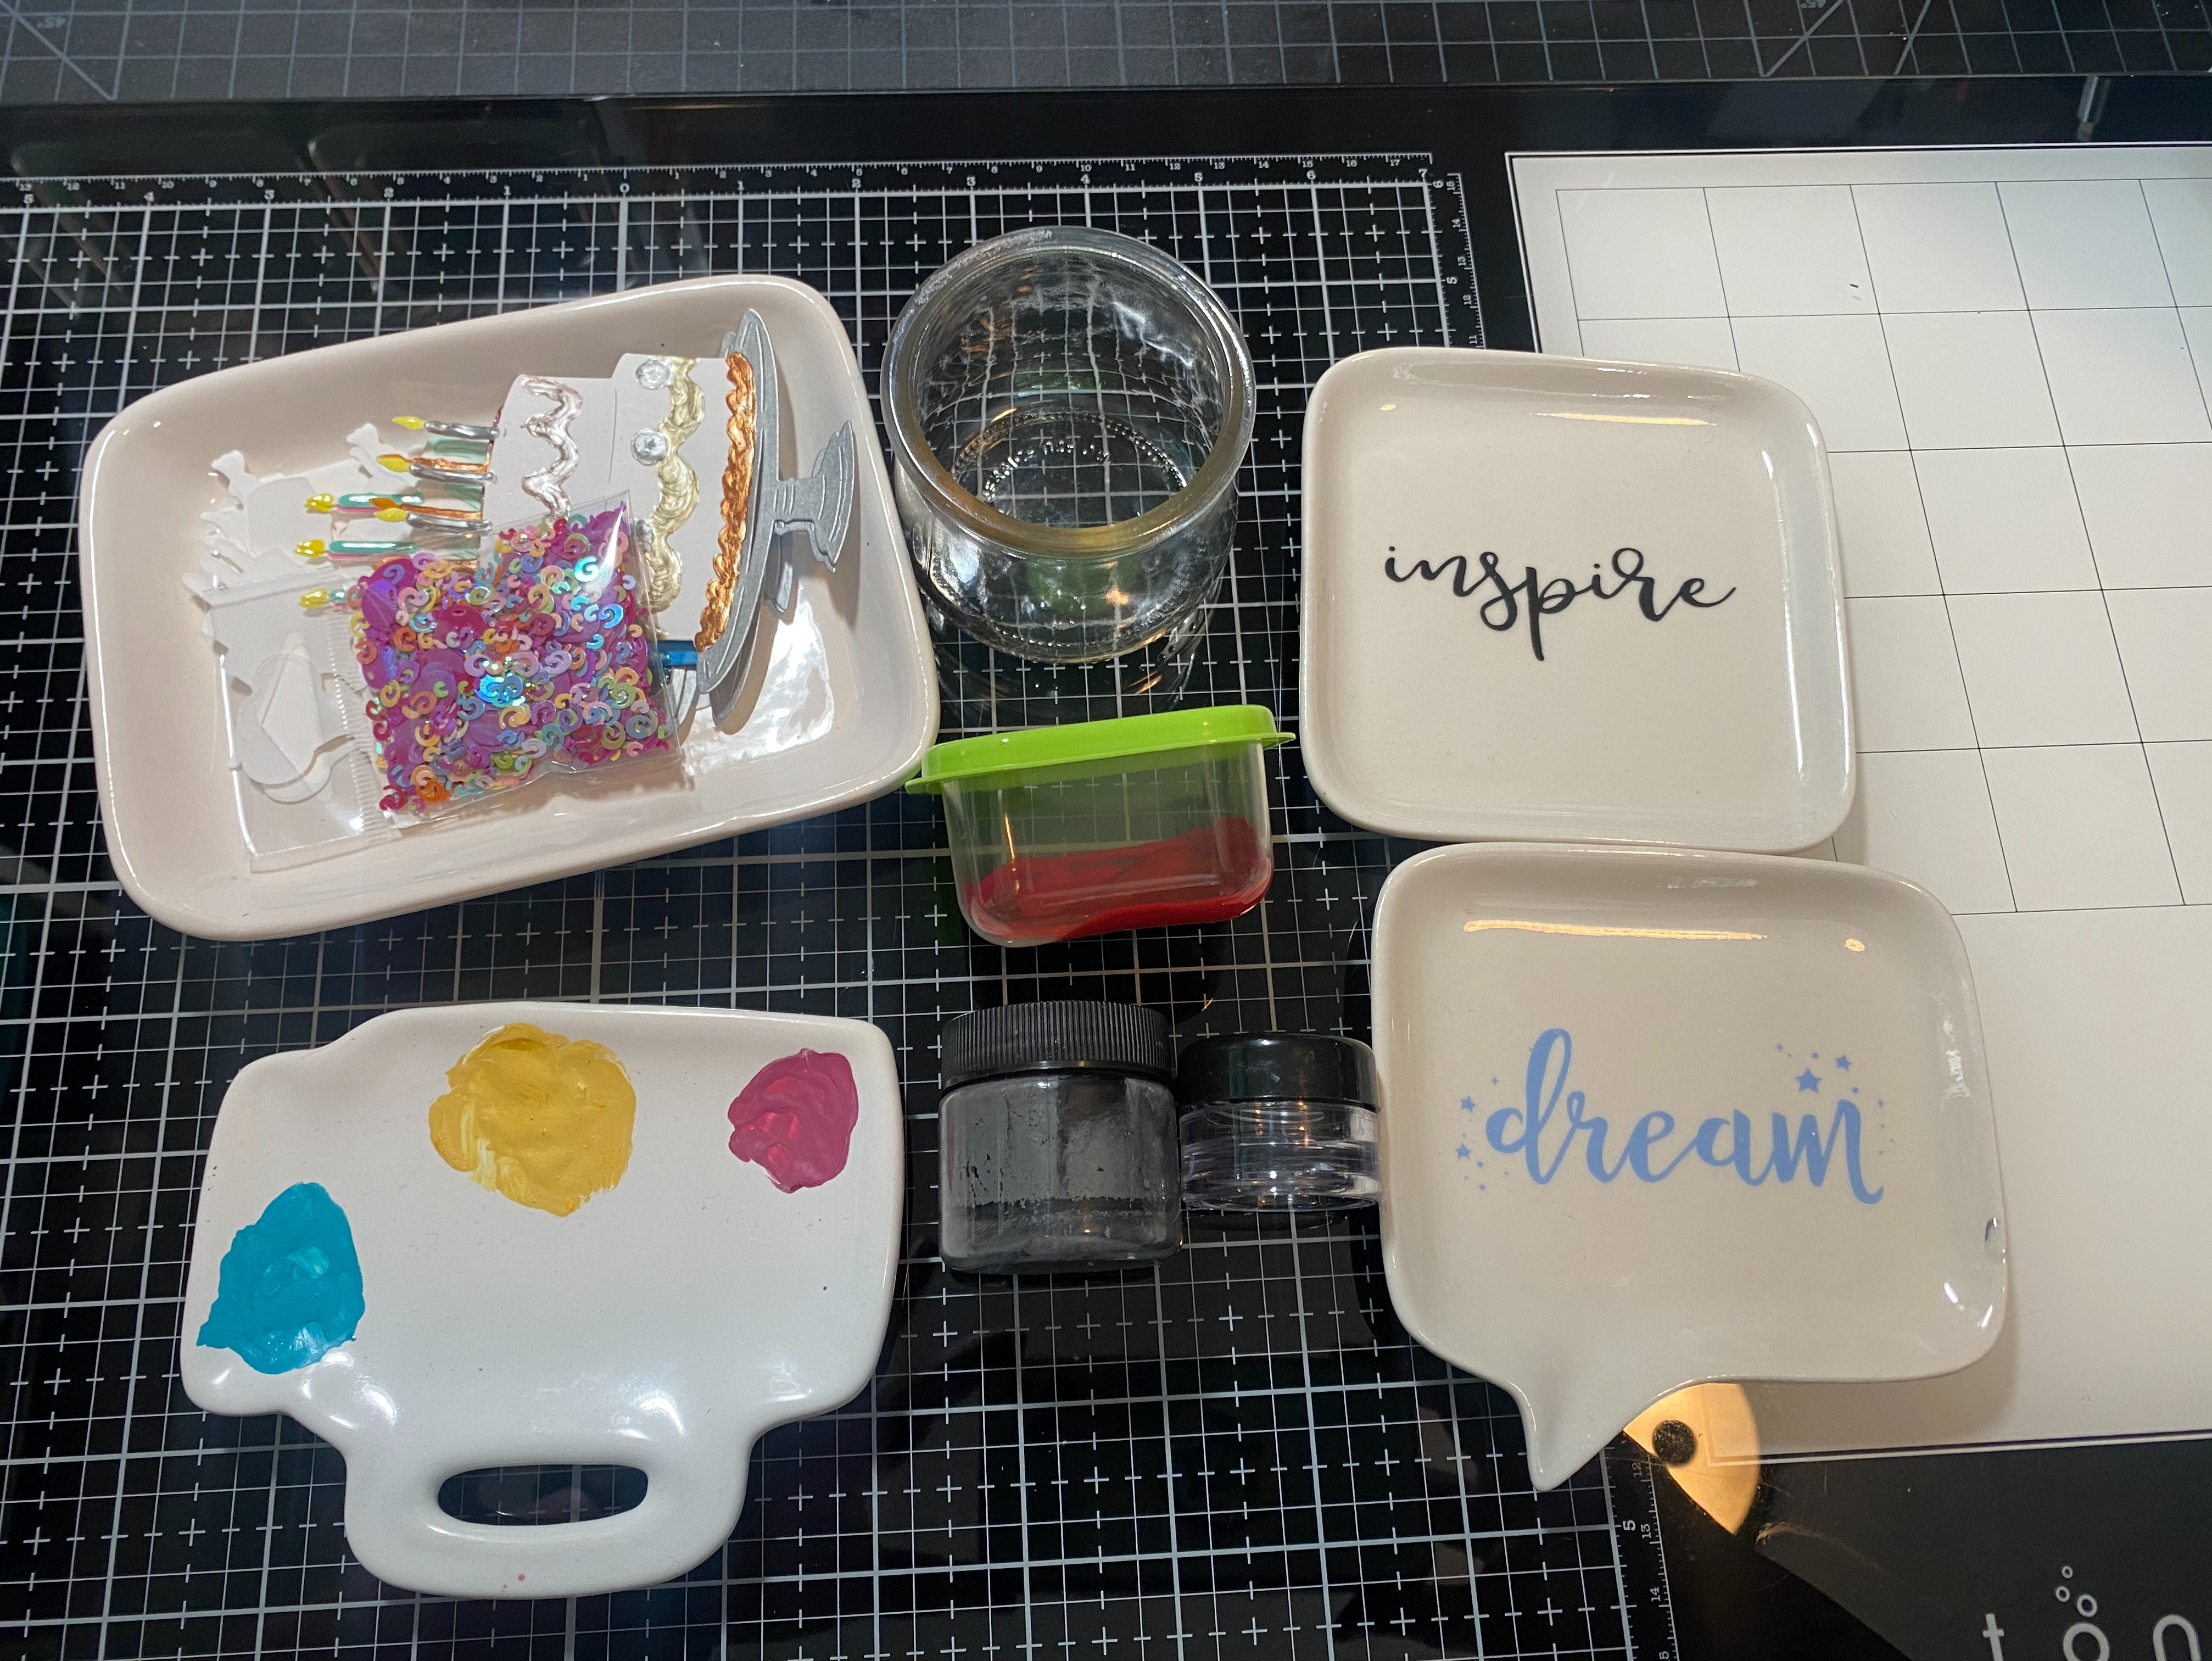
Trinket trays and other Dishes
Trinket trays are a main staple in my craft room. I use them every single time I craft. They hold my paint, die cut pieces, and anything else I need them too. I have them in several different sizes. As you can see from the picture I use these trays for several different projects.
When I am making cards or scrapbooking I used them to hold die cuts, small pieces of paper and other small embellishments. They keep me from losing things on my desk. It keeps them all together so I do not throw important things away.
The major thing I use them for is paint. I can put several small dabs of paint on one tray. This keeps them in one spot and from me spilling the paint and getting it everywhere. They are also great for mixing paint in them.
Now lets look at the small cups and jars. I use the small cups for water to wash brushes in or just as water for water color painting. I love the small jars or any container with a lid to mix paint to make new colors in them. This means I can save and store the new paint color instead of having to throw it away. I also use very small red solo cups to put paint and water into too.
I hope this gives you some ideas on how you can use trinket trays and other small containers. The trays I get at the Dollar Tree, along with some of the small containers. Other small containers I have re-purposed from things I have ran out of or eaten. Any small jars or cups will work.
Thank you for joining me my first series post. I hope it helped and that these trays and dishes are something that will help you out in your craft room.
There will be several Easter crafts on the blog this week. I must start off by saying that I do not advise going out of the house right now to get craft supplies. With Covid-19 please stay safe. We are going to start off with the biggest and easiest craft first. I am also giving you a bonus craft in this post. It is just as easy as the first one.
Supplies
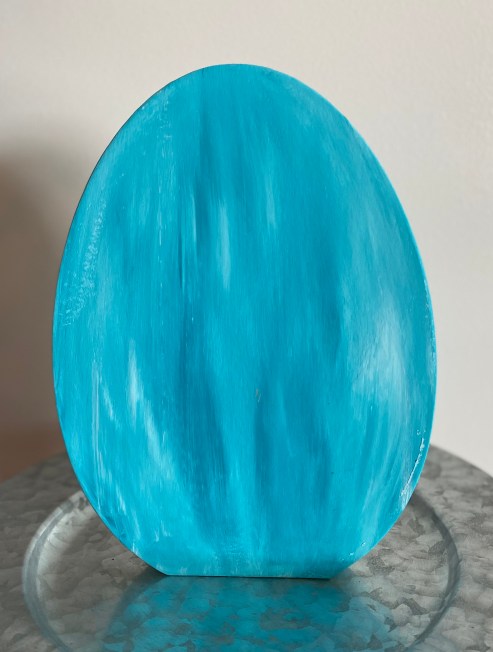
For this super easy project you will need is an egg. I found this egg at Target. You can cut one out of foam board from the Dollar Tree. You will also need some white paint or what ever color you want to paint your egg. Finally, a paint brush or two.
Lets Get to the Project
Would you like to know how easy this project is? All I did was paint it. Now I did change gears on the paint after I did not really like the all white egg. I added in some liquid teal water color to the white paint and lightly mixed it. As I painted the egg it blended and left streaks.
And here it is! I love the color and it will make a great back drop for the next few crafts that are coming up this week.
BONUS CRAFT
Since each of these crafts are so simple I decided to put them both in the same blog post.
Supplies
For this craft you will need a small wooden plaque and some stickers. These stickers are from Dollar Tree. You will also need some paint. I used Antique Wax by Waverly. Finally you will need some water if you decide to just wash the paint on instead of getting an opaque look.
Lets Get Started
I stated off by mixing the paint with a lot of water. I wanted the paint to look like a stain, not a thick paint. Then I took my paint brush and did a light wash of color over the plaque on all sides. After it dried completely, I added one of the stickers to the inside of the plaque. That’s it!! Another project done.
How cute is this?! I love it and it was so easy. Crafting does not have to be hard or time consuming. Things can be easy and fast and still look great!
I hope you enjoyed this simple projects and will shop you craft stash and see what you can come up with that is easy to do. Thank you for joining me again and please stay safe and healthy
Melissa McGuire
Supplies
Project 1
Egg- Target
Waverly White Chalk Paint- Walmart
Paint Brushes- Any craft store, Walmart, and Target
Teal Liquid Water Color- Hero Arts
Project 2
Wooden Plaque- Michael’s Craft Store
Easter Stickers- Dollar Tree
Antique Wax Waverly Paint- Walmart
Paint Brushes- Any craft store, Walmart, and Target


")


")
")

")
")
")
")
")
")
")
 Once the eggs dry you are good to go. I have them in my very bare tiered tray. They have a great farmhouse look to them but with a splash of color to them to make them look more like Easter eggs.
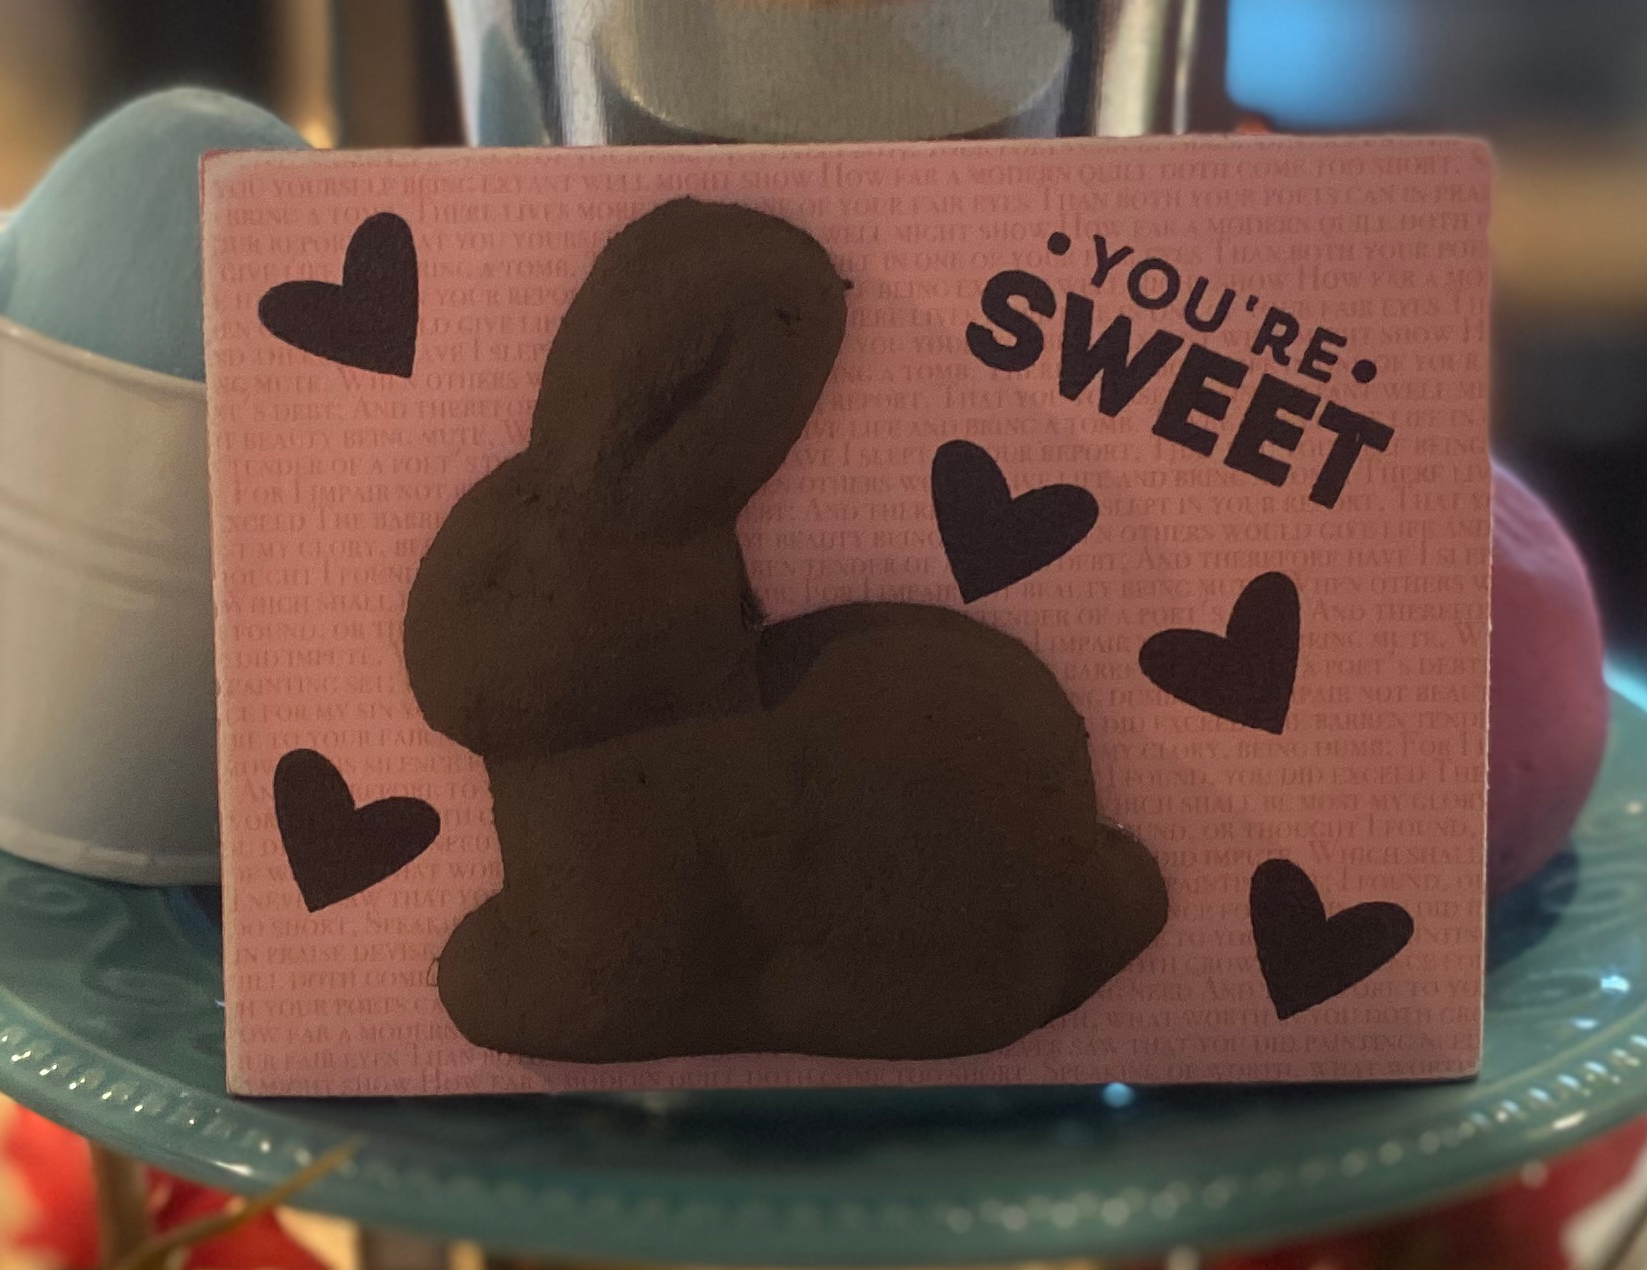
")
")
")
")
")
")
")
 Here is where you get to make these bunnies and eggs look like chocolate. I used a paint brush and the Waverly Truffle Chalk paint to paint them all. It took 3 thick coats to cover all that glitter. By the way, I hate glitter so any reason for me to cover it up is a good reason!
")
")
")
")
")
")
")
")
")
")
")
")
")
")
")
")
")
")
")