Plant an Egg!

Hello and I hope you all are safe and healthy.  Easter is fast approaching but there is still lots of time to get crafty.  Now I do not advise going out and getting craft supplies.  What I do advise is that you shop your craft supply stash.  I have a ton of supplies just laying around waiting to be used.  I also did a Easter shopping trip before for craft supplies before all this craziness  with COVID-19 started.

Image (7)

Can you plant an egg?  No not at all but you sure can make it look like it.  Chickens too!!   As I was looking at all the craft supplies I have, I came across some little flower posts and also some figures that I was going to paint for my tiered trays.  After playing around with them for a bit, I figured out that they would look cute stacked together. So I got to crafting.

Supplies

For this project you will need 3 small flower pots and three figures.  Also assorted colors of paints, paint brushes, and hot glue gun and hot glue.  Later I figured out I needed something to put inside of the pots to set my figures on so I used the tumbling tower blocks from Dollar tree.  I then used some moss to cover the blocks up.

Lets Get Started

I stated by doing what they call “dry brushing” on the pots.  You do this by getting a very small amount of paint on the brush, I even dab some of the paint off on a scrap piece of paper to make sure there is very little paint on it.  Then lightly brush the flower pot with the brush.  I used chalk paint for this.  You are looking for very light coverage.  This makes the pots look worn and aged.  You can do this with any color paint you want to or have on hand.  Also add as much or as little paint to the pots to get the look you like.

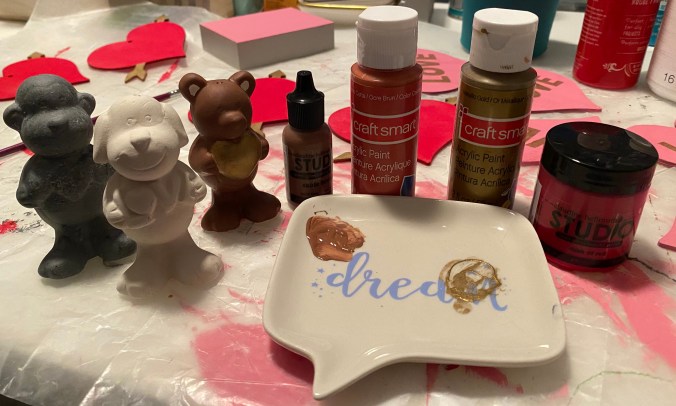
Lets move onto the figures.  I had two little chickens and an egg on hand.  First I pulled out the top piece that had the hanger on it.  It comes off really easy.  Then I used several different kinds of paints from a few different companies.  Some were metallic and other acrylic.  I just shopped my paint stash so that I had a wide range of colors.  To paint these figures, I used very small brushes.  The small brushes force me to slow down and take my time so I do not get paint everywhere.

Image (15)

Once the pots were dry I needed something to put in them for the figures to sit on.  I almost always have tumbling tower blocks on hand all the time from Dollar Tree.  I took 5 blocks and hot glued them to the bottom of each pot.

I put the figures on top of the blocks but they were still not sitting up high enough.  So I took some moss that I had (I have lots of it) and pushed it in between the blocks and the sides of the pot.

From there I put A LOT of hot glue on top of the blocks and added moss to the top.  I did this a few times to get the height I wanted. Once the figures were completely dried I added hot glue to the bottom of the figures and stuck it on top of the moss.  After the glue had set, I turned the whole thing upside down to shake off the extra moss and trimmed around the pot so that there was not any moss hanging over the edges of the pots.

Image (7)

Not bad for shopping my stash of craft supplies.  These are small enough for tiered trays or to set up around other decor.  I have them up on a bread box in my kitchen.  They are very cute!

Just because you might not have these same supplies does not mean you can not be crafty.  Look at what you have in your craft stash, or even look for things in your home that you can re-purpose.  Crafting is relaxing and can cheer you up.  You accomplish something plus create something new in your home to make you smile.

Thank you for joining me!  Please stay safe and healthy!

See you all soon!

Melissa McGuire

Supplies

Figures- Dollar Tree

Flower Pot- Dollar Tree

Several Colors and Kinds of Paint- Use what you have or places like Walmart carry paint.  Michael’s Craft Store is doing curbside pick on online orders.

Waverly White Chalk Paint- Walmart

Surebonder Hot Glue Gun and Hot Glue- Hobby Lobby, Amazon

Paint Brushes- Dollar Tree, Craft Stores, Walmart

Moss- Dollar Tree

Tumble Blocks- Dollar Tree

Cute as a BUNNY!

I must start off by apologizing for not posting more often.  We have had a shift in our household with my boys being out of school.  Homeschooling is not something I ever wanted to do, but here I am trying to do the best I can at it.  I have been trying to get us in a routine, which has proven to be a bit difficult.  We are headed in the right direction though and that means I am getting back at it with the craft projects. So let’s get crafty!

60503779704--E45AC9A1-4BA0-4AD2-859A-EB52268F7E25.fullsizerender

I love the unicorns with the flower crowns on their heads but with all boys in my house, a unicorn is just not something they would tolerate seeing in our house as regular decor.  My husband would ask if I was an 8 year old girl, instead of a 40 year old woman.  I can pull off something with a flower crown on it during Easter though.  I saw a picture of a bunny with a crown on it and thought “well I can make that!” So I would love to show you have I made this very cute Easter Bunny!

Supplies

IMG_5037

I found the bunny at Target in the Bullseye Playground. There were a few more figures there too but I can not remember what they were.  You can use any kind of figure you want.  If you can not find what you are looking for, you can cut your figure out of foam board from the Dollar Tree.

You will also need some fake flowers.  These can be bought at several stores and you should get your favorite kind of flowers if possible.  I buy flowers at the Dollar Tree a lot but I am not real impressed with their lavender this year so I got these flowers at Walmart.  I used around 2 bunches of flowers for this project.

Finally, some of the basics you will need are paint brushes, a hot glue gun and hot glue sticks, a pencil, wire cutters, and paint.  I used white chalk paint, a black paint pen, and red chalk paint.

Lets Get Started

The first thing I did was paint my bunny white with the white chalk paint.  Make sure you paint the sides too because they will showing.  The bunny took 2 coats of  paint and then I let it dry completely before moving onto the next step.

IMG_5044

I then took a pencil and drew the insides of the bunny’s ears the best I could.  I am not an artist and even the basics are hard for me when I comes to drawing anything by hand.  Just do the best you can.  You could also use felt and cut out two pieces of pink felt and glue them into the middle of the ears.  Once I had my outline drawn, I mixed the red chalk paint with the white chalk paint until I got the pink color I was looking for.  Then painted the inside of the ears and let them dry.

I cut several flowers off of the flower stems with the wire cutters and started to arrange them on the bunny to see what I liked and get an idea of how the bunny would look.  Then I hot glued the flower pieces down one at a time on the bunny just where the ears meet the head till I  thought the crown looked full.  I placed my flowers so the same flowers  were on both sides.  That way the crown looks balances and not like I just put the flowers on there randomly.

60503777090__5F24A83B-0DA5-42CB-A789-F6F1875D19B4

Now I had a decision to make.  I had to decide if I wanted to put a face on my bunny or not.  I did not like all the open white space so I want for it.  Using a pencil, I drew out the nose and the eyelashes one the bunny.   I figured if I used the pencil then I could erase it when I messed up.  Once I liked how things looked, I started weighing my options on what the best way would be to make the eyelashes black.  I can paint small details on projects about as well as I can hand draw anything.  Not well!  This led me to looking thought my craft room to find my best option that I can be the most successful at.  BAM! I found a black paint pen.  I traced my pencil lines with the paint pen and painted the nose with the same pink paint I mixed up for the ears.

IMG_5074

How cute if this Easter Bunny!  This is one of the best projects I have ever made.  I absolutely love it.  After Easter it might have a permanent home in my craft room.

Thank You for joining me today.  Please keep yourself and your families healthy and safe.  Please stay home as much as you can.  Prayers going out for all of you and our country!  God Bless!


Supplies

Bunny- Target

Fake Flowers- Walmart.  Dollar Tree, and most craft stores carry flowers.

Waverly White Chalk Paint- Walmart

Chalk Board Paint in Red- Tuesday Morning,

Paint Brushes- Hobby Lobby and other craft stores.

Surebonder Hot Glue Gun and Glue- Hobby Lobby

Wire Cutters- Hardware store

CraftSmart Black Paint Pen- Michael’s Craft Store

Pencil- Several Stores


Making a 3 Tiered Tray

3 tiered trays are a big trend right now.  The thing is, they can also be very expensive.  I have one from Hobby Lobby that I paid every bit of $20.00 for and that was because it was 50% off.  They only come in certain colors and I wanted something that did not look like everything else out there.  So I decided that I was not going to find what I was looking for and was just going to make my own 3 tiered tray for my kitchen.

IMG_5070

Supplies

To make my 3 tiered tray I used a plate and bowl set from Dollar Tree.  I love the teal color of the plates and bowl.  They were exactly what I was looking for.  So you will need 2 or 3 items that go from bigger to smaller like a 3 tiered tray does and you do not need 3 items, you can use only 2.  Then you need something to go in between each of your layers.  I picked 2 galvanized buckets from Hobby Lobby that were two different sizes.  They were half off that day so I spent around $5.00 for them.  So all together I have about $8.00 wrapped up in this tray.  You can get candle sticks to put between your layers too.  Dollar Tree sells some glass ones and porcelain ones too.  Hobby Lobby and Michael’s sells wooden bases and other kids of candle sticks.  It just has to be flat on the top and bottom.  Now if you want to paint you what ever you buy, do that first before you start gluing thing together.

I also used my hot glue gun and some E6000.  Later on I decided to use some twine to finish off my tray.

Lets Get Crafting

When I picked out my buckets to go in between my layers, I picked 2 buckets that were different sizes.  I wanted a taller gap between my bottom 2 layers than I did with the top two.  Now my buckets came with handles, so the first thing I did was pull the handles off.  It took a bit of pressure, but they all popped right off.

IMG_5026

After taking off the handles of my buckets, I started to plan out my layers.  I knew I wanted the bowl on top, the salad plate in the middle and the dinner plate on the bottom.  You could do just the salad and dinner plate if you want.

I also had to decide which way my buckets were going to face.  In the above picture, I had the bottom bucket upside down.  This was something I changed when I got to the next step. Also notice the seam on the top bucket.  Each bucket has one and that will be important to remember later.

IMG_5030

Now it is time to glue things together. I used both the E6000 and hot glue together.  The hot glue will provide an instant hold and the E6000 will make this craft last for years.  Since we are using hot glue, you do need to more fast.  For the top layer, I put a layer of E6000 on the bottom of the bowl.  Do that first since the E6000 takes a good 24 hours to dry.  Next I put a layer of hot glue on the top of my smaller bucket.  Then I placed the top of the bucket on the bottom of the bowl.  The edge of the bucket matched up with the bottom of the bowl so no need to find the center.

I repeated this step with the larger bucket and the salad plate.  It is easier to do everything separate first then assemble the tiers after that.  I let the hot glue set up for a good 5 minutes before moving on.

You can see what I was left with after adding the buckets to the plate and bowl.  After the hot glue set up and was solid, I started to assemble the 3 tiers.  I placed the bottom dinner plate down and then added the hot glue and E6000 mix on the bottom of the big bucket that is now joined with the salad plate.  Then flipped it right side up and place the bottom of the bucket on top of the dinner plate right in the center.  Now I eyeball the center of the dinner plate but feel free to measure it out and mark the plates before you start adding glue to things.

Give that a good 5 minutes for that hot glue to set up again and then do the some gluing process with the small bucket and the bowl.  Before you glue the plate and bowl together please look and see if your buckets or candlesticks have a seam in them.  I made sure to line up the seams so that the top and bottom bucket were in the same spot and facing the same way with the seams lining up together.  Once you have planned out which direction you are gluing things,  place your bucket in the center of the salad plate.

After putting the tray together I realized I did not like the way the buckets met the plates.  I looked around my craft room and tried a few different things like ribbon and different kinds of rope and twine around the buckets where they met the plates.  I decided on some twine.  I put a very thin layer of hot glue around the the bottom of the bigger bucket, where it met the dinner plate.  I started the twine at the seam of the bucket and took it all the way around the base of the bucket.  I did this where ever the buckets met the bowl or plates making sure the twine started and ended where the seams of the buckets were.

IMG_5070

Here is the final project.  I placed the tray in my kitchen.  I added a burlap charger plate underneath it along with a rectangular cutting board that was handmade from an Amish store near me.  The board holds what ever decorations I put on my kitchen island.  I love the color and rustic feel of this 3 tiered tray.  It is completely different than anything out on the market and cost me a forth of what the trays are in the stores or online.  I hope you like it too!

Please leave a comment below telling me if you like the tray or what kind of trays you would make.  Also check out Yellow Butterfly Craft Designs on Facebook and Instagram!

Thank you for joining me for another craft.  I have a St. Patrick’s Day craft coming up and several Easters crafts on the way!

Melissa McGuire

Supply List

Surebonder Hot Glue Gun- Hobby Lobby

Surebonder Hot Glue Sticks- Hobby Lobby

E600-Hobby Lobby, Michael’s Craft Store, Walmart and any hardware store

Bowl- Dollar Tree

Salad Plate- Dollar Tree

Dinner Plate- Dollar Tree

Small Galvanized Bucket- Hobby Lobby

Bigger Galvanized Bucket- Hobby Lobby

Twine- Hobby Lobby, Michael’s Craft Store, Walmart, Dollar Tree


Pot of Gold!

I know this post was suppose to be out last week but I have sick and unable to work on crafts or the blog.  So my deepest apologies and I will try to keep things on more of a schedule.  Now lets get to crafting!

St. Patrick’s Day is coming soon and it is one day we always celebrated in our home because it is my husbands birthday.  That makes St. Patrick’s Day another holiday we decorate for.

IMG_4874

I found these coins at the Dollar Tree and they are my inspiration for my projects.  I loved the idea of making a pot of gold to hang on the wall.  Dollar Tree also had a wooden pot of gold that I knew would be perfect for the base of my craft.

Supplies

First and for most you need gold coins.  I used all 3 bags of these coins making the pot of gold and the bonus craft.  Like I stated earlier, I found the wooden pot of gold at Dollar Tree but if you can not find it you can use foam board.  Cut it into the shape of a pot leaving some board at the top to be able to glue the coins to.

The paint I used was White Waverly Chalk Paint, black Chalk Board Paint, gold acrylic paint (which is not in the picture above), and some green water color paint.  The water color paint is optional.  It is what I had on hand since I could not find my green acrylic paint so I used it.  I also used scissors, paint brushes, Mod Podge and ribbon.


I started this project like I do most of my projects, by using the white chalk paint to prime the wood.  I then painted the pot part of the piece with black chalk paint and the top where the gold will go I painted gold.  The gold paint will look better showing though in case the coins do not cover all the wood.

Now lets get the coins ready to go.  I cut some of the coins.  I did not cut them all down the middle but I did several different points along the coins.  You can see it from the pictures.  I wanted to them be places along the edge where the coins would meet the pot to make sure they looked like they were coming out of the pot.  I then used my hot glue gun to start gluing the coins to the wood piece.  I did about three layers of coins to cover the wood piece and give some depth to the project.

A bit of white paint can do wonders.  I used the white chalk paint and a cheap brush to dry brush white streaks on the sides of the pot to give it a bit more of a 3-D effect.  If you get to much white paint on it, just go back over it in black.  Keep layering the paint until you are happy with the way it looks.

I thought the pot looked a bit plain.  I found these window clings at Dollar Tree and thought they would be the perfect addition to the pot.  I painted a thin layer of Mod Podge on the back of the window cling with a short bristled brush.  Then I placed the window cling, Mod Podge side down, and pushed out any bubbles.  I went over the edge of the cling with the paint brush without any added Mod Podge to make sure the edges were sealed down and then let them dry.  You can add as many clings as you want.  This method will also work if you find free printables on line and cut them out.  Just make sure the layer of Mod Podge you add is to the back and is very thin.  If not it will bubble.  Also if the paper is thin, make sure to be very careful with it or it will rip.

IMG_4881

The final step is to add a piece of ribbon on the back with some hot glue.  This will serve as the hanger for the project.

IMG_4892

This is the finished project.  I love it!  It is a one of a kind piece and looks great hanging up on my wall.  It was also fun and easy to make.

Bonus Craft!

I had several coins left over and decided I loved the idea of making another garland.  This garland I wanted to be different though.  I always see garland with beads and I just made one like that for Valentine’s Day.  So with this one I used the coins and ribbon instead.

Supplies


For this bonus project you will need thin ribbon, and coins.  I also used a piece of a wooden wreath I had on hand.  A few other supplies I used were scissors, a hot glue gun, and a silicon mat.  If you do not have a silicon mat you can use wax paper.

I started by lining up the coins on the silicon mat.  Each side of the coin is different so I tried to alternate the sides to make it more pleasing to the eye.  I lined up four to five coins at a time to be able to do more at one time.  Then I put a dot of hot glue on each coin and laid the ribbon on top of the coins in the glue.  After that I took another coin and put it on the top of the coin and ribbon like a sandwich.  I repeated this step until I ran out of coins.

Now I needed something to go on one end of the garland.  Looking around my craft room I spotted a wooden wreath with clovers on it that I bought for another project.  I just want the banner from the wreath for the other project so I took some strong scissors and cut off one of the clovers from it.  I picked the one with the hole in it so that I could attach it to my garland.  I painted it green with the metallic green water color paint I had.  Then I tied it to one end of the garland.  For the other end  of the garland, I made a tassel.

IMG_4891

Here is the final bonus project.  It is perfect and does not look like all the other garlands out there.  It is a great touch to my entry way decor.

I hope you have all have a wonderful week and that you are looking forward to spring.  I have one more St. Patrick’s Day project and then we are on to Easter!

Thank you for joining me!

Melissa McGuire

Supplies

Wooden Pot of Gold- Dollar Tree

3 Bags of Gold Coins- Dollar Tree

White Waverly Chalk Paint- Walmart

Black Chalk Board Paint- Target, Waverly Chalk Paint at Walmart has one called Ink

FolkArt Gold Metallic Acrylic Paint- Walmart

Water Color Green Paint- Hero Arts, Use what ever green paint you have on hand

Paint Brushes- Hobby Lobby

Ribbon- Walmart, Hobby Lobby, Michael’s

Window Clings- Dollar Tree

Mod Podge, Dollar Tree

Tim Holtz Scissors- Hobby Lobby

Surebonder Hot Glue Gun- Hobby Lobby, Amazon

Surebonder Hot Glue Sticks-Hobby Lobby, Amazon

Silicon Mat- Amazon


Figures Perfect for 3-Tiered Trays

The one thing I have found a love for, is decorating 3-tiered trays.  I find it difficult to find figures that are small enough to fit in the trays and not take them over.  So I was on the hunt for Valentine’s Day figures to fill out my 3 tiered trays.

Supplies

DSC_0554

The main thing that you will need are these little figures from the Dollar Tree.  They each come in a package with paint.  You will also need paints in the colors you want, paint brushes, paint dishes and something to sit the figures on while they dry.

DSC_0560

The first thing you will do is pull the tops off each figure.  These figures come with hangers on them but since we are using them to stand it trays, you can pull the hangers off of them.  They come out pretty easy with a little bit of tugging.  Once that part is done, it is onto the painting.

The Project

IMG_4775

You do not need to prime these figures.  They are made of plaster so they hold onto the paint well.  I started with the base colors of brown and rust color for two of the animals.  I wanted the bear and dog to be traditional colors.  From there I wanted the monkey to look galvanized.  I used the method that I used a few weeks ago on some plaques to achieve that affect.    The colors you use are completely up to you.  Use your creativity and think outside of the box.  I did the galvanized monkey because it matches my decor better and I wanted something that did not scream out that it was for Valentine’s Day.

Now to create some interest and contrast, I painted the items in the animal’s hands and the insides of their ears a different color.  I love how the red and gold pop.  The monkey is awesome with the red hearts, ears and nose because it really stands out against the way it is painted.  I used enamel accents to dot on their eyes to make them stand out.   It gives them a finishing touch.  Enamel accents is, what I would consider, an extra craft supply.  It is not something you need to have.  I use them very little so it is not something you need to run out and buy.   You can use black paint or even a black marker to make their eyes stand out.

These are so cute!  They make the perfect little addition to any Valentine decor.  It is one of those things that are simple and easy to do.  You can use what ever colors you want and this can be done for any holiday.

Hope you all enjoyed this craft and have a great week.

Melissa McGuire

Supply List

Figures- Dollar Tree

Paint- Any colors you want.  Walmart, Michael’s and Hobby Lobby are great places to get              paint and also some Dollar Trees have paint too.

Paint Brushes- Walmart, Hobby Lobby, and Michael’s

Enamel Accents- Michael’s but this one is not necessary.  You can use black paint or even                                  a black marker.


Hearts in a Row

One thing that is fun to do, and makes a simple impact each holiday or season is a garland.  These can be hung or draped anywhere.  They can be made out of several different things and be any length to go with what ever space you have to put them in.

IMG_4779

I found wooden hearts at the Dollar Tree a few weeks ago and thought they would be perfect for a garland.  I have a big hallway that leads into our kitchen and it is the one place that I love to decorate for the different holidays.  My husband gave me this big red truck for Christmas, so that is hung in the hallway.  While it takes up a lot of space on the wall, that wall still needs a bit more.  I thought different kinds of garland would go perfect there each holiday.  Since Valentine’s Day is coming up first, I decided to start with that garland.

Supplies

The things you will need for this garland are pretty easy to get.  I used these wooden hearts from the Dollar Tree.  One set of 5 has an arrow through them and the other set of 5 has the word LOVE on them.  Each package also contains twine to tie them where ever you want.  Other supplies you will need is what ever paint colors you want to you.  I used Waverly White Chalk Paint, Chalk Board Red Chalk Paint, and FolkArt Metallic Gold Paint.  The other things I used were twin and paint brushes that I had on hand.

Lets Get Started

I started by painting the hearts with arrows red leaving the arrow part alone.  I then mixed some white chalk paint in with the red to make the pink color you see in the picture.  Then I painted the hearts with the word LOVE on them pink.  It took two coats of paint to cover all the hearts front and back.  At this point I planned on using the back side of the hearts so you could not see the LOVE word on them.  Like usual though I changed my mind.

I decided I wanted some kind of a contrast color on the arrows so I chose an acrylic metallic gold.  The arrows took 3 coats of paint to cover.  I only painted the front side of the arrows to save some time.  The back of the arrows I painted red.  Now if you want all your hearts facing the same way make sure that you chose a side and paint all the hearts that way.

DD2D1DDF-159A-44D1-85CF-5202AC39DB85

This is where I changed my mind.  I saw on a YouTube video where someone had colored in the word LOVE on their hearts and I really liked it.  So for this I used that same acrylic metallic gold paint.  Now it took four to five coats to cover over the pink paint.  Sometimes changing you mind can give you more work, but I think that it was completely worth it.

Remember those small pieces of twine that were in the package of the hearts, this is where you are going to use them.  If what you are using for your garland does not come with anything to tie it together with, you can use twine or even ribbon to tie you garland together.

I started this all by measuring my twine across the space that I am hanging my garland.  I measured an extra 12 inches on the end of that twine so that I could tie loops in it to hang it on the wall.  I am using command strips to hang it.  Then I picked my middle point and started tying the hearts on one at a time.  I knew I wanted an odd number of hearts so I made sure that I put the heart in the middle that I wanted to use more of.

IMG_4779

This is the finished product.  I made sure the hearts were evenly spaced apart and that there was room at the end of each side of the twine before the loops for some visual interest.  I also tied my hearts on tight to the twine.  You could leave them loose.  There are several ways you could do this.  You would only use one kind of heart or you could leave the wood plain instead of painting them.  Make them match your style!

Bonus

IMG_4786

I had a few hearts left over and decided to use them as decor.  I tied the twine around them because I do not like leaving the hole empty and it gives these hearts a bit more of a rustic feel.


Thank you for joining me again and I hope you love this garland like I do.  On Friday we will be looking at how to make little figurines for a 3-tiered tray!

Melissa McGuire

Supplies

2 Kinds of Wooden Hearts- Dollar Tree

Waverly White Chalk Paint- Walmart

ChalkBoard Red Chalk Paint- Tuesday Morning

FolkArt Metallic Gold Paint- Walmart

Paint Brushes- Hobby Lobby

Paint Trinket Tray- Dollar Tree

Twine- Hobby Lobby


Boxes of Love

IMG_4658

My inspiration this week was an advertisement I received from Michael’s Craft Store.  I thought these boxes were very cute and the project looked very easy to recreate.  I was right!  Once I got the boxes them selves done though, I decided to head in a different direction with the inside of the boxes. Lets get it to it!

Supplies

DSC_0608DSC_0575


To make this project, I used 4 of the Dollar Tree shadow boxes.  I also used Waverly White Chalk Paint and Red Chalkboard Paint.  You will need a few paint brushes, some E6000 or another type of strong glue, and a hot glue gun.  When I decided to go a different direction, Dollar Tree come though again with some very cute Valentine’s stickers.

Time to Get Started

I started by popping off the circles that were in the middle of each one of the boxes.  Then I used the Waverly White chalk paint to prime the boxes on the inside and out, but I did not do the backs.  I also painted the circles, that I had removed from the boxes, white.  They needed 3 coats to get the look I wanted.  I applied the white paint on the circles very thick because I wanted deep brush strokes on the circles to add some texture to the project.

My next step started with painting the outside rims of the boxes red, leaving the middle of them white.  Then I remembered that the circles were white and that they would not stand out once I put them back in the boxes so I decided to paint the inside of the boxes red too.  I only put one coat of red paint on them.  I did not want the red to be completely opaque to add some more visual interest to the final project.

DSC_0136

  I am hoping that you can see the way the paint looks in this picture.

So once I had the boxes and circles painted, I started looking at different ways I could write the word “LOVE”  out in them like the inspiration project.  Sitting on my desk were these Dollar Tree Valentine’s stickers.  The top ones in the picture are metallic stickers and the ones on the bottom are wooden hearts.  I decided to combine the two types of stickers and places them in the center of the hearts.  I used hot glue to attach the wooden hearts onto the white circles.

Now it is time to attach all the boxes together.  This is a piece of decor I want to have for a while so it must hold up when I store it each year.  It is because of this, that I used a combination of hot glue and E6000 when I attached the boxes together.  The reason for both types of glue is because the E6000 is a very strong glue and will hold the boxes together for the long term, but it takes a good 24 hours to dry.  As for the hot glue, that gives an immediate bond to give the E6000 time to dry.

Since I used a mixture of stickers, I laid out the boxes to decide how I wanted them to look once they were all attached together.  This is where I get a bit picky.  I did not want two wooden pink hearts in the same row or two of the same kind of hear stickers in the same line.  So that is why I wanted to plan it out a head of time.  Just so you know, I am not a perfect crafter.  I took the heart stickers off the wooden stickers a few times to make sure I had it the way I wanted it.  I even had to pull two of the boxes apart at one point.  When I craft, I mess up and change my mind all the time.

I added both types of glue to one side of a box and added the next box to it.  Then I repeated that step with the other two boxes. I attached the two bottom boxes together and the two top ones, making sure they were as even as possible so that they would attach to each other nicely.  From there I glued the top two boxes to the bottom two boxes with the same two types of glue method.  If any of the glue seeps out to the front of the boxes, just used a bit of red chalk paint to cover up the glue.  And your done!

DSC_0153

I love these boxes.  This is not what I had planned to do but I am glad I switched things up a bit because I like this so much better.  You can add anything you want to the center of these boxes.  You do not have to put the circles back in them but if you do not, make sure you sand down the rough spots before you paint them.  You can use stencils or stickers to spell out different four-letter words in the boxes.  Just use your imagination and you can have a one of a kind piece of decor to brighten up your home.

Thank you so much for coming back to my blog and I will see you all again soon!

Melissa McGuire

Supply List

Waverly White Chalk Paint- Walmart

Red Chalkboard Paint- You can use Waverly Red Chalk Paint.  I believe my chalk paint came from Tuesday Morning.

Paint Brushes- Hobby Lobby

Trinket Dish for Paint- Dollar Tree

4 Shadow Style Boxes- Dollar Tree

Wooden Heart Stickers- Dollar Tree

Metallic Stickers- Dollar Tree

Surebonder Hot Glue Gun- Hobby Lobby

Surebonder Glue Sticks- Hobby Lobby

E6000 Glue- Hobby Lobby


Beads can be a Great Accent

Valentine’s Day is right round the corner.  While I do not decorate big for Valentine’s Day, I do like having some Valentine’s Day decor up in our home.  Once the Christmas decor is put away, the house looks so empty.  Winter decor can be pretty bland depending on what colors you decorate with.  So Valentines decor goes up soon after New Year in our house to add some color to the blah winter.  This year though I needed some new decor and inspiration.  Facebook and its crazy amount of adds came to the rescue!

DSC_0610

I found a piece on Facebook and thought it would go great with the faux galvanized plaques I did a few days ago.  It was a wooden plaque with beads strung across the inside of it.  I was very excited to make this project and a bonus project with beads.  I had never used wooden beads before.  It was fun.  Lets get started.

Supplies

Some of the things you will need are twine, skewers, and a paint brush.  You will also need beads and a drill.  There are a few options for beads.  You can get plain wooden beads or get beads that are already colored.  If you get wooden beads you might need paint if you want to paint them like I did.  I purchased 2 sizes of beads for some variety.

Lets Get Started

The first thing I did was string the wooden beads onto the skewers.  This makes them much easier to paint and they do not roll all over your work surface.  I also found a way to prop the skewers up so that the beads were hanging in the air and not touching my work surface.  From there I started with the red chalk paint and painted 8 of the small beads.

I did not have any pink chalk paint.  So I mixed the red chalk paint that I had left in my dish with some white chalk paint to create the pink shade I wanted.  I also got out some Popsicle sticks to help roll and stabilize the beads as I painted them because I found it was messy to use my fingers to do this.  After I painted my 8 small beads pink, I painted 8 of the larger beads white.  Then I let them all dry completely.

DSC_0600

While my beads were drying, I drilled a small hole in the side of my plaque.  The top of my plaque already had a hole in it but if yours does not, you will need to drill one in the top of the plaque too.  This is to put the twine though so we can drape it across the plaque.  Make sure to use light pressure and go slow with the drill because the material of the plaque is very delicate.

DSC_0602

Once the beads were dry I took 5 of the smaller ones and strung them on the twine.  You can use which ever beads you want, in any color you chose.  I filled my twine with the beads but you could leave some of the twine showing.  If your twine starts to fray as you are pushing it though the beads, use a small piece of tape to wrap around the end of the twine to give it more stability.

DSC_0603

After you get your beads strung on the twine, thread the twine though the holes of the plaque.  You can tie knots or bows with the twine to hold it onto the plaque.

DSC_0610

This is my finished project.  It is so cute and just what I was looking for!


Bonus Project

DSC_0607

I had several beads left over and thought it was the perfect time to make a Valentine’s bead garland.  Bead garlands have been very popular lately but they are very expensive.  I was able to make one for almost a fourth of the cost.

DSC_0602

Making the garland was a piece of cake.  I started off by stringing the rest of my beads on the twine.  I did not cut the twine off the roll yet because I was not sure how much twine I would need.  I used all the beads I painted except for one white one and I also added in some plain wooden beans that were all natural.

DSC_0604

I had a heart left over that I scraped off one of the plaques I galvanized.  I got my drill back out and drilled a small hole in the top of the heart.  This would finish off  one end of my bead garland.  I painted the heart with white chalk paint and the pink paint I had left over from painting the beads.  Then I sanded the edges of the heart to make it a bit more rustic.   I tied it on to my strand of beads.

DSC_0605

On the other end of the twine I cut about 5 inches past the beads.  I then took another piece of twine and wrapped it around my hands several times.  This will serve at the tassel for the garland.  Once I had wrapped the twine around my had about 15 times, I slide it off my hand and started wrapping the bunch of twine with another piece of twine to hold it together like a tassel.  Leave a big loop at the bottom of the bunch and a small loop on the top.  You will use the small loop to tie the tassel to the other end of the bead garland.  The bottom, bigger loop of twine, you will cut the loop apart and then shape up the bottle of the tassel.  Tie the tassel onto the string of beads and you have your garland.

DSC_0609

This garland can add a pop of color to any 3-tiered tray or even a letter board.  The other great thing is that you can make this as long or as short as you want.  It is one of those crafts that is completely customizable with the colors, length, bead size and what you put on the ends.  You can have a one of a kind garland that is perfect for your home any time of the year.

Thank you for joining me today!

Enjoy your week!


Supplies

Waverly White Chalk Paint- Walmart

Chalkboard Paint- Tuesday Morning

Skewers- Dollar Tree

Paint Brush- Hobby Lobby

Twine- Hobby Lobby or Dollar Tree

Square Plaque- Dollar Tree

Wooden Beads- Hobby Lobby


Faux Galvanized Plaque Tutorial

https://wordpress.com/read/feeds/72502766/posts/2553143677

It is easy to Galvanize!

DSC_0592

One of my favorite things to do is to make anything look galvanized.  I have a lot of farm house decor in my house and anything galvanized fits right in with that.  Galvanized decor is expensive and I wanted to be able to make something on my own that did not cost a fortune.  Now I will tell you, I have tried using spray paint to do this but spray paint and I do not get along.  It runs or will not cover my object.  So I have been trying different ways to get that galvanized look without costing me a fortune.  I wanted to be able to do this method with anything and while it is not a fast method, it does work really well and I have great results every time I do it.

With this being the start of a new year and my 40th birthday being in January, the first thing I wanted to make this year was some inspirational plaques to keep me motivated thought the winter.  I wanted these plaque to fit in small places like on 3-tiered trays or as filler decor.  I think these plaques do just that.

DSC_0548

You will need Dollar Tree square plaques.  These are in the stores almost all year long.  They come in several different holiday prints or just as regular everyday decor.

DSC_0549

Also on the supply list is some sand paper, a scraper or spatula, and some kind of sponge.  All of these can be found at the craft store or Dollar Tree.  These tools are in my craft room at all times and I use them often.

DSC_0547

Finally, you will need paint.  I use the Waverly Chalk paint as my primer and to set a solid base at the start.  Then I start the faux galvanizing process with the metallic paints.  These are all from FolkArt and I get them at Walmart along with the Waverly Chalk paint.  The metallic paints that are shown here are Brushed Silver, Sterling Silver, Gunmetal Gray, and Sequin Black.  Please use what ever silver or gray toned metallic paints you have on hand.  Walmart does sell them though for pretty cheap.  Major craft stores will carry versions of these paints too. Now onto our project!

DSC_0558

I started by scrapping off the key and heart from the plaques.  Sometimes these come off really easy and other times you have to really work at it.  The heart came off easy and I set that aside for another project.  The key came off in pieces.  They each left a small spot that needed to be sanded before I could paint them.  The surface does not have to be completely smooth but I wanted it to be some what even.

DSC_0559

Once the surface of the plaques were sanded, I used a baby wipe to wipe them down.  I then took a Dollar Tree trinket tray and put some of the Waverly White Chalk Paint in it.  The brush I am using is one with short bristles from Hobby Lobby.  You can get them on sale all the time.  I feel the short bristles help to apply the paint better and gives a thicker coat.  I applied one coat of paint just to prime the plaque so the next layer of paint had a great base to stick to.  Do not worry if you can still see the words through the paint because after the next step it will be gone.  Let the white chalk paint dry completely before moving on to the next step.


Now it is time to get a bit messy.  In a Dollar Tree trinket tray, put some Waverly White chalk paint, 2 to 3 shades of silver paint and the black sequin paint in it.  To get the galvanized look, you want some of that paint to mix when you load up your sponge.  So having it in a tray like like this will help.


Place your sponge in the paint and use a bouncing motion twisting the sponge as you go to get the different paints on the sponge.  Do not bounce the sponge a lot because if you do, you can mix the colors to much and things will become muddy.

After your sponge is loaded with paint, start to bounce it on the plaque.  Twist the sponge as you go so some of the the paint will mix and blend.  I normally start of the sides of the plaque first and them move to the top.  Do one full coat of paint on the plaque and let it dry.

This is after the first coat of paint was dry.  You can still see some of the white chalk paint but you can also see the patterns and texture in the paint.

DSC_0578

And this is what it looks like after 2 full coats.  From here I will go over any spots I do not like and add to it with the paints.  I really like a big contrast between the white chalk paint and the black sequin paint.  The shine and the matte finishes are what make it look galvanized.

Now it is time for the words and phrases.  I have 4 plaques that I painted but I will only be using 3 of them today.  I knew I wanted to use something from Rachel Hollis because, for me, she screams motivation.   From there I got onto Etsy just to see what I could find.  I found one quote that was about crafting that I loved and another one that was just inspirational.

I am doing this step with a Cricut for a few reasons.  I am not a great painter so I did not want to try and free hand this.  I also did not have any stencils.  If you can free hand this please do it.  I think that would add a lot of charm to these plaques.  If not and you do not own any kind of cutting machine then you can use stencils or print out an image and color on the back of the image with pencil or chalk.  Then place the image word side up on the plaque and trace it on to the plaque.  After that use a paint pen or paint and a brush to fill it in.

I used Oracal 651 vinyl and cut out all my phrases in white.  I also cut a few detail pieces out in red holographic vinyl to make some things pop on one of the plaques.

DSC_0579

I applied the vinyl and these are the finished products.  I love them and have them sitting in different places in my home.  It is just the inspiration I was looking for to motive me in this new year and something that can say up no matter what season it is.  They look galvanized and match my farmhouse style decor that is all through my home.  I will, for sure, be making more of these to transition into different holidays.

Thank you for joining me in this tutorial.  Please look for Yellow Butterfly Craft Designs on Facebook and Instagram.  Join me on Friday for a Valentine’s Day tutorial that will tie in with this tutorial.

Have a great day!

Melissa McGuire


List of Supplies

Scraper-Dollar Tree

Sand paper-Dollar Tree or hardware store

Brush sponges-Dollar Tree, Amazon, Craft store

Trinket tray-Dollar Tree

Paint Brush-Hobby Lobby

Square Plaque-Dollar Tree

Waverly White Chalk Paint-Walmart

FolkArt Brushed Silver Metallic Paint-Walmart

FolkArt Sterling Silver Metallic Paint-Walmart

FolkArt Gunmetal Gray Metallic Paint-Walmart

FolkArt Sequin Black Metallic Paint-Walmart

Cricut Air 2-Michael’s Craft Store

Oracal 651 White Vinyl-Michael’s Craft Store

Cricut Red Holographic Sparkle Vinyl-Michael’s Craft Store

Let me Introduce myself

38900385_10156706740627698_7640064336395763712_o72198842_10157743013827698_801889863249952768_o


My name is Melissa McGuire and I turn 40 in just a few days. I have been married to my husband Lawrence for over 18 yrs and we currently live in Kentucky with our three boys. Aidan is our hockey player and is 15 years old. Connor is our tech kid and is 11 yrs old. Jesse is our youngest and gives a run for our money at 6 yrs old. I am currently a stay at home mom and I am very excited to start this new adventure with this blog.

I have been a crafter all my life. It all started with my mom. Then in 2004, my husband deployed and we had a brand new baby. I wanted a way to keep track of the milestones that our son was making.  I was looking for something that he could look though when he got back. That is where I found my love of scrapbooking and paper crafting. I would use whatever I could get my hands on to put in a scrapbook. It was something I enjoyed and I was good at it. From there, each time my husband deployed I would make small books and other crafty things with our kids’ pictures on it to send him. My husband would get creative fun things in the mail to keep his spirits up.

About 5 years later, I found stamping and card making! That ignited a whole new creative passion for me. I love making cards and stamping images. Companies like Hero Arts and Lawn Fawn are just a few of my favorite. I also love anything Tim Holtz related. There are so many great companies that put out great products that I wish I could try them all.

My newest adventure in crafting is turning Dollar Tree or thrift items into works of what I consider art. I even get things from the craft stores or places like Target and Walmart and change them up to fit the decor in my home or make things for the different holidays. It’s crafting on a budget and a lot of fun.

I am excited to show the things I create and teach others how to make them. I love that I can help people make a simple craft that looks like something expensive you would get at a place like Kirkland’s. These crafts are easy and inexpensive. Some quick and some take some time. I also plan to do different crafts with different materials and give alternatives to help even the newest crafter.

So welcome to Yellow Butterfly Craft Designs and let’s get crafty!!